
Hardware manual


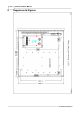

7Hardware Layout
© 2008 Apollo Security Inc.
2.3 Firmware
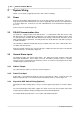
PROM Label Information
The PROM that contains the program is labeled with information to identify the program and the
product with which it operates. The following is a sample of a typical PROM label and a
description of the various fields within the label.
ASA-72
101079-04/B
COPYRIGHT 1994
APOLLO: B8FD
ASA-72
—
This is the product that this program intended to be used in.
101079-04-B
—
This is the part number of the PROM. The field after the second dash is
the revision of this version of program. This field will change if the program is updated.
COPYRIGHT 1995
—
The year of the program copyright.
APOLLO: B8FD
—
The 4 characters after the colon is the program checksum. This
number uniquely identifies each different program.
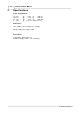
PROM Installation
Remove the old PROM from location U7 (see Figure 101) by prying it out of its socket with a blunt
object such as a flat blade screwdriver or with a PROM removal tool. Use care to not damage the
circuit board or surrounding components. Do not damage the old PROM, it can be erased and
re-used, and should be returned.
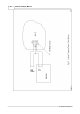
The new PROM can now be installed in its socket. Please note the direction of the notch on
Figure 56. The new chip must be installed with the notch in this position. Failure to install the
chip with the correct orientation will result in destruction of the chip and possible damage to the
ASA-72. The new chip may require its pins be bent inward slightly before it will fit into the socket.
Apply power to the ASA-72 and verify correct operation of the program update.
2.4 Additional Installation Information