
Achiever Charbroilers Installation and Operation Manual


-
7 -
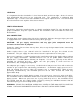
Fig. 2
All orifices are of the fixed type and require no adjustment.
Standing pilots should be adjusted to provide a slight yellow tip on the flame. Pilots may be
lighted by removing adjacent cast iron top grates and radiants.
Air shutters on the main burners must be individually adjusted to provide a blue flame. All traces
of yellow should be adjusted out of the burner flame. While making adjustments, you may notice
that some burners, especially to the far right and left, have a higher flame. This is part of the
unit’s design and is a normal effect.
When charbroiling, turn burner control valves to
1
/
3
or ½ to prevent overheating.
Scrape top grates during broiling with a wire brush to keep the grates clean. Do not allow debris
to accumulate on the grates.
Turn flame to low setting during slack periods to conserve energy.
The charbroiler is a free vented appliance. All products of combustion and the heat generated by
the burners pass through the grates. When meat is placed on the grates, this blocks the venting
and causes a temperature build-up. The charbroiler operates most efficiently with valves turned
down to
1
/
3
or ½.
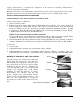
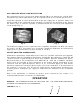
LIGHTING THE GAS PILOT (Fig. 3)
1. Turn the individual burner gas valves OFF
and wait 5 minutes.
2. Remove the Top Grates. Turn the
incoming main gas supply valve ON.
Light pilots using a taper (Fig. 3).
3. To light the burners, turn the individual
burner valves ON.
Fig. 3
TO COMPLETELY SHUTDOWN THE BURNERS AND PILOT LIGHTS
For complete shutdown: Turn the main gas supply valve OFF. (Make sure all individual burner
valves are off before relighting.)
PREHEATING THE CHARBROILER
Allow the charbroiler to preheat for 30 minutes. Rub grates with cooking oil before using. Note
that grease runs forward and drips into the trough in front of the charbroiler before draining into
the grease drawer
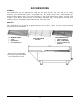
BURNER VALVES
Pilot