User's Manual MindBooster™ Handheld © 2002 VTECH Printed in China 91-01530-004
Dear Parent, At VTech®, we know that kids have a lot to juggle these days - busy school schedules, sports, extracurricular activities, and of course, homework. That’s why we created the XL Series™ - an innovative line of portable learning companions designed to fit the always on-the-go lifestyle of your school-aged child.
MindBooster™ Handheld Thank you for purchasing the VTech® MindBooster™ Handheld learning toy. The MindBooster™ Handheld is a fun-filled learning companion for on-the-go children age 7-9 that boosts logic and critical thinking skills. At this age, kids are beginning to receive homework assignments, and are starting to apply basic skills to word problems, logic, and more abstract thinking.
TABLE OF CONTENTS CHAPTER 1. INTRODUCTION ................................................................. 1 CHAPTER 2. GETTING STARTED ........................................................... 1 POWER SOURCE .................................................................................................................. 2 BATTERY INSTALLATION .................................................................................................... 2 STANDARD FOR BATTERIE TOYS ................................
CHAPTER 5. IR ............................................................................................ 11 EFFECTIVE WORKING POSITION FOR IR COMMUNICATION ............................ 11 CHAPTER 6. DESCRIPTION OF ACTIVITIES ................................... 12 TWO PLAYING MODES: ....................................................................................................12 ON-SCREEN KEYBOARD .................................................................................................
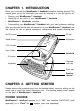
CHAPTER 1. INTRODUCTION Boost your mind with the MindBooster™ Handheld interactive learning product! This manual gives you all the information you need.
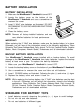
BATTERY INSTALLATION BATTERY INSTALLATION 1. Make sure the MindBooster™ Handheld is turned OFF. 2. Locate the battery cover on the bottom of the MindBooster™ Handheld and use a screwdriver to unscrew the cover. 3. Insert 3 “AAA” size batteries as illustrated. DO NOT RECOMMEND TO USE RECHARGEABLE BATTERIES in this unit. 4. Close the battery cover. NOTE: Remove all factory-installed batteries and use new, alkaline batteries for best performance.
• Remove batteries from equipment when the unit will not be in use for a long time. • Do not dispose of batteries in fire. • Do not attempt to recharge ordinary batteries. • The supply terminals are not to be short-circuited. • Only batteries of the same and equivalent type as recommended are to be used. AC ADAPTOR Use the VTech® adaptor or any standard adaptor complying with EN61558 DC 9V 300mA AC center-positive adaptor. CONNECTING THE ADAPTOR 1. Make sure the unit is OFF. 2.
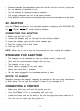
AUTO SHUT-OFF To save power, the MindBooster™ Handheld automatically shuts down if it doesn’t receive input after several minutes. Press the On/Off key to wake your unit. We recommend that you turn off the unit when finished playing. Remove the batteries and unplug the adaptor if MindBooster™ will not be used for an extended period of time. CHAPTER 3.
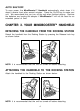
THE DESCRIPTION OF ALL THE PARTS OF HANDHELD Press and hold this button for about 1 second to turn the handheld ON. Press this button again to turn the handheld OFF. Press this button to reset your unit. Synchronise the data between MindBooster™ Handheld and your desktop computer. For details, please refer to Chapter 4. Press this button to send or receive messages and files to another unit. For details, please refer to Chapter 5. Press this button to change the sound level of the speaker.
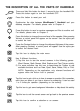
THE DESCRIPTION OF ALL THE PARTS OF THE KEYBOARD The VTech® MindBooster™ Handheld learning aid has a full alphanumeric keyboard with 56 keys including: FUNCTION KEYS Press this key to exit an activity. Press the Exit key a few times to go back to the main menu. Press this key to capitalise letters. This key can also access the alternate functions of other keys when both are pressed at the same time. Alternate functions are displayed above the main function of a key.
Press this key to select an activity’s level of difficulty from easy to medium to hard. The level of difficulty will automatically increase if you get 100 points during two rounds in a row. The level of difficulty will automatically decrease if you get 0 points during two rounds in a row. Press this key to get some hint answering a question. But remember, each time you press it you lose a chance for answering. It can be used 1 or 2 times per question (depending on the activity).
To enhance your MindBooster™ Handheld with this Sync function, an accessory VTech® vPort™ (sold separately) is needed. The vPort™ is an electronic device which offers Infrared wireless communication between your MindBooster™ Handheld (or any selected VTech® learning unit) and your PC. In the vPort™ package, there is a CD ROM with Desktop Software inside. To perform a Sync, the MindBooster™ Handheld Desktop Software must be installed.
SYNCING YOUR MINDBOOSTER™ HANDHELD WITH YOUR COMPUTER 1. Make sure your vPort™ are connected properly to your PC. 2. Make sure the IR port of vPort™ and the IR lens of MindBooster™ Handheld are facing to each other between 5 cm and 45 cm (2 inches and 1.5 feet). 3. Make sure the VTech® Desktop software is installed on your computer. 4. Make sure the VTech® vPort™ Manager is installed and running on your computer. 5. Press the Sync button on your MindBooster™ Handheld.
5. When you have finished making your list, press the Sync button on your MindBooster™ Handheld. This begins the Sync session. 6. To play the new activities on your MindBooster™ Handheld go to the Main Menu and select the Download category. Then you’ll see a list of the new activities you have downloaded. DELETING ACTIVITIES FROM YOUR MINDBOOSTER™ HANDHELD 1. Go to the Main Menu and select System Options Area. 2. Select File Manager from the System Options Area menu. 3.
To open the uploaded file, open the application that can read RTF format or BMP format (for e.g. Microsoft Word for RTF format). Then pick the file open function and select the file from your Personal Folder. CHAPTER 5. IR MindBooster™ Handheld has Infrared (IR) port that enables wireless communication between XL Series learning unit. Through the IR port, an XL Series unit can play IR game with another XL-Series learning unit.
CHAPTER 6. DESCRIPTION OF ACTIVITIES TWO PLAYING MODES: During Training there are two modes of play: Adventure and Manual. The default setting is Adventure mode. If you want to change the mode, you can select System Options Area of the Main menu, then choose Preference for selecting Adventure/ Manual option. After selecting the option, you can go back to the training area from the main menu to play. ADVENTURE MODE Adventure mode includes Word Games, Math Games, and Mind Explorer.
TRAINING AREA STATUS BAR While you’re playing a game or activity, the Status Bar of play, time remaining, chances remaining, and current score. shows your level Shows your current score. Shows the number of chances you have left. Shows the time you have left for the activity. Shows the level of difficulty. Tap it to change the level of difficulty. WORD GAMES ANTONYMS Opposites attract: In Antonyms, you’ll see a word, then a list of words. Choose the one with the OPPOSITE meaning of the given word.
ANALOGY Analogy will show you 3 words. Then tap the to show/hide the multiple-choice screen. Think about the words and deduce what relationship the first two shares. Then use the stylus to select the word from the multiple-choice list that has the same kind of relationship to the 3rd word. Tap Enter to confirm your answer. Press Hint and one incorrect answer will be eliminated. MATH GAMES ADDITION It all adds up: Add the numbers and input the answer using the stylus or the keyboard.
PLANET TRIVIA Planet Trivia improves your knowledge about Planet Earth. The game plays the same as Grammar Quiz. HISTORY TRIVIA You’re History: improve your knowledge of history. Grammar Quiz. The game plays the same as STRANGE TRIVIA Strange but True! Strange Facts tests your knowledge of the weird and wonderful. The game play is the same as Grammar Quiz. FUN LAND ENTERTAINMENT FENCES Good fences make good neighbors! In this game you can play against the machine or against a pal via the IR communicator.
CREATIVITY CREATION STATION Create your own creature with Creation Station. Then use IR and send it to your friend while you chat. To create a new character, tap the New icon , then enter the name of your character to save the character. To chat and and select the components. Tap Done send the image to a friend, press the IR button or tag the IR chat icon Start talking! Enter your words into the blank field and tap Enter. Tap the icon of your friend's character to see more information of his character.
3) To add a rest, simply select the rest note by tapping the stylus on the screen. 4) To erase or insert a note: Use the stylus to tap the icon for erase on the top of the screen. for insert and 5) Use the following to play your songs: Select the instrument to play your song Tap this icon to start to play your song To stop playing Select the tempo to play the song To turn page of the staff, tap the two arrow buttons on the bottom of the screen ARTWORK STUDIO A picture says a thousand words.
MUSIC LIBRARY icon or icon or use the arrow Hear ye, hear ye... Use your stylus to tap the keys to pick a song from the song-name list, double click the song or click the icon or press Enter to hear a song. Press the icon again to stop. (or click icon to see a numbered list of songs. Pick one of them or press the a number between 1 and 10 to hear a song.) MY WORLD AREA SCHOOL TOOLS CLASS SCHEDULE Let’s you personalise your Daily Class Schedule.
Save a file and/or save changes to a file View the previous or next record Delete a file or record. Print out the contents of a file DICTIONARY Put away the big books: with the MindBooster™ Handheld you can access professional dictionaries from the World Wide Web! First, select the New Search option, then type the word(s) or phrase(s) you want to look up and press the “Tick” button or the Enter key. Then perform the Sync with your computer and select the View Result option.
CALENDAR Your MindBooster™ Handheld has a built-in monthly Calendar for the years 1900 to 2099. Use the Print icon to print out a calendar of any month. Inside Calendar, or the To Do List there are 2 more icons for going to the Daily Journal activity directly. activity DAILY JOURNAL Got a lot of parties, field trips and exams to remember? Daily Journal helps you keep track of them all. Tap or press Action to activate new, edit, save, delete, print and purge functions.
PERSONAL PROFILE It’s all about you in Personal Profile. This application lets you store information about yourself, such as your Name, Nickname, Phone number, and Email address, Address, Date of birth, Horoscope, Hobby, Favorite Movie, School, Grade and More! Tap or press Action to activate edit and save functions.
Date Format Set date format as MM/DD or DD/MM Background Music Turn the background music on or off ACTIVITY SAVING TABLE • The files/records from the following activities can be saved into the main unit. — Class Schedule — Test Trainer — Address Book — Daily Journal — To do list — Personal Profile — Creation Station — Music Composer — Artwork Studio NOTE: The data of Dictionary activity and download games/data can also be stored in main unit.
Alt Alt Alt Alt Alt Alt Alt + + + + + + + R L C G I U W Shortcut Shortcut Shortcut Shortcut Shortcut Shortcut Shortcut key key key key key key key for for for for for for for NEXT RECORD PREVIOUS RECORD COMPLETED CLEAR RENAME FORMAT MEMORY CHECK CHAPTER 7. CARE AND MAINTENANCE 1. Keep your MindBooster™ Handheld clean by wiping it with a SLIGHTLY damp cloth. Never use solvents or abrasives. 2. Keep it out of direct sunlight and away from direct sources of heat. 3.
TECHNICAL SUPPORT If you have a problem that cannot be solved by using this manual, we encourage you to visit us online or contact our Consumer Services Department with any problems and/or suggestions that you might have. A support representative will be happy to assist you. Before requesting support, please be ready to provide or include the information below: • The name of your product or model number. (The model number is typically located on the back or bottom of your product.