
Specifications


1.Manual_Chap3_Processing.doc Prepared by Resource Management Group, Inc.
6/28/04 Page 14 of 17 941 358-7730
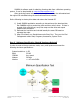
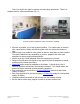
Figure 3.5
The technician proceeds as follows:
a) Look for each part of the system specification.
b) If the part exists, check to see if it meets the minimum specification. Test the
part to be sure it works.
c) If it fails to meet the minimum spec, remove it, take one from inventory that
meets the spec and install it.
d) If the part is missing, take one from inventory that meets the spec and install it.
e) Test any replacement parts before continuing.
f) After the system meets all specifications, it is ready for retail.
4.42 Monitor Testing
Plug the monitor into the test PC system. Boot the machine. Use the monitor controls
or to properly center and resize the desktop. If it displays the workspace of the
operating system properly then it probably is a good working monitor. If any of the
resolution/size controls are NOT working properly target the monitor for recycling and
palletize it.
3.43 Large Peripheral Testing
Printer
• Connect to the test computer system with cables, run
Add/Remove Hardware
from the Windows Control Panel and see if you have proper drivers.
• If not, install drivers and turn on printer.
• Try printing a test page.
• If test page does not work check all connections. If proper drivers have been
installed run a diagnostic on the printer using the installed printer software.
• If it still won’t print, recycle.
• If it prints but the page appearance is smudged, run the printer head cleaning
procedure in the manual or help software for the printer is available for
instructions on how to do it.
Scanner
• Connect to the test computer system with cables, run
Add/Remove Hardware
from the Windows
Control Panel
and see if you have proper drivers.
• If not, install drivers and turn on scanner.
• Try scanning a test page.
• If test page does not work check all connections. If proper drivers have been
installed run a diagnostic on the printer using the installed printer software.