D-Link AirPremier AG TM DWL-7100AP 802.11a/802.11g (2.
Contents Package Contents ................................................................................3 Introduction............................................................................................4 Wireless Basics ....................................................................................6 Installation Considerations ....................................................................8 Getting Started ..................................................................................
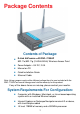
Package Contents Contents of Package: D-Link AirPremierTM AG DWL-7100AP 802.11a/802.11g (2.4GHz/5GHz) Wireless Access Point Power Adapter – 5V DC, 2.0A Manual on CD Quick Installation Guide Ethernet Cable Note: Using a power supply with a different voltage than the one included with the DWL-7100AP will cause damage and void the warranty for this product. If any of the above items are missing, please contact your reseller.
Introduction At up to fifteen times the speed of previous wireless devices (up to 108Mbps in Super AG mode), you can work faster and more efficiently, increasing productivity. With the DWL-7100AP, bandwidth-intensive applications like graphics or multimedia will benefit significantly because large files are able to move across the network quickly. Inclusion of all three standards (802.11g; 802.11a; 802.11b) means that the DWL-7100AP is versatile enough to allow connection to almost any 802.
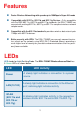
Features Faster Wireless Networking with speeds up to 108Mbps in Super AG mode Compatible with 802.11a, 802.11b and 802.11g Devices - Fully compatible with the IEEE 802.11a, 802.11b and 802.11g standards, the DWL-7100AP can connect with existing 802.11b-, 802.11g- or 802.11a- compliant wireless network adapter cards. Compatible with the 802.11b standard to provide a wireless data rate of up to 11Mbps with 802.11b devices.
Wireless Basics D-Link AirPremierTM AG wireless products are based on industry standards to provide easy-to-use and compatible high-speed wireless connectivity within your home, business or public access wireless networks. Strictly adhering to the IEEE standard, the D-Link AirPremierTM AG wireless family of products will allow you to securely access the data you want, when and where you want it. You will be able to enjoy the freedom that wireless networking delivers.
Wireless Basics (continued) Standards-Based Technology The DWL-7100AP Wireless Access Point utilizes the 802.11a, 802.11b and draft 802.11g standard. The IEEE 802.11g standard is an extension of the 802.11b standard. It increases the data rate up to 54Mbps within the 2.4GHz band. The 802.11a standard also increases the data rate up to 54Mbps, but within the 5GHz band. Both 802.11a and 802.11g utilize OFDM technology.
Wireless Basics (continued) Installation Considerations Desktop and laptop computers with wireless network adapters installed can access the D-Link AirPremierTM AG DWL-7100AP from virtually anywhere within its operating range. Keep in mind, however, that the number, thickness and location of walls, ceilings, or other objects that the wireless signals must pass through, may limit the range.
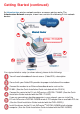
Getting Started Right out of the box, with its default settings, the DWL-7100AP will automatically connect with other D-Link AirPremierTM AG products. IP ADDRESS Note: If you are using a DHCP-capable router in your network you will not need to assign a static IP address.
Getting Started (continued) An Infrastructure wireless network contains an access point or router.
Using the Configuration Menu Whenever you want to configure your network or the DWL-7100AP, you can access the Configuration Menu by opening the web-browser and typing in the IP address of the DWL-7100AP. The DWL-7100AP default IP address is shown below: Open the web browser Type in the IP address of the access point Note: if you have changed the default IP address assigned to the DWL-7100AP, make sure to enter the correct IP address.
Using the Configuration Menu (continued) Home > Wireless Note: In the Configuration screens that follow, you will be able to configure settings for 802.11a and 802.11g devices in your network. Settings that you input for 802.11g devices will also apply to 802.11b devices in your network. Wireless BandSSID- SSID Broadcast- Channel- Select 802.11g or 802.11a from the pulldown menu. Service Set Identifier (SSID) is the name designated for a specific wireless local area network (WLAN).
Using the Configuration Menu (continued) Home > LAN LAN is short for Local Area Network. This is considered your internal network. These are the IP settings of the LAN interface for the DWL-7100AP. These settings may be referred to as private settings. You may change the LAN IP address if needed. The LAN IP address is private to your internal network and cannot be seen on the Internet.
Using the Configuration Menu (continued) Advanced > Mode Choose 802.11a or 802.11g wireless band; then select from the following options: Access Point: Select this mode to create a WLAN (wireless local area network). PtP Bridge (Point to Point Bridge): This mode enables you to connect two WLANS. Remote AP MAC Address: Input the remote AP MAC address of the AP with which the DWL-7100AP will associate.
Using the Configuration Menu (continued) Advanced > Performance Wireless Band: Select 802.11a (up to 108Mbps speed in turbo mode in the 5GHz range) or 802.11g (up to 54 Mbps speed with AirPlus adapters.) 52 Frequency: The frequency range will be displayed. Channel: The default channel for 802.11a is 52. The default channel for 802.11g is 6. Data Rate: Select the transmission rate for the network Beacon Interval: Beacons are packets sent by an access point to synchronize a wireless network.
Using the Configuration Menu (continued) Advanced > Filters Access Control: Disabled Accept Reject - Disable the Access Control feature Accept the MAC addresses in the list into the network Reject the MAC addresses in the list from participating in the network Access Control List: Input the MAC addresses into the list MAC Address (Media Access Control Address) A unique hardware address that identifies a device on a network. It is assigned at the factory and cannot be changed.
Using the Configuration Menu (continued) Advanced > Encryption Hexadecimal digits consist of the numbers 0-9 and the letters A-F ASCII (American Standard Code for Information Interchange) is a code for representing English letters as numbers from 0-127 Wireless Band: Select 802.11a or 802.11g. Authentication: Select from one of the following: Open System: the DWL-7100AP will be visible to all devices on the network. Open System is the default setting.
Using the Configuration Menu (continued) Advanced > Grouping Load Balance: Select Enabled or Disabled. When you Enable Load Balance you allow several DWL-7100APs to balance wireless network traffic and wireless clients among the DWL-7100APs in the network. Assign each access point a different non-overlapping channel (e.g., 1, 6, 11). User Limit: Set the User Limit in this field (0-64). Link Integrity: Select Enabled or Disabled.
Using the Configuration Menu (continued) Advanced > DHCP Server > Dynamic Pool Settings DHCP Server ControlEnable or Disable the DHCP function here. Dynamic Pool SettingsIP Assigned From Enter the starting IP address in the range. The Range of Pool (1-255)Enter the number (the quantity) of IP address in the range. SubMask- Enter the subnet mask here. Gateway- Enter the IP address of the router on the network.
Using the Configuration Menu (continued) Advanced > DHCP Server > Static Pool Settings DHCP Server ControlEnable or Disable the DHCP function here. Static Pool SettingsAssigned IPEnter the static IP address of the device here. Assigned MAC AddressEnter the MAC address of the device here. SubMask- Enter the subnet mask here. Gateway- Enter the IP address of the router on the network.
Using the Configuration Menu (continued) Advanced > DHCP Server > Current IP Mapping List This screen displays information about the current DHCP dynamic and static IP address pools. This information is available when you enable the DHCP function of the DWL7100AP and assign dynamic and static IP address pools. Current DHCP Dynamic Pools-These are IP address pools to which the DHCP server function has assigned dynamic IP addresses.
Using the Configuration Menu (continued) Tools > Admin User Name: The default User Name is admin. Old Password: To change your password, first enter the old password. New Password: Enter the new password. Confirm New Password: Re-enter the new password. Apply: To save changes, click Apply. Tools > System Apply Settings and Restart: If you have made any changes to the configuration settings, click Restart to apply the changes.
Using the Configuration Menu (continued) Tools> Firmware Update File: Click on Browse to find the updated firmware file on your hard drive. (Before you browse your hard drive you will need to download the updated firmware from the D-Link Support website: http://support.dlink.com) After you find the updated firmware file on your hard drive, click OK.
Using the Configuration Menu (continued) Tools > Cfg File Update FileBrowse for the configuration settings that you have saved to your hard drive. Click OK when you made your selection. Load Settings to the Local Hard DriveClick OK to load the selected settings. Tools > Misc. Telnet Settings StatusClick to Enable a Telnet session. TimeoutSelect a time period after which a session timeout will occur.
Using the Configuration Menu (continued) Status > Device Info This window displays the settings of the DWL-7100AP, as well as the firmware version and the MAC address. Status > Stats This window displays the network traffic statistics for both received and transmitted communications through the Ethernet port and wireless connections associated with the access point. You may select 802.11a or 802.11g statistics.
Using the Configuration Menu (continued) Help The Help menu is displayed here. You can also click on Help in any window for additional information.
Networking Basics Using the Network Setup Wizard in Windows XP In this section you will learn how to establish a network at home or work, using Microsoft Windows XP. Note: Please refer to websites such as http://www.homenethelp.com and http://www.microsoft.com/windows2000 for information about networking computers using Windows 2000, Me or 98. Go to Start>Control Panel>Network Connections Select Set up a home or small office network When this screen appears, click Next.
Networking Basics (continued) Please follow all the instructions in this window: Click Next. In the following window, select the best description of your computer. If your computer connects to the internet through a gateway/router, select the second option as shown. Click Next.
Networking Basics (continued) Enter a Computer description and a Computer name (optional.) Click Next. Enter a Workgroup name. All computers on your network should have the same Workgroup name. Click Next.
Networking Basics (continued) Please wait while the Network Setup Wizard applies the changes. When the changes are complete, click Next. Please wait while the Network Setup Wizard configures the computer. This may take a few minutes.
Networking Basics (continued) In the window below, select the option that fits your needs. In this example, Create a Network Setup Disk has been selected. You will run this disk on each of the computers on your network. Click Next. Insert a disk into the Floppy Disk Drive, in this case drive A. Format the disk if you wish, and click Next.
Networking Basics (continued) Please read the information under Here’s how in the screen below. After you complete the Network Setup Wizard you will use the Network Setup Disk to run the Network Setup Wizard once on each of the computers on your network. To continue click Next.
Networking Basics (continued) Please read the information on this screen, then click Finish to complete the Network Setup Wizard. The new settings will take effect when you restart the computer. Click Yes to restart the computer. You have completed configuring this computer. Next, you will need to run the Network Setup Disk on all the other computers on your network. After running the Network Setup Disk on all your computers, your new wireless network will be ready to use.
Networking Basics (continued) Naming your Computer To name your computer in Windows XP, please follow these directions: Click Start (in the lower left corner of the screen). Right-click on My Computer. Select Properties. Select the Computer Name Tab in the System Properties window. You may enter a Com- puter Description if you wish; this field is optional. To rename the computer and join a domain, click Change.
Networking Basics (continued) Naming your Computer In this window, enter the Computer name. Select Workgroup and enter the name of the Workgroup. All computers on your network must have the same Workgroup name. Click OK. Checking the IP Address in Windows XP The wireless adapter-equipped computers in your network must be in the same IP address range (see Getting Started in this manual for a definition of IP address range).
Networking Basics (continued) Checking the IP Address in Windows XP This window will appear. Click the Support tab. Click Close. Assigning a Static IP Address in Windows XP/2000 Note: DHCP-capable routers will automatically assign IP addresses to the computers on the network, using DHCP (Dynamic Host Configuration Protocol) technology. If you are using a DHCP-capable router you will not need to assign static IP addresses.
Networking Basics (continued) Assigning a Static IP Address in Windows XP/2000 Double-click on Network Connections. Right-click on Local Area Connections. Double-click on Properties.
Networking Basics (continued) Assigning a Static IP Address in Windows XP/2000 Click on Internet Protocol (TCP/IP) Click Properties In the window below, select Use the following IP address. Input your IP address and subnet mask. (The IP addresses on your network must be within the same range. For example, if one computer has an IP address of 192.168.0.2, the other computers should have IP addresses that are sequential, like 192.168.0.3 and 192.168.0.4.
Networking Basics (continued) Checking the Wireless Connection by Pinging in Windows XP and 2000 Go to Start > Run > type cmd. A window similar to this one will appear. Type ping xxx.xxx.xxx.xxx, where xxx is the IP Address of the Wireless Router or Access Point. A good wireless connection will show four replies from the Wireless Router or Access Point, as shown. Checking the Wireless Connection by Pinging in Windows Me and 98 Go to Start > Run > type command. A window similar to this will appear.
Troubleshooting This Chapter provides solutions to problems that can occur during the installation and operation of the DWL-7100AP Wireless Access Point. We cover various aspects of the network setup, including the network adapters. Please read the following if you are having problems. Note: It is recommended that you use an Ethernet connection to configure the DWL-7100AP. 1. The computer used to configure the DWL-7100AP cannot access the Configuration menu.
Troubleshooting (continued) 2. The wireless client cannot access the Internet in the Infrastructure mode. Make sure the wireless client is associated and joined with the correct access point. To check this connection: Right-click on the Local Area Connection icon in the taskbar> select View Available Wireless Networks. The Connect to Wireless Network screen will appear. Please make sure you have selected the correct available network, as shown in the illustrations below.
Troubleshooting (continued) 3. Check that the drivers for the network adapters are installed properly. You may be using different network adapters than those illustrated here, but this procedure will remain the same, regardless of the type of network adapters you are using.
Troubleshooting (continued) Double-click on Network adapters Right-click on D-Link DWL-A650 Wireless Cardbus Adapter Select Properties to check that the drivers are installed properly Look under Device status D-Link DWL-A650 to check that the device is working properly D-Link DWL-A650 Click OK 43
Troubleshooting (continued) 4. What variables may cause my wireless products to lose reception? D-Link products let you access your network from virtually anywhere you want. However, the positioning of the products within your environment will affect the wireless range. Please refer to Installation Considerations in the Wireless Basics section of this manual for further information about the most advantageous placement of your D-Link wireless products. 5.
Troubleshooting (continued) 7. Resetting the DWL-7100AP to Factory Default Settings After you have tried other methods for troubleshooting your network, you may choose to Reset the DWL-7100AP to the factory default settings.
Technical Specifications Standards IEEE 802.11g IEEE 802.11b IEEE 802.11a IEEE 802.3 IEEE 802.3u Device Management Web-based - Internet Explorer v6 or later; Netscape Navigator v6 or later; or other Java-enabled browsers DHCP Client Network Architecture Supports Infrastructure Mode LEDs Power WAN LAN (10/100) WLAN - 802.11a, 802.
Technical Specifications (continued) Safety and Emissions: FCC CE CSA Physical Dimensions: L = 7.6 inches (193mm) W = 5.5 inches (140mm) H = 1.2 inches (31mm) Wireless Data Rates with Automatic Fallback: 48Mbps 36Mbps 54Mbps 18Mbps 12Mbps 24Mbps 9Mbps 6Mbps 11Mbps 2Mbps 1Mbps 5.
Technical Specifications (continued) Media Access Control: CSMA/CA with ACK Wireless Transmit Power: 15dBm(32mW)±2dB Power Adapter: Ext. Power Supply DC 5V, 2.0A 100-120V ~ 50-60Hz Weight: 0.
Technical Support You can find software updates and user documentation on the D-Link website. D-Link provides free technical support for customers within the United States and within Canada for the duration of the warranty period on this product. U.S. and Canadian customers can contact D-Link technical support through our website, or by phone. Tech Support for customers within the United States: D-Link Technical Support over the Telephone: (877) 453-5465 24 hours a day, seven days a week.
Warranty and Registration (USA only) Subject to the terms and conditions set forth herein, D-Link Systems, Inc. (“D-Link”) provides this Limited warranty for its product only to the person or entity that originally purchased the product from: • • D-Link or its authorized reseller or distributor and Products purchased and delivered within the fifty states of the United States, the District of Columbia, U.S. Possessions or Protectorates, U.S. Military Installations, addresses with an APO or FPO.
• The customer must submit with the product as part of the claim a written description of the Hardware defect or Software nonconformance in sufficient detail to allow D-Link to confirm the same. • The original product owner must obtain a Return Material Authorization (“RMA”) number from the Authorized D-Link Service Office and, if requested, provide written proof of purchase of the product (such as a copy of the dated purchase invoice for the product) before the warranty service is provided.
LIABILITY OF D-LINK UNDER THIS WARRANTY IS LIMITED TO THE PURCHASE PRICE OF THE PRODUCT COVERED BY THE WARRANTY. THE FOREGOING EXPRESS WRITTEN WARRANTIES AND REMEDIES ARE EXCLUSIVE AND ARE IN LIEU OF ANY OTHER WARRANTIES OR REMEDIES, EXPRESS, IMPLIED OR STATUTORY. Governing Law: This Limited Warranty shall be governed by the laws of the State of California.