Go to businessphones.vtech.com to register your product for enhanced warranty support and latest VTech product news.
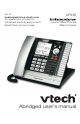
Congratulations on your purchase of this VTech product. Before using this VTech product, please read the Important safety information. This abridged user’s manual provides you with the basic installation and setup instructions. You may refer to the online complete user’s manual for complete installation and operation instructions at businessphones.vtech.com. For customer service or product information, visit our website at businessphones.vtech.com or call 1 (800) 595-9511.
Important safety information This symbol is to alert you to important operating or servicing instructions that may appear in this user’s manual. Always follow basic safety precautions when using this product to reduce the risk of injury, fire, or electric shock. Safety information • • Read and understand all instructions in the user’s manual. Observe all markings on the product. • Do not use the telephone to report a gas leak in the vicinity of the leak.
Important safety information Especially about cordless telephones • Electrical power: The telephone base must be connected to a working electrical outlet. The electrical outlet should not be controlled by a wall switch. Calls cannot be made from the handset if the telephone base is unplugged, switched off or if the electrical power is interrupted. • Power adapter: The power adapter is intended to be correctly oriented in a vertical or floor mount position.
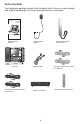
Parts checklist Your telephone package contains the following items. Save your sales receipt and original packaging in the event warranty service is necessary. Go to businessphones.vtech.com to register your product for enhanced warranty support and latest VTech product news.
Table of contents Getting started Console overview ..................................... 1 Console screen icons ............................... 4 Alert tones and lights................................ 5 Alert tones ............................................. 5 Lights..................................................... 5 Console installation .................................. 6 Console installation (system telephone) ... 10 For installation with use of UP406 deskset in the system (auto set IP) ....
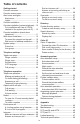
Getting started Console overview MENU/SELECT CALL HISTORY • Press to enter the menu. • While in the menu, press to select an item or save an entry or setting. • Press to view caller ID information. MESSAGE WAITING indicator • Flashes when there are new messages in the central mailbox or private mailbox. ANS SYS • Press to enter the answering system setup menu. LINE 1-LINE 4 keys • Press to make or answer a call on the desired line.
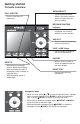
Getting started Console overview One-touch keys Press to dial the desired one-touch number. Directory card To write names on the directory card, follow the steps below: 1. Pull out the directory card. 2. Write the information on the directory card. 3. Replace the directory card under the plastic cover. SPEAKER • Press to turn on the speakerphone. Press again to turn it off. MIC FLASH TRANSFER • During a call, press to answer an incoming call when you receive a call waiting alert.
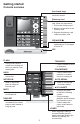
Getting started Console overview Main menu The > symbol highlights a menu item. >Ringers Set Date/Time One Touch Phone Settings System Setup Registration Customer Support Main menu • Ringers • Set Date/Time • One Touch • Phone Settings • System Setup • Registration • Customer Support Using menus • Press MENU/SELECT to show the main menu. • Press or to scroll through menu items. • Press MENU/SELECT or press /SKIP to select a highlighted menu item. • Press MENU/SELECT to save changes.
Getting started Console screen icons L1 L2 L3 L4 Telephone lines -On when this console is selected under the corresponding line group setting. Ringer off - On steadily when the ringer volume is set to OFF. Headset - On steadily when using a corded headset. Speakerphone - On steadily when using the speakerphone. MUTE Mute - Microphone is muted. PRIV Call privacy - On steadily when the call privacy feature is set to On. REC Record a call - On steadily when recording a call.
Getting started Alert tones and lights Alert tones One beep You have set the hold reminder on. -ORThe telephone is recording a memo. -ORYou have set the message alert tone on. -ORThere is an incoming call waiting. Lights LINE 1/LINE 2/LINE 3/LINE 4 • On when the telephone line is in use. • Flashes when the telephone line is on hold. • Flashes quickly when there is an incoming call or a transfer call. MESSAGE WAITING • Flashes when there are new private or central messages.
Getting started Console installation • Do not power up the console until you have plugged in all telephone lines and the Ethernet cable as instructed in steps 4-5. • The power adapter is intended to be correctly oriented in a vertical or floor mount position. The prongs are not designed to hold the plug in place if it is plugged into a ceiling, under-the-table or cabinet outlet. 1. Plug the end of the coiled handset cord into the jack on the left side of the telephone. 2.
Getting started Console installation 3. Snap the kickstand into the desired grooves until it locks into place. 4. Connect the telephone lines, Ethernet cable (if necessary) and power adapter. See the illustration on the next page to connect to four single-line wall jacks; or see page 9 to connect to two 2-line wall jacks.
Getting started Console installation Option 1: Connect to four single-line wall jacks NOTES: Use only the power adapter supplied with this product. To order a replacement power adapter, visit our website at businessphones.vtech.com or call 1 (800) 595-9511. In Canada, please dial 1 (800) 267-7377. Plug the black telephone line cords into the L1/2 and L3/4 jacks of the console, and plug the gray telephone line cords into the L2 and L4 jacks of the console respectively.
Getting started Console installation Option 2: Connect to two 2-line wall jacks NOTES: • • • Use only the power adapter supplied with this product. To order a replacement power adapter, visit our website at businessphones.vtech.com or call 1 (800) 595-9511. In Canada, please dial 1 (800) 267-7377. A 2-line wall jack supports two telephone numbers in one wall jack. Contact your telephone service provider for details.
Getting started Console installation (system telephone) For installation with use of UP406 deskset in the system (auto set IP) If you want to use the console as a stand-alone telephone, skip to the next page for installation instructions After the console is powered up, it takes at least one minute to start up the system and the screen displays booting.... during startup. The screen displays Is this Console going to register UP406 Desksets? ‘SELECT’: Yes ‘CANCEL’: No. Press SELECT.
Getting started Console installation (stand-alone telephone) This UP416 console can be used as a stand-alone telephone without connecting it to UP406 desksets via an Ethernet network. Follow the steps below to set up the console if you do not connect it to an Ethernet network. 1. Follow the steps on pages 6-9 to connect the line cords and adjust the console’s viewing angle. 2. When the screen displays Is this Console going to register UP406 Desksets? ‘SELECT’: Yes ‘CANCEL’: No, press CANCEL.
Getting started Wall mount installation To mount the console on the wall 1. Unplug the power adapter from the outlet, the telephone line cords from the wall jacks (or DSL filters), and the Ethernet cable from the Ethernet switch or router. 2. Put the corded handset aside. Use a coin to rotate the handset tab 180 degrees. The protruding edge holds the corded handset when the phone is mounted on the wall. Protruding edge Handset tab 3.
Getting started Wall mount installation 4. Snap the kickstand into the outermost groove until it locks into place.
Getting started Wall mount installation 5. Install the wall mount bracket to the console as shown below. Insert the upper tabs of the mounting bracket into the upper slots at the back of the console. Press the lower tabs of the mounting bracket into the lower slots at the back of the console until they lock into place. 6. Connect the telephone line cords, Ethernet cable (if necessary) and power adapter as shown below.
Getting started Wall mount installation 7. Align the upper wall mounting hole on the back of the console with the upper tab of the standard wall plate. Make sure the lower wall mounting hole on the mounting bracket also aligns with the lower tab of the standard wall plate. Push the console down until it clicks securely in place. 8. Bundle the telephone line cord and power adapter cord neatly with twist ties.
Getting started Wall mount installation Wall mount to tabletop installation To change the console from the wall mount position to tabletop position, follow the steps below. 1. If the telephone line cords and power adapter cord are bundled, untie them first. 2. Push the console up to remove it from wall. Unplug the telephone line cords (or DSL filters) from the wall, the power adapter from the power outlet, and the Ethernet cable from the Ethernet switch or router. 3. See Console installation on pages 6-7.
Getting started System setup Prime line Use this feature, also known as automatic line selection, to choose which line is automatically selected each time you make an outside call. If you select Auto, the console selects any available telephone line starting from Line 1. To set the prime line: 1. When the console is idle, press MENU/SELECT. 2. Press or to scroll to System Setup, then press MENU/SELECT or /SKIP. or to scroll to Prime Line, then press 3. Press MENU/SELECT or /SKIP. 4.
Telephone settings Telephone setup Ringer volume Use this feature to set the ringer volume to one of six levels or turn the ringer off. When the ringer is off, the icon appears on the console screen. The UP416 console stores the volume setting for all lines. 1. When the console is idle, press MENU/SELECT. 2. Press MENU/SELECT or /SKIP to select Ringers. 3. Press MENU/SELECT again or /SKIP to select Ringer Volume. 4. Press , , /REPEAT, /SKIP, or S/VOLUME/T on the console to adjust the ringer volume. 5.
Telephone settings Telephone setup Set date/time The answering system displays the date and time of the message while playing messages. Before using the answering system, set the date and time as follows. Follow the steps below to set the month, day, year and time: 1. When the console is idle, press MENU/SELECT. 2. Press or to scroll to Set Date/Time, then press MENU/SELECT or /SKIP. 3. Use the dialing keys to enter the month (MM), day (DD) and year (YY).
Telephone settings Telephone setup Call privacy The call privacy is set to Off by default. The console allows other extensions to join a call in progress. You can turn this setting on to ensure that only one device uses a line. To turn this feature on or off: 1. When the console is idle, press MENU/SELECT. 2. Press or to scroll to Phone Settings, then press MENU/SELECT or /SKIP. or to scroll to Call Privacy, then press 3. Press MENU/SELECT or /SKIP. 4. Press or to scroll to On or Off. 5.
Telephone operation Telephone operation The telephone comes programmed to select the line automatically for calls when you do not press a line key. To override the automatic line selection setting, see Prime line on page 17 for details. When you answer a call, the telephone automatically selects the ringing line. Making and ending a call To make a call using the console: 1. Lift the handset or press SPEAKER .
Telephone operation Options while on calls Call privacy During a call, you can temporarily change the call privacy setting to allow or disallow other extensions to join the call. The original setting is automatically restored after you hang up. To turn call privacy off during a call: 1. While on a call, press MENU/SELECT. 2. Press MENU/SELECT to select Call Privacy. 3. Press or to choose Off, then press MENU/SELECT.
Telephone operation Redial The last 10 telephone numbers dialed (up to 30 digits) are stored in the console. To view the 10 most recently dialed numbers 1. Press AUTO REDIAL to enter the redial list and display the most recently called number. 2. Press or to view other recently called numbers. 3. Press CANCEL to exit the redial list. To redial a number • • When the desired number displays on the screen, lift the handset, press SPEAKER or HEADSET.
Telephone operation Conference call The system can support 5-way conference with a maximum of one outside call and four system extensions (including the initiating party), or two outside calls and three system extensions (including the initiating party). The outside call must be established first because an intercom call cannot be placed on hold. There are two ways to establish a conference call. A.
Telephone operation Conference call To drop an outside line: • Press the corresponding line key (LINE 1-LINE 4). -OR• If there are two outside calls, press MENU/SELECT and then press or to choose End Line X. Press MENU/SELECT to confirm. -OR• If the other end of the outside line hangs up the call, press the corresponding line key (LINE 1-LINE 4) to release that line for other system extension use. B. Join a call in progress 1. Make or answer an outside call on the console, then press MENU/SELECT. 2.
Telephone operation Intercom You can use the intercom feature for conversations between the console and a system deskset, or between two system desksets. The console and each deskset in the telephone system MUST be assigned a unique extension number for the intercom feature to work. The assignment is done when the console is initially set up. Make an intercom call to an extension 1. Press INTERCOM on the console when it is idle. 2.
Telephone operation One touch This telephone has 32 one- and two-touch memory locations (speed dial locations) where you can store the phone numbers or system extension numbers you wish to dial more quickly. You can store up to 30 digits in each location. You can access the first 16 locations using only the one-touch buttons. To access the remaining 16 locations, press LOWER and then the one-touch button for the desired location.
Telephone operation One touch Assign a one-touch entry (continued) • 6. 7. 8. 9. You can store the flash signal required by some special services as part of a dialing sequence. Press or to choose Add flash, then press MENU/SELECT. A F appears on the screen. Continue storing the number as usual. Press or to choose Done, then press MENU/SELECT to save the setting and return to the previous menu.
Directory Create directory entries Create a new directory entry Use the following steps to store a name and number in the directory. 1. When the console is idle, press DIRECTORY. 2. The console shows a summary with the number of directory entries stored. Press MENU/SELECT to add an entry. 3. The screen displays Enter Name. Use the dialing keys to enter the name (up to 15 characters). Each time you press a key, the character on that key appears.
Directory Create directory entries Create a new directory entry (continued) • You can include a pause while storing a dialing sequence that requires one during actual dialing. Press or to choose Add pause, then press MENU/SELECT. A P Enter Number appears on the screen. 8005959511_ • Store a signal for switching to temporary tone signaling. If you have dial pulse (rotary) service, Select to: this signal is required for some special services. Press or to choose Send tone, then press Done MENU/SELECT.
Directory Search directory Search by name The names appear in alphabetical order. Follow the steps below to search for directory entries on the console. 1. Press DIRECTORY on the console. The screen displays a summary with the number of directory entries stored. 2. Press or to browse through the directory. 3. Use the dial pad keys (2-9) to enter a letter to start a name search. • If there is an entry matching the letter you press, the directory shows the first name beginning with that letter.
Caller ID Caller ID operation Review the caller ID information 1. When the console is idle, press CALL HISTORY. The console displays XX New calls (the number of missed call) and XX calls (the total number of missed calls and reviewed calls). 2. Press or to review the caller ID information. The caller ID entries are stored in reverse chronological order starting with the most recent entry. 3. To exit without making changes, press CANCEL. Dial a call history entry 1.
Caller ID Caller ID operation Save a caller ID entry to the directory (continued) • Store a signal for switching to temporary tone signaling. If you have dial pulse (rotary) service, this signal is required for some special services. Press or to choose Send tone, then press MENU/SELECT. A T appears on the screen. All numbers you enter after this will send touchtone signals during dialing. • You can store the flash signal required by some special services as part of a dialing sequence.
Answering system Auto attendant setup You can set up the auto attendant to answer outside calls, provide callers with a company directory, direct calls to a specified extension, and enable callers to record voice messages. You can use the default announcement or record up to three outgoing announcements and one directory announcement. For details on how to use the auto attendant features, see Using the auto attendant section in the online complete user’s manual.
Answering system Auto attendant setup Night mode You can turn the night mode on or off. When it is off, only General OGM is available in the announcement submenu; when it is on, both Day and Night OGMs are available in the Announcement submenu. 1. When the console is idle, press ANS SYS. 2. Press or to scroll to Auto Attendant, then press MENU/SELECT or /SKIP. 3. Press or to scroll to Night Mode, then press MENU/SELECT or /SKIP. or to choose On or Off. 4. Press 5.
Answering system Auto attendant setup Set the start and end time of auto attendant announcement When the night mode is turned on, you can set the start and end time of the Day OGM and Night OGM. 1. When the console is idle, press ANS SYS. or to scroll to Auto Attendant, then press 2. Press MENU/SELECT or /SKIP. 3. Press or to scroll to Announcement, then press MENU/SELECT or /SKIP. 4. Press or to choose Day OGM or Night OGM, then press MENU/SELECT or /SKIP. 5.
Answering system Private mailbox setup This console has a private mailbox that can answer calls and record messages when it is turned on. Private mailbox on/off You can turn the private mailbox on or off. The console displays MB when the private mailbox is set to On. 1. When the console is idle, press ANS SYS. or to scroll to Private Mailbox, then press 2. Press MENU/SELECT or /SKIP. 3. Press or to scroll to Priv MB ON/OFF, then press MENU/SELECT or /SKIP. 4. Press or to choose On or Off. 5.
Answering system Auto attendant operation Auto attendant (AA) flow chart Incoming call AA answers and plays outgoing announcement Caller dials 9 Caller dials 0 Caller dials extension number Caller enters remote access code AA records central message AA plays directory OGM AA calls extension Answering system remote access Normal call or private mailbox records message Yes Extension picks up the call No command entered AA replays outgoing announcement No command entered No Caller enters anot
Answering system Answering system operation Message playback From the console, you can play the messages in both the central and private mailboxes. You can choose to play the new messages only or play all messages (new messages and old messages). By default, the system announces the date and time of the recording before playing each message. After the last message, you hear, “End of the messages.” To listen to messages in the mailbox: 1. While the console is idle, press ANS SYS. Play Messages 2.
Answering system Remote access Use this feature to reach your answering system remotely by calling any telephone line connected this console from any touch-tone telephone. Make sure the auto attendant feature or the private mailbox of the console is turned on for this feature to work. Remote access can only play messages stored in the private mailbox. To remotely reach the answering system: 1. Dial any telephone line connected to this console from any touch-tone telephone. 2.
Answering system Remote access 7 Press to play current private mailbox announcement. • Press 9 to record and wait for the beep before speaking. • Press # to stop recording. 8 Press to stop the playing message. 9 Press to start recording a memo. • Press # to stop recording. 0 # Press to turn the private mailbox on or off. Press during a message playback to delete current message. Press during a message playback to delete all messages. 5. Hang up to end the call.
Appendix Troubleshooting If you have difficulty with your telephone, please try the suggestions below. For customer service, visit our website at businessphones.vtech.com or call 1 (800) 595-9511. In Canada, please dial 1 (800) 267-7377. The console fails to obtain an IP from the router. • Make sure your router is properly installed and plugged into the Ethernet network. • Make sure the DHCP server is enabled on your router, so that it can allocate IP automatically.
Appendix Troubleshooting There is no dial tone. • First try all the suggestions above. • Make sure you plug the handset cord securely and firmly into the jack on the telephone base and the corded handset. • If the previous suggestions do not work, disconnect the telephone line from the console and connect it to a different telephone. If there is no dial tone on that telephone either, the problem is in your wiring or local service. Contact your telephone service provider.
Appendix Maintenance Taking care of your telephone • • • • Your telephone base contains sophisticated electronic parts, so you must treat it with care. Avoid rough treatment. Place the corded handset down gently. Save the original packing materials to protect your telephone base if you ever need to ship it. Avoid water • You can damage your telephone base if it gets wet. Do not use the corded handset in the rain, or handle it with wet hands.
Appendix FCC part 68 and ACTA This equipment complies with Part 68 of the FCC rules and with technical requirements adopted by the Administrative Council for Terminal Attachments (ACTA). The label on the back or bottom of this equipment contains, among other things, a product identifier in the format US:AAAEQ##TXXXX. This identifier must be provided to your telephone service provider upon request.
Appendix FCC part 15 This equipment has been tested and found to comply with the limits for a Class A digital device, pursuant to Part 15 of the FCC Rules. These limits are designed to provide reasonable protection against harmful interference when the equipment is operated in a commercial environment. This equipment generates, uses, and can radiate radio frequency energy and, if not installed and used in accordance with the instruction manual, may cause harmful interference to radio communications.
Appendix Limited warranty 1. What does this limited warranty cover? The manufacturer of this VTech product warrants to the holder of a valid proof of purchase (“CONSUMER” or “you”) that the product and all accessories provided in the sales package (“PRODUCT”) are free from defects in material and workmanship, pursuant to the following terms and conditions, when installed and used normally and in accordance with the PRODUCT operating instructions.
Appendix Limited warranty 5. How do you get warranty service? To obtain warranty service, visit businessphones.vtech.com or call 1 (800) 595-9511. In Canada, please dial 1 (800) 267-7377. NOTE: Before calling for service, please review the user’s manual; a check of the PRODUCT’s controls and features may save you a service call.
Appendix Technical specifications RF frequency band 1921.536MHz - 1928.448MHz Channels 5 Operating temperature 32°F - 122°F 0°C - 50°C Telephone base voltage 5.
Source of music files for the Music on hold feature: FreeMusicArchive.org. Used under open license. Designed to fit you home. And your life. VTech Communications, Inc. A member of THE VTECH GROUP OF COMPANIES. VTech is a registered trademark of VTech Holdings Limited. Specifications are subject to change without notice. © 2014 VTech Communications, Inc. All rights reserved. 04/14. UP416_ACIB_V1.