Congratulations on your purchase of this VTech product NEED HELP? Our representatives are here to help you with any questions concerning the operation of this product, available accessories, or any other related issues. Call Toll Free: 1-800-595-9511 In Canada, Call: 1-800-267-7377 or visit our website at www. vtechphones.
Important Safety Instructions When using your telephone equipment, basic safety precautions should always be followed to reduce the risk of fire, electric shock and injury, including the following: 1. Read and understand all instructions. 2. Follow all warnings and instructions marked on the product. 3. Unplug this product from the wall outlet before cleaning. Do not use liquid or aerosol cleaners. Use a damp cloth for cleaning. 4.
Important Safety Instructions F. If the product exhibits a distinct change in performance. 13. Avoid using a telephone (other than cordless) during an electrical storm. There is a remote risk of electric shock from lightning. 14. Do not use the telephone to report a gas leak in the vicinity of the leak. 15. Only put the handset of your telephone next to your ear when it is in normal talk.
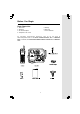
Before You Begin Enhanced 2.4GHz Technology - Your t 2453 operates on a dual band transmission that combines the best of 2.4GHz and 900MHz technologies, providing enhanced performance over standard cordless telephones. About Caller Identification (Caller ID) Your t 2453 has a caller ID(CID) with call waiting feature that works with service from your local phone service provider. caller ID with call waiting lets you see who’s calling before you answer the phone, even when you’re on another call.
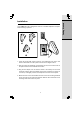
Before You Begin Parts Check List: 1. 2. 3. 4. 5. Battery 6. Belt Clip 7. User’s Manual Base Unit Handset AC Power Adaptor Telephone Line Cord To purchase replacement batteries, visit us on the web at www.vtechphones.com or call VTech Communications, Inc. at 1-800-5959511. In Canada, call VTech Telecommunications Canada Ltd. at 1-800-2677377.
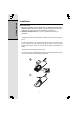
Getting Started Installation Before You Install 1. Choose a location for the base near an electrical outlet and a telephone jack. This phone requires a modular telephone jack and a standard electrical outlet (110v AC) not controlled by a wall switch. 2. Install the handset battery. Use only the provided VTech battery, or equivalent. a). Align the two holes in the plug with the socket pins, then snap the plug into place. b). Place the battery in the compartment with the wires in the lower right corner.
Getting Started Installation 3. Attach belt clip to the cordless handset (optional). To attach To remove Table/Desk Installation Standard electrical outlet Modular telephone jack After charging the battery for at least 12 hours, connect the telephone line cord. Connect the power cord. NOTE: Install the base unit away from electronic equipment such as personal computers, television sets or microwave ovens. Avoid excessive heat, cold, dust or moisture.
Getting Started Installation 4. Charge the Handset Battery Place the handset in the base. Charge the battery for at least 15 hours the first time. NOTE: If the phone will not be used for a long period of time, remove the battery to prevent possible leakage. 5. Check for Dial Tone After the batteries are charged, pick up the handset and press PHONE; you should hear a dial tone. 6. Set the Dial Mode If you have touch tone service, the phone is ready to use as soon as the battery is charged.
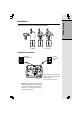
Your t 2453 base unit is designed to mount on a standard telephone wall plate. Wall mounting is optional. 1 2 3 1. Open the hinged wall mount bracket on the underside of the base, then swivel it down and lock it into place as shown in the diagram above. 2. Run the power and telephone cords through the slot, then connect them to the jacks located on the underside of the base. 3. Plug the AC adapter into an electrical outlet.
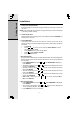
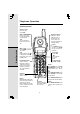
Telephone Operation Handset Operation Answer a Call Press any key except OFF. Hold Handset Volume Adjust the volume while on a call. A double beep will sound when you reach the maximum or minimum setting. Basic Operation Press to put a call on hold. Press again to release hold. -ORUse the extension phone to pick up the call. Select Use SELECT in conjunction with PROG during handset programming. Make a Call Press PHONE, then dial the number.
Telephone Operation In Use/Charging • Flashes in unison with inbound calls. Basic Operation • Flashes slowly when the handset is in use. • Flashes rapidly when a call is on hold. • Glows steadily when the handset is charging. Page Press to page the handset for up to 60 seconds. Press again, or press OFF on handset, or place handset in base to cancel the page.
Telephone Operation Basic Operation Handset Ringer Style/Battery Save You can select from four different handset ringer styles, or turn the ringer off and extend the battery life. 1. With the handset in OFF mode, press PROG/CHAN. 2. Press until the screen displays RINGER:. 3. Press SELECT. The current setting blinks, and you will hear a sample of the ring. 4. Press or to select RINGER: 1, 2, 3, 4 or OFF. You will hear a sample of each ring tone. 5. Press SELECT to choose the displayed ringer setting.
Telephone Operation Operating Range This cordless telephone operates within the maximum power allowed by the Federal Communications Commission (FCC). Even so, this handset and base can communicate over only a certain distance — which can vary with the locations of the base and handset, the weather, and the construction of your home or office. If you receive a call while you are out of range, the handset might not ring or if it does ring, the call might not connect when you press PHONE.
Telephone Memory You can store up to nine numbers with names (up to 15 characters and 24 digits in each location) you dial frequently into the speed dial memory locations you assign (1 through 9) in each handset. You can also store telephone numbers with names alphabetically in the directory. See Telephone Directory for instructions. NOTES: • The entries you stored in speed dial memory will be marked with 01 through 09 in the telephone directory. • Press OFF at any time to exit memory dial mode.
Speed Dialing 6. When you finish entering the name, press SELECT or PROG. The screen displays ENTER NUMBER. 7. Enter the telephone number. Use to backspace and make corrections. Press REDIAL/PAUSE to store a pause in the dialing sequence. -ORPress REDIAL/PAUSE to display the last number dialed from this phone. 8. Press SELECT or PROG to store your entry. The screen displays DISTINCT RING? and the current setting. 9. Press or to change the setting.
Speed Dialing Reassign Locations in Memory 1. Press and hold the memory location key (1 through 9) of the entry you wish to reassign. 2. When the screen displays the entry you want to reassign, press SELECT. Then press until SPEED flashes. SPEED EDIT 8005959511 ERASE 01 Basic Operation 3. Press SELECT. The screen displays ENTER 1-9. 4. Press the keys (1 through 9) to reassign this entry into another memory location. You’ll hear a confirmation beep.
Telephone Directory Your t 2453 can store 50 (including the nine speed dial entries) numbers with names (up to 15 characters for the name and 24 digits for the number) in each handset. NOTE: Press OFF at any time to exit directory. Store a Number/Name in the Directory 1. Press PROG. The screen displays DIRECTORY. 2. Press SELECT. The screen displays ENTER NAME. 3. Using the chart below, enter up to 15 characters for the name you’re storing with the number.
Telephone Directory 8. Press SELECT or PROG to confirm your selection. If you chose Y, a DD will be displayed with the directory entry. NOTE: When memory is full the screen displays MEMORY FULL, an error tone sounds, and you will not be able to store a new number until you delete a stored number. Edit a Number/Name Stored in the Directory 1. Press (DIR). The screen displays DIRECTORY. 2. Press or to scroll alphabetically through the entries stored in the directory.
Telephone Directory -ORPress the dial pad key for the first letter of the entry you want to dial. 3. When the number you want to dial is displayed, press PHONE. Move a Number/Name to the Memory 1. Press (DIR). The screen displays DIRECTORY. 2. Press or to scroll alphabetically through directory. — OR — Press the dial pad key for the first letter of the entry you want to move. 3. When the screen displays the entry you want to move, press SELECT. Then press until SPEED flashes.
Caller ID Operation Caller’s name Long distance call * VTech L 800-595-9511 AM NEW 5/01 5:40 P M OLD 28 Date of call Time of call Party has called 2 or more times Caller’s telephone number Position of call in call history Basic Operation About Call History (Caller ID) Your t 2453 can store up to 50 calls in its caller ID memory. The most recent call will have the highest number. When the memory is full, the oldest call will be deleted to make room for new incoming call information.
Caller ID Operation Dial a Displayed Number 1. Locate the record in call history that you want to dial. 2. If you wish to change how the number is dialed, press #. The screen displays alternate dialing sequences available for this call (area code + number; 1 + area code + number; number only; 1+ number). 3. Press SELECT. Press until DIAL flashes. DIAL PROGRAM 8005959511 5/01 5:40 PM OLD 28 4. Press SELECT again. The number is automatically dialed.
Caller ID Operation Display Screen Messages Screen Displays: When: The other party is blocking name and/or number information. UNKNOWN Your phone company is unable to receive information about this caller’s name and/or number. * (after the name) This caller has called you more than once.
Answering System Operation At The Base Audible Indicators Your t 2453 telephone system gives you voice prompts for feature operations and voice confirmations when you press a button or complete an operation. Setting the clock 1. Make sure the answering system is on. 2. Press TIME/SET. The system announces the clock setting, then announces: “To Set Day and Time, press TIME/SET.” 3. Press TIME/SET. 4. Press CHANGE until the system announces the correct day, then press TIME/SET. 5.
Answering System Operation At The Base Select a feature setting Turn Answering System on or off Enter Answering System feature setup and choose a feature to set..... Basic Operation Review/change clock setting; confirm feature settings . Record outgoing announcements, and memos. Record Your Announcement NOTE: If you have assigned different mailboxes to different people, be sure to tell callers in your announcement to press 1 ,2 , or 3 to leave a message in the appropriate mailbox.
Answering System Operation At The Base Setting Up Your Answering System You can set up one feature at a time, or you can set up a feature and then move on to set up another feature. 1. Make sure the answering system is on. 2. Press MENU until the system announces the feature you want to set. Refer to the Feature Summary below for a description of the features and your choices. 3. Press SELECT until the system announces the desired setting. 4. Press TIME/SET to confirm your selection. 5.
Answering System Operation At The Base Listen to, Save & Delete Messages The system automatically saves your messages until you delete them, and can store approximately 15 minutes of messages, memos, and announcements (up to a maximum of 99 messages).Your caller can leave a message of up to 4 minutes in length. A MAILBOX key will flash to alert you to new, unplayed messages. If all messages in a mailbox have been reviewed, the key will glow steadily.
Answering System Operation At The Base Call Screening/Intercept 1. Make sure the answering system is on, and set the message playback volume control above level 1 so you can hear the caller’s message. 2. If you decide to take the call, press PHONE on the handset. 3. If you pick up an extension phone during the announcement and the announcement does not stop right away, press and release the telephone switchhook.
Answering System - Remote Access Connect with the Answering System You can access many features of this system remotely from a touch tone phone. 1. Dial your telephone number. 2. When the system answers, enter your Remote Access Code (preset to 50). The system beeps once and then announces the number of new messages. 3. Enter a remote command (see Remote Access Commands). 4. Press * 0 to exit remote operation. Voice Menu The system has voice prompts to help you with remote operation.
Answering System - Remote Access Function: Function: Command: Command: Record memo Press *8 , then mailbox number where you want memo recorded; speak after beep; press #5 when finished. End remote access call Press *0 . Turn system off Press #0; the system announces, “Answering machine off.” Press # 0 again to turn the system back on. Turn system on When system is off, it answers after 10 rings and announces, “Please enter your security code.” Enter your remote access code.
Batteries Basic Operation Battery Care and Maintenance • A fully charged battery provides an average talk time of about six hours. • The battery needs charging when: — A new battery is installed in the handset. — The phone beeps twice every five seconds. — The screen displays BATTERY LOW and the low battery icon. • Place the handset in the base so the CHARGING light turns on.The battery is typically fully charged in 15 hours.
In Case Of Difficulty If you have difficulty operating your phone, the suggestions below should solve the problem. If you still have difficulty after trying these suggestions, call VTech Communica- tions at 1-800-595-9511. In Canada, call VTech Telecommunications Canada Ltd. at 1-800267-7377. The phone doesn't work at all • • • Make sure the power cord is plugged in. Make sure the telephone line cord is plugged firmly into the base unit and the telephone wall jack.
In Case Of Difficulty Common cure for electronic equipment If the unit does not seem to be responding normally, then try putting the handset in its base. If it does not seem to respond, do the following (in the order listed): 1. Disconnect the power to the base. 2. Disconnect the handset battery, and spare battery, if applicable. 3. Wait a few minutes. 4. Connect power to the base. 5. Re-install the battery(ies). 6. Wait for the handset to re-establish its link with the base.
Maintenance Taking care of your telephone Your cordless telephone contains sophisticated electronic parts, so it must be treated with care. Avoid rough treatment Place the handset down gently. Save the original packing materials to protect your telephone if you ever need to ship it. Avoid water Your telephone can be damaged if it gets wet. Do not use the handset outdoors in the rain, or handle it with wet hands. Do not install your base unit near a sink, bathtub or shower.
Warranty Statement What does this limited warranty cover? • The manufacturer of this VTech product, VTech Communications, warrants to the holder of a valid proof of purchase (“Consumer” or “you”) that the product and all accessories provided by VTech in the sales package (“Product”) are free from material defects in material and workmanship, pursuant to the following terms and conditions, when installed and used normally and in accordance with operation instructions.
Warranty Statement 5. Product whose warranty/quality stickers, Product serial numbers plates or electronic serial numbers have been removed, altered or rendered illegible; or 6. Product purchased, used, serviced, or shipped for repair from outside the United States, or used for commercial or institutional purposes (including but not limited to Products used for rental purposes ); or 7. Product returned without valid proof of purchase (see 2 below); or 8.
Warranty Statement Limitations: Implied warranties, including those of fitness for a particular purpose and merchantability (an unwritten warranty that the product is fit for ordinary use) are limited to one year from date of purchase. Some states do not allow limitations on how long an implied warranty lasts, so the above limitation may not apply to you.
FCC, ACTA and IC Regulations This equipment complies with Parts 15 of the Federal Communications Commission (FCC) rules for the United States. It also complies with regulations RSS210 and CS-03 of Industry and Science Canada. Operation is subject to the following two conditions: (1) this device may not cause interference, and (2) this device must accept any interference, including interference that may cause undesired operation of the device.
Additional Information FCC, ACTA and IC Regulations 1. Product identifier and REN information 2. The label on the back or bottom of this equipment contains, among other things, an identifier indicating product approval and the Ringer Equivalence Number (REN). This information must be provided to your local telephone company upon request. For equipment approved prior to July 23, 2001, the product identifier is preceded by the phrase “FCC Reg No.” and the REN is listed separately.
FCC, ACTA and IC Regulations 6. Programming/testing of emergency numbers If this product has memory dialing locations, you may choose to store police, fire department and emergency medical service telephone numbers in these locations. If you do, please keep three things in mind: a We recommend that you also write the telephone number on the directory card, so that you can still dial the emergency number manually if the memory dialing feature doesn’t work.
FCC, ACTA and IC Regulations Users should ensure for their own protection that the electrical ground connections of the power utility, telephone lines and internal metallic water pipe system, if present, are connected together. This precaution may be particularly important in rural areas. Caution: Users should not attempt to make such connections themselves, but should contact the appropriate electrical inspection authority, or electrician, as appropriate.
Technical Specifications FREQUENCY CONTROL WEIGHT Crystal controlled PLL synthesizer Handset: Base: TRANSMIT FREQUENCY POWER REQUIREMENTS Base: 2410.2 - 2418.9 MHz Handset: 912.75 - 917.10 MHz Handset: 148 grams 344 grams 400mAH Ni-Cd Battery RECEIVE FREQUENCY Base: Base: 912.75 - 917.10 MHz Handset: 2410.2 - 2418.9 MHz MEMORY CHANNELS Speed Dial: 9 Memory locations 24 digits per location NOMINAL RANGE EFFECTIVE Maximum power allowed by FCC and IC.
Table Of Contents Important Safety Instructions..........................................................................2 Before You Begin...............................................................................................................4 About Caller Identification (Caller ID)................................................................4 Parts Check List......................................................................................................4 Getting Started....................
Table Of Contents Caller ID Operation......................................................................................................20 About Call History(Caller ID)..............................................................................20 Review Call History.............................................................................................20 Delete Records from Call History...................................................................20 Dial a Displayed Number....................
VTECH TELECOMMUNICATIONS LTD. A member of THE VTECH GROUP OF COMPANIES. Distributed in the U.S.A. by VTech Communications, Inc. Beaverton, Oregon, 97008 Distributed in Canada by VTech Telecommunications Canada Ltd., Richmond, B.C. V6X 1Z9. Copyright 2005 for VTECH TELECOMMUNICATIONS LTD.