91-000153-031-000_E2725B_RO.qxd 2/13/1950 7:21 PM Page 1 User Manual (Part 2) 2.
91-000153-031-000_E2725B_RO.qxd You must install and charge battery before using the telephone. 2/13/1950 7:21 PM STOP! Page 2 See page 7 for easy instructions. For customer service or product information, visit our web site at Please also read www.telephones.att.com or call 1-800-222-3111. Enclosed in product package.
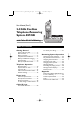
91-000153-031-000_E2725B_RO.qxd 2/13/1950 7:21 PM Page 1 User Manual (Part 2) 2.4 GHz Cordless Telephone/Answering System E2725B with Caller ID & Call Waiting Table of contents Getting Started To review your call log.....................21 Quick reference guide ........................2 Parts checklist .......................................4 Before you begin ..................................5 Telephone base installation................6 Battery installation & charging ..........7 Wall mounting ....
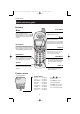
91-000153-031-000_E2725B_RO.qxd 2/13/1950 7:21 PM Page 2 Getting Started Quick reference guide Handset Select/Menu V CID Press to display menu, or to select highlighted item from menu. Press to scroll down in menus. Press when phone is not in use to display Caller ID information (see page 21). While entering names, press to move the cursor to the left. ^ DIR Press to scroll up in menus. Press when phone is not in use to display phone book entries (see page 16).
91-000153-031-000_E2725B_RO.qxd 2/13/1950 7:21 PM Page 3 Getting Started Quick reference guide Telephone Base Volume Handset Locator Press to adjust message playback volume. Press to locate handset if lost (see page 10). In Use Charging On when handset battery is charging. On when handset is in use. Flashes when another phone is in use on the same line, or answering system is answering an incoming call. Answering System Controls (see pages 22-30) Press to repeat message. Hold to slow playback.
91-000153-031-000_E2725B_RO.qxd 2/13/1950 7:21 PM Page 4 Getting Started Parts checklist Remember to save your sales receipt and original packaging in case you ever need to ship your telephone for warranty service.
91-000153-031-000_E2725B_RO.qxd 2/13/1950 7:21 PM Page 5 Getting Started Before you begin About Caller Identification Telephone operating range Caller ID with Call Waiting features in this telephone let you see who’s calling before you answer the phone, even when you’re on another call. These features require services provided by your local telephone company. This cordless telephone operates with the maximum power allowed by the Federal Communications Commission (FCC).
91-000153-031-000_E2725B_RO.qxd 2/13/1950 7:21 PM Page 6 Getting Started Telephone base installation Install the telephone base as shown below. Choose a base location away from electronic equipment, such as personal computers, television sets or microwave ovens. Avoid excessive heat, cold, dust or moisture. Plug power cord transformer into electrical outlet. Plug telephone line cord into telephone jack. NOTE: Use only the power cord supplied with this product.
1-000153-031-000_E2725B_RO.qxd 2/13/1950 7:21 PM Page 7 Getting Started Battery installation & charging After battery installation, place the handsets in their base unit or charger and allow to charge for 12 hours before use. You can keep the batteries charged by returning the handsets to their base unit or charger after each use. When the battery is fully depleted, a recharge takes about 10 hours.
91-000153-031-000_E2725B_RO.qxd 2/13/1950 7:21 PM Page 8 Getting Started Wall mounting The base can be installed on any standard wall-phone outlet as shown below. Choose a location away from electronic equipment, such as personal computers, television sets or microwave ovens. Avoid excessive heat, cold, dust or moisture. Install the line cord as shown in the diagram. Connect cords as shown on page 6, then press and slide down firmly so base is held securely on outlet mounting pegs.
91-000153-031-000_E2725B_RO.qxd 2/13/1950 7:21 PM Page 9 Getting Started Belt clip & optional headset Install belt clip as shown below if desired. For hands-free telephone conversations, you can use any industry standard 2.5 mm headset (purchased separately). For best results use an AT&T 2.5 mm headset. Snap belt clip into notches on side of handset. Rotate and pull to remove. Plug 2.5 mm headset into jack on side of handset (beneath small rubber cap).
91-000153-031-000_E2725B_RO.qxd 2/13/1950 7:21 PM Page 10 Telephone Operation Elapsed time PHONE 00:00:12 Basic operation Making and answering calls To answer an incoming call, press PHONE (or SPEAKER, or any dial pad key). To make a call, press PHONE or SPEAKER, then dial a number. Press OFF to hang up. To preview numbers before dialing, enter numbers first, then press PHONE or SPEAKER to dial. Press DELETE or CLEAR at any time to make corrections as you are entering numbers.
91-000153-031-000_E2725B_RO.qxd 2/13/1950 7:21 PM Page 11 Telephone Operation Options while on calls Volume control Press the VOLUME buttons on the side of the handset to adjust listening volume. Each button press raises or lowers volume by one level. When you change the volume level, the new setting becomes the default. The new volume level will be applied each time you use the handset, speakerphone or headset.
91-000153-031-000_E2725B_RO.qxd 2/13/1950 7:21 PM Page 12 Telephone Operation Intercom calls Intercom calls Use the intercom feature to have conversations between the handsets. Press the INTERCOM button on a handset to initiate an intercom call. This handset will call the other handset. Press PHONE, INTERCOM, SPEAKER or any dial pad key on the handset being paged to enter intercom mode with the first handset. To end the intercom call: • Press OFF or INTERCOM at the handset.
91-000153-031-000_E2725B_RO.qxd 2/13/1950 7:21 PM Page 13 Telephone Operation Call Forward and Call Transfer Call Forward and Call Transfer An external call can be forwarded or transferred from one handset to the other. The difference between forward and transfer depends on if the sending handset needs to talk with the receiving handset before the external call is sent to the other handset.
91-000153-031-000_E2725B_RO.qxd 2/13/1950 7:21 PM Page 14 Telephone Operation Highlighted menu item > DIRECTORY CALL LOG Handset settings At the feature menu you can change settings to customize how the telephone works. Press MENU, then use the ^V buttons to scroll to the feature you want to change. As you scroll through the menu, the top menu item is always highlighted with a > symbol. Press SELECT to select the highlighted item.
91-000153-031-000_E2725B_RO.qxd 2/13/1950 7:21 PM Page 15 Telephone Operation Handset settings Handset name HANDSET NAME AT&T_ At this menu you can customize the name that appears on the handset screen when the phone is idle. Press DELETE to erase letters, then replace them with a name of your preference, up to 16 characters long (see page 17 to enter letters). Press SELECT to confirm. Language LANGUAGE ENGLISH At this menu you can select the language used in all menus and screen displays.
91-000153-031-000_E2725B_RO.qxd 2/13/1950 7:21 PM Page 16 Phone book Shared phone book directory Pat Williams 555-1234 The phone book directory is stored in the base, and is shared by both handsets. Changes made at either handset will be reflected in both. Only one handset at a time can use the phone book. If a second handset attempts to use the phone book, the screen will display NOT AVAILABLE AT THIS TIME. Memory capacity The phone book directory can store up to 50 entries.
91-000153-031-000_E2725B_RO.qxd 2/13/1950 7:21 PM Page 17 Phone book AT&T New phone book entries To create a new phone book entry Press MENU twice to select DIRECTORY. Press V to highlight STORE. Press SELECT, then enter the telephone number when prompted. > DIRECTORY CALL LOG Use the dial pad to enter up to 32 digits, then press You will be notified if the number is already in your phone book. SELECT.
91-000153-031-000_E2725B_RO.qxd 2/13/1950 7:21 PM Page 18 Phone book AT&T Phone book search Press DIR to display the first listing in the phone book. You can then use the ^ or V to browse through the phone book, or search to find a specific entry. Press OFF at any time to exit the directory. Andrew 555-6789 To browse through the directory To browse, press ^ or V to scroll through all entries one by one. Entries will be displayed alphabetically by the first letter in the name.
91-000153-031-000_E2725B_RO.qxd 2/13/1950 7:21 PM Page 19 Phone book AT&T To dial, change or delete entries To dial a number When any phone book entry is displayed, press PHONE (or SPEAKER) to dial the displayed number. Andrew 555-6789 To delete an entry When any phone book entry is displayed, press DELETE to delete the displayed entry from the phone book. Once deleted, an entry cannot be recovered.
91-000153-031-000_E2725B_RO.qxd 2/13/1950 7:21 PM Page 20 Caller ID Logs How Caller ID works Pat Williams 908-555-0100 AM NEW 11/23 10:01 If you subscribe to Caller ID service provided by your local phone company, information about each caller will be displayed after the first ring. Caller’s name Caller’s number Pat Williams 908-555-0100 AM NEW 11/23 10:01 Appears when new call is received Time of call Date of call Information about the last 50 incoming calls is stored in your call log.
91-000153-031-000_E2725B_RO.qxd 2/13/1950 7:21 PM Page 21 Caller ID Logs AT&T 6 NEW CALLS NEW To review your call log To review your call log Pat Williams 555-1234 10:31 AM NEW 11/23 Press CID to review your call log. The most recent call is displayed first. Use the arrow buttons to scroll through the list as shown at left. To return a call Press PHONE (or SPEAKER) to call the number as displayed.
91-000153-031-000_E2725B_RO.qxd 14 2/13/1950 7:21 PM Page 22 Answering System Operation Message capacity Message counter The answering system can record up to 99 messages, depending on the length of each message. Individual messages can be up to four minutes long, but total maximum recording time is 15 minutes. Messages will remain available for replay until you delete them. Number of messages (or, during playback, message number currently playing). Press to set clock (see page 23).
91-000153-031-000_E2725B_RO.qxd 2/13/1950 7:21 PM Page 23 Answering System Operation Day and time announcements To set day and time Before playing each message, the answering system announces the day and time the message was received. 1. Make sure the answering system is on. 2.
91-000153-031-000_E2725B_RO.qxd 2/13/1950 7:21 PM Page 24 Answering System Operation 14 Outgoing announcements Outgoing announcements are the messages callers hear when calls are answered by the answering system. Elapsed recording time (seconds). 1. Press to stop recording. MENU To record your outgoing announcement “Change announcement” Press MENU until you hear "Change announcement." Then press RECORD and begin speaking after you hear "Now recording.
91-000153-031-000_E2725B_RO.qxd 2/13/1950 7:21 PM Page 25 Answering System Operation Announce Only mode A “A” is displayed when Announce Only is activated. In announce only mode, callers hear an announcement but cannot leave messages. This option is useful, for example, to notify callers that you will be away for an extended period and request that they call back after a certain date. 1.
91-000153-031-000_E2725B_RO.qxd 2/13/1950 7:21 PM Page 26 Answering System Operation Changing feature options Menu features can be changed to customize how the answering system operates. Press MENU repeatedly to hear each feature. Press CHANGE when you hear the feature you want to modify. 1. MENU Press until desired feature is heard (see list at right). 2. CHANGE Press until desired selection is heard. 3. MENU Press to set selection and move to next menu option.
91-000153-031-000_E2725B_RO.qxd 2/13/1950 7:21 PM Page 27 Answering System Operation Number of messages waiting (or, during playback, message number currently playing). 14 Message playback Press PLAY/STOP to hear messages. The system announces the number of messages, then begins playback. If you have new messages waiting, you will hear only the new messages (oldest first). If there are no new messages, the system will play back all messages (oldest first).
91-000153-031-000_E2725B_RO.qxd 2/13/1950 7:21 PM Page 28 Answering System Operation 14 Elapsed recording time (seconds). Press to stop recording. Recording and playing memos Memos are messages you record yourself. They are saved, played back and deleted exactly like incoming messages. You can record a memo as a reminder to yourself, or leave a message for someone else if others in your household use the answering system. To record a memo 1. RECORD “Now recording...” 2. Speak into microphone.
91-000153-031-000_E2725B_RO.qxd 2/13/1950 7:21 PM Page 29 Answering System Operation Message window displays 14 The message window usually displays the total number of memos and incoming messages. See the list below for explanations of other displays in this window. Message window Message window displays 0 No messages. 1-98 Number of messages/memos, or message number currently playing (flashes if you have new messages). 10-99 Current remote access code while setting (see page 26).
91-000153-031-000_E2725B_RO.qxd 2/13/1950 7:21 PM Page 30 Answering System Operation 1. Dial your telephone number from any touch-tone phone. Remote access 2. When system answers, enter two digit remote access code (19 unless you have changed it). 3. Enter remote commands (see list at right). Play messages Press to hear new messages (if none are new, all play back). Hang up to end call and save all undeleted messages. Repeat or go back Press to repeat current message.
91-000153-031-000_E2725B_RO.qxd 2/13/1950 7:21 PM Page 31 Appendix Screen icons, indicator lights & tones Handset screen icons & alert tones Screen icons Speakerphone in use. Ringer off. AT&T MUTE NEW 11/23 Battery charging (animated display). 10:01 AM Low battery (flashing); place handset in base or charger to recharge. MUTE Microphone is muted. NEW New calls (press CID to review call log). Alert tones Happy tone Programming command completed successfully.
91-000153-031-000_E2725B_RO.qxd 2/13/1950 7:21 PM Page 32 Appendix In case of difficulty If you have difficulty with your phone, please try the suggestions below. For Customer Service, visit our web site at www.telephones.att.com, or call 1-800-222–3111. Telephone does not work at all • Make sure battery is installed and charged correctly (see page 7). • Make sure the AC adapter is plugged into an outlet not controlled by a wall switch.
91-000153-031-000_E2725B_RO.qxd 2/13/1950 7:21 PM Page 33 Appendix In case of difficulty Incomplete messages • If a caller leaves a very long message, part of it may be lost when the system disconnects the call after 4 minutes. • If the caller pauses for more than 7 seconds, the system stops recording and disconnects the call. • If the system’s memory becomes full during a message, the system stops recording and disconnects the call.
91-000153-031-000_E2725B_RO.qxd 2/13/1950 7:21 PM Page 34 Appendix Technical specifications RF Frequency Band (Handset to base) 2400 MHz — 2485 MHz RF Frequency Band (Base to handset) 2400 MHz — 2485 MHz Channels 95 Channel Spacing 864 KHz Output Power 20 dBm Sensitivity -96 dBm Modulation GFSK Operating Temperature 32°F — 122°F 0°C — 50°C Base Unit Voltage (AC Voltage, 60Hz) 96 — 130 Vrms Base Unit Voltage (AC Adapter Output) 9VDC @600mA Handset Voltage 3.2 — 4.
91-000153-031-000_E2725B_RO.
91-000153-031-000_E2725B_RO.qxd 2/13/1950 7:21 PM Page 36 Appendix Remote access wallet card Use the wallet card below to help you remember commands to control your answering system from any touch tone telephone. Cut along dotted line. Call your phone number, then enter your 2-digit access code (preset to 19). Action Remote Command #1 #2 #4 #6 #5 Fold here. Voice help menu ...................... Play messages ............................ Repeat message ........................ Skip message ......
91-000153-031-000_E2725B_RO.qxd 2/13/1950 7:21 PM Page 37 www.telephones.att.com Copyright © 2004 Advanced American Telephones. All Rights Reserved. AT&T and the Globe Design are trademarks of AT&T Corp., licensed to Advanced American Telephones. Printed in China. Issue 3 AT&T 02/05.
CORDLESS Troubleshooting TAGS 250 De-register and register De-register handset from the E2525, E2600B and E2555 Please take the Handset out of the Base before de-registering. Using the [SOFT] Keys on the Base, press MENU, then press the Down arrow twice until BASE SETTINGS is highlighted. Press OK, then press MUTE 3 times and FLASH twice. This will deregister the unit, please see more info to re-register. Adding Handsets / Registering Handsets Your telephone can accommodate up to 8 cordless Handsets.
The Handset provided with your telephone is automatically registered as Handset 1. Additional Handsets will be assigned numbers in the order the are registered (2, 3, 4, etc.) up to a maximum of eight. Keypad Tone Feature - Vtech Telephones When the Keypad Tone Feature is ON but the handset is OFF (i.e. in standby): You will hear loud tones being emitted through the external speaker on the back of the handset when you press any handset button except for the volume key.
button, and the [OFF] button emitted through the external speaker on the back of the handset. 2.You will not hear any tone when you press the [SOUND SELECT] button. Keypad Tone Feature When the Keypad Tone Feature is ON but the handset is OFF (i.e. in standby): You will hear loud tones being emitted through the external speaker on the back of the handset when you press any handset button except for the volume key. When the Keypad Tone Feature is ON and the handset is ON (i.e.
When the Keypad Tone Feature is ON and the Speakerphone on the handset is ON: 1.You will hear the tones from the number buttons ([0] - [9]), the [SOFTKEY] buttons (the three unnamed buttons under the display), the [XFER/INTERCOM] button, the [SPEAKER] button, the [PHONE] button, and the [OFF] button emitted through the external speaker on the back of the handset. 2.You will not hear any tone when you press the [SOUND SELECT] button. 5860 Ringer On/Melody Selection Turn Ringer On 1.
·Every call conversation cuts in and out, other end hears beeps. 1.Advise the customer that you (the rep) will place a no charge replacement order that will be shipped via UPS service, which should arrive within 14 days. Advise the customer that they will also receive a prepaid ARS label sent via US Mail to return their original unit (no charge will be incurred by the customer). 2.
· After placing the order, send an internal referral commitment to the [VTECH ARS LABEL] team for a prepaid UPS ARS Label to be sent to the customer. NOTE: DO NOT SEND THESE CUSTOMERS BACK TO THE RETAILER FOR REPLACEMENT (EVEN IF THEY ARE WITHIN THE FIRST 30 DAYS OF PURCHASE). IT IS IMPORTANT THAT YOU FOLLOW THIS PROCESS.
·Enter the 15 digit Base ID Code, located on the underside of the Base Unit. The ID Code can include numbers (0-9) and characters (*,#). ·Press OK. The Handset will display: PLEASE WAIT! ·Wait approximately 15 seconds. The Handset will display FOUND BASE. NOTE: Occasionally, it will take longer than 15 seconds for the Handset to find the Base Unit. This is normal. If the Handset displays: BASE BUSY TRY LATER, this indicates that the system is in use.
SET TIME PONER TIEMPO REGLER L'HEURE CLOCK MODE MODO RELOJ MODE HORLOGE REGISTER REGISTRAR REGISTRE RINGER VOLUME TIMBRE VOLUMEN SONNERIE VOLUME RINGER MELODY TIPO DE TIMBRE SONNERIE MELODIE VIBRATE CONTROL CTRL VIBRACION MODE VIBRATION LOW BATT TONE TONO DE BAT BAJA SON PILE FAIBLE RANGE TONE TONO DE RANGO SON DE PORTEE KEYPAD TONE TONO DE DECLADO SON DU CLAVIER CONTRAST CONTRASTE CONTRASTE LANGUAGE IDIOMA LANGUE TO CHANGE HANDSET MENU FROM SPANISH: Press MENU. Scroll down to CONFIG AURICULAR. Press OK.
FRENCH CALLS LOG GUEA DE LLAMADAS REGISTRE D'APPEL BASE SETTINGS CONFIG BASE REGLAGES BASE DISPLAY BASE-ID NUMERO DE BASE NUMERO DE BASE RINGER VOLUME TIMBRE VOLUMEN SONNERIE VOLUME RINGER MELODY TIPO DE TIMBRE SONNERIE MELODIE KEYPAD TONE TONO DE DECLADO SON DU CLAVIER TONE/PULSE TONOS/PULSOS TONALITE/IMPUL CONTRAST CONTRASTE CONTRASTE LANGUAGE IDIOMA LANGUE TO CHANGE BASE MENU FROM SPANISH: Press MENU. Scroll down to CONFIG BASE. Press OK. Scroll down to IDIOMA. Press OK.
3.Hold down [PAGE] key for 5 seconds. When the LINE IN USE light begins to flash, release the [PAGE] key. 4.The HANDSET CHARGING light will blink 5 times. Within 5 seconds from when it stops blinking, press [PAGE] once. VT2461 Mk1 DEREGISTER A SINGLE HANDSET 1.Unplug power from the Base. Remove spare battery pack. 2.Hold down [PAGE] while reconnecting power. When the POWER light begins to blink, release the [PAGE] key. 3.Press [PAGE] 1 to 4 times, corresponding to the Handset you wish to deregister. 4.
- Advise the customer that you are sending him or her a brand new replacement set (Cordless 2230 or 2255 whichever the customer has). If the customer does not want the replacement, advise him or her to return their unit to the place of purchase. Stop! If the customer accepts the replacement 2230/2255 continue.... - Inform the customer that he or she will receive the new replacement set(s) within 14 business days.
9.Hit "Ok". Now "line or Line In" should show up in the master volume control for Recording. Please make sure that there is a check mark in the Select box under the "Line or Line IN 10.Go to Options and Select Properties. 11.There should be an option to adjust Recording or playback volume control. Choose Playback. 12.There is another section under playback where you pick which volume controls you want to show on the bar. Make sure there is a check next to "line or Line in". If there is not, please check it.
of line voltage available at the phone and the distance of miles between the two other parties. Customer may consider 3-way calling service (if available through local telco) as alternative. Customer is less likely to experience volume loss due to more direct routing of conference. Caller Id after 2nd ring Most Telco's send out the Caller ID information between the 1st and 2nd ring. Some Telco's send out this information later.
This cordless operates in the 900 megahertz frequency band. Radio signals in this band can penetrate small openings and reflect around obstructions more effciently than those of conventional cordless telephones. This alows the unit to operate in areas that are typically difficult for cordless phones. Your cordless telephone operates at the maximum power allowed by the Federal Communications Commission (FCC).
940101B2-7CPS2A (CRS will not accept a slash.) The battery save feature will deactivate the ring approximately 60 seconds after being set. After 60 seconds, the phone will enter "sleep mode". The phone will not ring or display "incoming call" when the extension phones are ringing. If any button on the phone is pressed, this will "wake up" the phone. If there is an incoming call within 60 seconds of a button being pressed, the phone will ring.
·If possible advise your callers to leave a message. ·Check with the local telephone company and advise them 7-10 seconds of silence is required for the answering system to disconnect. NOTE: Charges may apply Call Waiting disconnects answering system Answering System senses a fluctuation in line voltage caused by the Call Waiting signal and disconnects. Contact Local Telephone Company for possible solutions.
Calling in same Area Code Many LTCO's are changing their dialing sequence to 0 +, or 1 +, 10-digit dialing (0 + 0r 1 + area code + seven-digit phone number) for all long distance calls that are made within the same area code. All 0 +, or 1 +, 7-digit dialing within the same area code will be eliminated. This also means that local credit card and operator assistance calls that traditionally have been 0 + 7 dialed calls will now require 0 + 10 dialing.
5.Replace battery cover. 6.Recradle handset in base for 15 seconds. 7.Pick up handset and press phone. NOTE: Be sure batteries have been charged recently. If not, charge batteries fully for 16 hours. Common Cure If the unit does not seem to be responding normally, then try putting the handset in the base to reinitialize the unit. If it still does not seem to respond after doing this a few times, do the following (in the order listed): 1.Unplug the power cord. 2.Remove the handset battery. 3.
To determine if telephones ring separately or together: 1.Remove telephones from line. 2.Replace one at a time. ·Line 1 has a higher pitched ring that helps differentiate it from the ring of Line 2. ·Have someone call on each line. ·Let the telephone ring approximately five times and listen to the difference. ·Try using 2 two conductor cords or purchase a 267C adapter. ·Try a Triplex adapter and use a two cord connection. Ringer Volume Not Adjustable Ringer volume cannot be adjusted.
. Ringer Equivalence On the bottom of each telephone or adjunct is a Ringer Equivalence. 1.Find this number for everything connected to your telephone line. 2.Add up all the numbers to get the total Ringer Equivalence. Julian Date NOTE: Contact the telephone company, if required. The Julian date for this unit is found on the bottom of the unit.