Sit-to-Stand™ Activity Walker © 2009 VTech Printed in China 91-060820-003-006
Dear Parent, Ever notice the look on your baby’s face when they learn something new through their own discovery? These self-accomplished moments are a parent’s greatest reward. To help fulfill them, VTech® created the Infant Learning® series of toys.
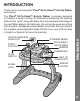
INTRODUCTION Thank you for purchasing the VTech® Sit-To-Stand™ Activity Walker learning toy! ON/OFF/LANGUAGE SELECTOR PUPPY JOYSTICK STEERING WHEEL ROLLER BALL ADJUSTABLE MIRROR TURNING KEY SLIDE SWITCH WHEEL LOCK LIGHT-UP PIANO KEYS Introduction The VTech® Sit-To-Stand™ Activity Walker is uniquely designed for toddlers 9 months and up.
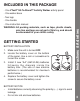
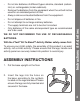
INCLUDED IN THIS PACKAGE - One VTech® Sit-To-Stand™ Activity Walker activity panel - One walker base - Two legs - One handle WARNING: All packing materials, such as tape, plastic sheets, wire ties and tags are not part of this toy, and should be discarded for your child’s safety. GETTING STARTED BATTERY INSTALLATION 1. Make sure the unit is turned OFF. 2. Locate the battery cover on the bottom of the panel. Use a coin or screwdriver to loosen the screw. 3.
• • • • • • Do not mix batteries of different types: alkaline, standard (carbonzinc) or rechargeable (nickel-cadmium). Remove the batteries from the equipment when the unit will not be used for an extended period of time. Always remove exhausted batteries from the equipment. Do not dispose of batteries in fire. Do not attempt to recharge ordinary batteries. The supply terminals are not to be short-circuited. Only batteries of the same and equivalent type as recommended are to be used.
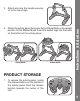
4. Attach the activity panel facing you for the Sitting Mode or the upright position for the Walker Mode. Insert the walker legs into the holes on the bottom of the activity panel. Sitting Mode Walker Mode Instructions & Activities 3. Attach and lock the handle securely on to the top of legs. PRODUCT STORAGE 1. To remove the activity panel, locate the release buttons on the bottom of the activity panel. Push the release buttons towards the center of the unit.
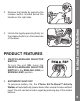
3. Unlock the legs by pressing firmly on the release buttons on the underside of the base. PRODUCT FEATURES 1. ON/OFF/LANGUAGE SELECTOR SWITCH To turn the unit ON, move the ON/OFF/LANGUAGE SELECTOR SWITCH to the ENGLISH (ENG) or SPANISH (ESP) position. Instructions & Activities 2. Remove the handle by pressing the release button located below the handle on the right side. 2.
3. THREE POSITIONS OF PLAY Sitting Mode Carry-along Mode Walker Mode 4. WHEEL LOCK Slide the wheel lock switch on the base of the walker to lock the position to secure the wheels while in the Sitting Mode. Remember to unlock the wheel lock before playing in the Walker Mode. Instructions & Activities The three positions of play include Sitting Mode, Carry-along Mode, and Walker Mode. Change the mode of play by moving the activity panel. 5.
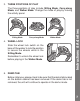
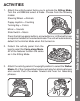
ACTIVITIES 1. Attach the acitivity panel facing you to activate the Sitting Mode. Turn the unit ON and select a mode. Choose from the following modes: Steering Wheel = Animals Puppy Joystick = Counting Mirror = Sounds Slide Switch = Music Press the light-up piano buttons, arrow buttons or roll the ball to hear a response related to the selected mode. The unit will automatically default to the Animal Mode when first turned on. 2. Detach the activity panel from the legs to select the Carry-along Mode.
MELODY LIST 1. Old MacDonald Had a Farm 2. Row, Row, Row Your Boat 3. Sing a Song of Sixpence 4. The Entertainer 5. Can Can 6. Eine Kleine Nachtmusik 8. Skip to My Lou 9. The Farmer in the Dell 10. Pop! Goes the Weasel 11. London Bridge is Falling Down 12. Brahms’ Lullaby 13. Mary Had a Little Lamb CARE & MAINTENANCE 1. Keep the unit clean by wiping it with a slightly damp cloth. 2. Keep the unit out of direct sunlight and away from any direct heat source. Care & Maintenance 7. Jack and Jill 3.
TROUBLESHOOTING If for some reason the program/activity stops working or malfunctions, please follow these steps: 1. Please turn the unit OFF. 2. Interrupt the power supply by removing the batteries. 3. Let the unit stand for a few minutes, then replace the batteries. 4. Turn the unit ON. The unit should now be ready to play again. If the problem persists, please call our Consumer Services Department at 1-800-521-2010 in the U.S.
This equipment has been tested and found to comply with the limits for a Class B digital device, pursuant to Part 15 of the FCC Rules. These limits are designed to provide reasonable protection against harmful interference in a residential installation. This equipment generates, uses and can radiate radio frequency energy and, if not installed and used in accordance with the instructions, may cause harmful interference to radio communications.
Sit-to-Stand™ Activity Walker © 2009 VTech 91-060820-003-006
INTRODUCCIÓN ¡Gracias por comprar Sit-To-Stand™ Activity Walker de VTech®! Estamos comprometidos en ofrecer los mejores juguetes para entretener y educar a su hijo. Con un diseño único, podrá jugar de muchas formas y llegará a ser su juguete preferido. Antes de que pueda empezar a andar, lo podrá usar como un panel de actividades de aprendizaje: música, sonidos, voces, luces...
• Un juguete Sit-To-Stand™ Activity Walker de VTech® • Una base para el andador. • Dos patas. • Una barra. • Un manual de instrucciones. ADVERTENCIA: Todos los materiales de este embalaje, tales como cintas, hojas de plástico, alambres y etiquetas, no son parte de este juguete y deberían ser desechados para la seguridad de su hijo. INSTALACIÓN DE LAS PILAS 1. Asegúrese de que el juguete esté apagado. 2. Localice el compartimento de las pilas en la parte posterior del mismo. 3.
• • • • • • • • Reemplace todas las pilas cada vez que se cambien. No mezcle pilas nuevas y viejas. No utilice pilas de diferentes tipos. Extraiga las pilas cuando no se vaya a utilizar el juguete durante un largo periodo de tiempo. No intente recargar pilas normales. No acerque las pilas al fuego. No se debe provocar cortocircuitos en los bornes de una pila. Las pilas deben ser instaladas por un adulto o bajo su supervisión. Retire las pilas usadas del juguete.
4. Encienda el juguete, ahora debería funcionar. 5. Si el producto sigue sin funcionar, utilice pilas nuevas. Si el problema continúa, por favor, póngase en contacto con su distribuidor local. Es necesario que el montaje de este juguete lo realice un adulto. No es apropiado que los niños participen en él. Asegúrese de que todas las piezas quedan encajadas correctamente. 1. Coloque la base en el suelo. 2. Introduzca las patas siguiendo los dibujos. Asegúrese de que quedan perfectamente fijadas.
Sitting Mode 5. Pa r a d e s m o n t a r e l p a n e l d e actividades, localice las piezas en la parte trasera del juguete, y presione ambas hacia el centro. 6. Retire la barra presionando el botón situado bajo ésta en la parte derecha. Walker Mode Instrucciones de montaje 4. Coloque el panel de actividades en posición vertical para el “modo sentado” o en posición horizontal para el “modo andador”. 7. Desmonte las patas presionando firmemente los botones colocados bajo la base de color.
CARACTERÍSTICAS DEL JUGUETE 2. Desconexión automática: Para preservar la duración de las pilas, la unidad se apagará automáticamente después de unos minutos sin jugar. Para encender de nuevo la unidad, deberá pulsar cualquier tecla. 3. Tres modos de juego: Según la posición del panel, podrá jugar de tres formas diferentes. Sitting Mode Carry-along Mode Características 1. Para encender el juguete, sitúe el botón On/Off/Selector de idioma en la posición inglés (ENG) o español (ESP). Walker Mode 4.
5. Función demo: Antes de comenzar a jugar asegúrese de retirar la tira de plástico situada en la parte posterior del juguete. Mientras permanece inser tada, funciona como DEMO. Please remove this strip. Bitte den Plastikstreifen entfernen. Veuillez retirer cette languette avant utilisation. Por favor, retire la pieza de plástico para jugar. Verwijder deze strip. 1. En el modo sentado y modo panel de actividades, las respuestas y actividades son iguales.
CUIDADO Y MANTENIMIENTO 1. Limpie el juguete con un paño suave ligeramente húmedo. No utilice disolventes ni abrasivos. 2. Manténgalo lejos de la luz directa del sol o de cualquier otra fuente de calor. 3. Quite las pilas cuando el juguete no vaya a ser utilizado durante un largo periodo de tiempo. 4. No deje caer la unidad sobre superficies duras, ni la exponga a la humedad o al agua. 5. No trate de reparar la unidad ni desmontar el producto.
que ninguna interferencia pueda producirse en una instalación en particular. Si este aparato produce interferencias en la recepción de radio o televisión (lo que puede determinarse fácilmente conectando y desconectando el aparato), aconsejamos al consumidor que trate de corregir la interferencia adoptando una o más de las siguientes medidas: - Reorientar la antena receptora. - Cambiar de posición el producto con respecto al aparato receptor. Nota - Separar el producto del aparato receptor.