Precomputer Power Pad Plus TM User’s manual
Dear Parent: At VTech® we know that children have the ability to do great things. That’s why all of our electronic learning products are uniquely designed to develop a child’s mind and allow them to learn to the best of their ability. Whether it’s learning about letters, numbers, geography or algebra, all VTech® learning products incorporate advanced technologies and extensive curriculum to encourage children of all ages to reach their potential.
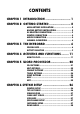
CONTENTS CHAPTER 1 INTRODUCTION ............................ 1 CHAPTER 2 GETTING STARTED ........................ 2 MAIN BATTERY INSTALLATION ............................... 2 BACKUP BATTERY INSTALLATION ........................... 2 AC ADAPTOR CONNECTION ................................... 3 PRINTER CONNECTION ..........................................4 MOUSE CONNECTION ............................................4 GENERAL OPERATION ..........................................4 CHAPTER 3 THE KEYBOARD ......
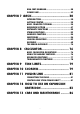
RAM CART MANAGER.......................................... 28 POWER LINK .......................................................29 CHAPTER 7 BASIC.......................................... 30 INTRODUCTION ................................................... 30 GETTING STARTED .............................................. 32 BASIC COMPUTER TUTORIAL................................ 34 REFERENCE SECTION ........................................... 47 ARITHMETIC FUNCTIONS ......................................
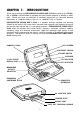
CHAPTER 1: INTRODUCTION Thank you for buying the PRECOMPUTER POWER PAD™ PLUS learning toy by VTECH®. We at VTECH® are committed to providing the best possible products to develop a child’s mind. Should you have any questions or concerns, please call our Consumer Services Department at 1-800-521-2010 in the U.S. or 1-800-267-7377 in Canada.
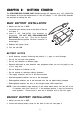
CHAPTER 2: GETTING STARTED The PRECOMPUTER POWER PAD™ PLUS learning unit operates on 4 “AA” (UM-3/LR6) size batteries for the main compartment or a 9V AC adaptor. 2 “AA” (UM-3/LR6) batteries are required to backup the unit. MAIN BATTERY INSTALLATION 1. Make sure the unit is OFF. 2. Locate the main battery cover on the back of the unit and open it. 3. Insert 4 “AA” (UM-3/LR6) size batteries as illustrated. DO NOT USE RECHARGEABLE BATTERIES in this unit.
3. Insert 2 “AA” (UM-3/LR6) size batteries as illustrated. DO NOT USE RECHARGEABLE BATTERIES in this unit. (The use of Rayovac Renewable/Rechargeable Alkaline batteries is encouraged.) 4. Replace the battery cover. 5. Turn the unit ON. NOTE: While replacing the backup batteries, the 4 “AA” size batteries must be kept in the unit or the unit must be connected to the 9V adaptor while the adaptor is plugged in.
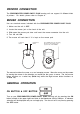
PRINTER CONNECTION The PRECOMPUTER POWER PAD™ PLUS learning unit can support 12 different kinds of printers. For details, please refer to Chapter 6. MOUSE CONNECTION Use our standard mouse, included with the PRECOMPUTER POWER PAD™ PLUS. 1. Make sure the unit is OFF. 2. Locate the mouse jack at the back of the unit. 3. Slide open the mouse port door and insert the mouse connector into the unit. 4. Turn the unit ON. 5. The mouse will work best if it is kept on the mouse pad.
Automatic Shut Off If there is no input into the PRECOMPUTER POWER PAD™ PLUS unit for about 20 minutes, the unit will automatically shut off to save power. To turn the unit back on after an automatic shut off, press the ON button again. We recommend turning the unit OFF when not in use. If the PRECOMPUTER POWER PAD™ PLUS unit is not in use for a long period of time, remove the main compartment batteries or unplug the adaptor.
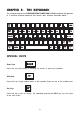
CHAPTER 3: THE KEYBOARD The computer keyboard on PRECOMPUTER POWER PAD™ PLUS combines the operation of a standard computer keyboard with several other functions described below. SPECIAL KEYS Enter Key: Press this key after typing or choosing an answer to input your selection. Shift Key: Press this key to type capital letters or the symbols shown on top of the number keys. Esc Key: Press this key to exit an activity. to the main menu.
Caps Lock Key: Press this key to make all letters appear in upper case. Press this key again to return to normal typing mode. When the Caps Lock function is activated, the Caps Lock light will turn on. Answer Key: Press this key to see the correct answer to any question. Right Player/Left Player Keys: Press these keys with activities featuring a 2-player mode. The first person to hit his or her appropriate left or right player button will get the opportunity to answer the question first.
Hint Key: Press the Shift key and this key simultaneously when inputting text in Trivia activities when you need a hint. You will be given three multiple choice answers to choose from. In Rocket Fuel, you may replay the current stage. Break Key: Press the Shift and Break keys simultaneously when you want to interrupt a program in the BASIC activity while it is running. Alt Key: Press this key and the letter ‘P’ to activate the printing function in the activities.
Backspace Key: Press this key when you want to delete the character before the cursor position. 3, #, and £: Press this key to type the number “3”. Press Shift and this key simultaneously when you want to type the symbol “£”. Press Alt and this key simultaneously when you want to type the symbol “#”. ACTIVITY SELECTOR There are 38 activities in the PRECOMPUTER POWER PAD™ PLUS unit and they are divided into 5 categories. This includes Word Games, Mathematics, Computer Skills, Games and Trivia.
Player Key: Press this key to change from 1-player mode to 2-player mode and vice versa for activities with 2-player mode. If you want to change the player mode, press this key first and then select a player mode by typing the number 1 or 2. If you select the 2-player mode, you will be prompted to enter the names of the first player and second player. Level Key: The unit provides 4 levels of challenge in most of the activities.
CHAPTER 4: ACTIVITIES AND FUNCTIONS HOW TO PLAY SELECTING/CHOOSING/HIGHLIGHTING During the course of entering the activities and during game play, you will be asked to either select, choose or highlight an object, a number, a letter or a word. This can be done in two different ways: Mouse You can move the cursor arrow with the mouse. When the cursor arrow is on the item you want to choose, press the left mouse button, or the Enter key. You may also move the cursor to highlight text.
There are 5 large icons on top of the Main Menu. You can choose from the following: Word Games . , Mathematics , Computer Skills , Games , and Trivia Use 1 of the following 2 ways to enter into one of the five categories: 1. Press any one of the five activity buttons from the Membrane Activity Selector. 2. Choose an activity icon on the screen. After choosing the category (Word Games, Mathematics, etc.), you may select an activity: Choose an activity on the screen.
NOTE: The • • • • • • • • • • • following activities do not feature the two-player mode: Word Puzzles Spy Trap Rocket Fuel Keyboard Skills Typing Challenge Word Processor BASIC Tutor BASIC Design A Card Spell Checker Calculator GENERAL DISPLAY In most of the activities, you will see a display with status information, useful icons and a working area. The status information will include the players’ scores, the number of chances remaining to answer a question, the current level, and the time indicator.
TENSES Two tenses of a verb will appear on the screen. Type in the missing tense (present, past or past participle) of that verb and press the Enter key to confirm your answer. WORD PUZZLES This is a crossword puzzle game with 10 missing words in each puzzle. Use the cursor keys or mouse to select one of the missing words. Press the Enter key to receive a clue for the chosen word. Type in the word for that clue and press the Enter key to confirm your answer.
WORD MAKER The unit will display a prefix or a suffix of a word at the bottom of the screen. Several suffixes/prefixes scroll across the screen above the word. When the correct suffix/prefix is above the word, press the Enter key to input your answer. SENTENCE SCRAMBLER A group of words will appear on the screen. You must rearrange the words to form a correct sentence.
FRACTIONS A fraction will display on the screen. 3 multiple choice options will be given. Decide which option is the correct answer and press its corresponding number or click on the answer with your mouse. FLIP FLOP FRACTIONS An equation which involves turning a fraction into a decimal/percentage will appear on the screen. Type in the answer using the number keys on the keyboard and press the Enter key to confirm your answer.
to type each letter. Each correct letter equals 1 point. After typing 100 letters (50 for the left hand, 50 for the right hand), the score and the rewarding screen will be shown. Expert Course In the expect course, follow the screen and type the given text. After you have completely typed the text, your typing speed and accuracy will appear on the screen. TYPING CHALLENGE This activity helps to improve your keyboarding skills through this exciting typing game.
To create and print a Folded Card : Select Folded Card. Choose a picture to be used in the folded card. Type in your text message. You are allowed up to eight lines of text. Press the Enter key several times. The unit will ask you if you have finished entering your text. Select yes or no. Select Print. SPELL CHECKER Spell Checker is an electronic word list that contains approximately 75,000 words and is used to check the correct spelling of words.
the rules of the game: 1. Press the number key or use your mouse to select the numbers. You may select any number. If all nine of the squares fill up, you will lose a turn. 2. Try to select the numbers so that 2 to 3 continuous numbers that you choose, add up to the number in the middle of the screen. 3. A spy appears in one of the blank squares. Press the Space bar or click on the spy immediately to put the spy in jail. If you don’t catch a spy within 5 seconds, he will disappear. 4.
TRIVIA This challenging trivia game has 1000 questions in 4 different topics: Science, English, Geography and General. All topics are available with a 2-player mode and 4 levels. Once you have selected a topic, a question will appear on the screen. If you know the answer to the question type in your answer and the press the Enter key to input your answer. If you don’t know the answer, you may select 3 multiple choice options by pressing the Hints key.
J=L means the current line is justified left. NB means the current word is not bolded. B means the current word is bolded. CH means which character the cursor is on in a particular line. PLEASE NOTE THAT THE VT-25 THERMAL PRINTER PRINTS 25 CHARACTERS PER LINE ON A STANDARD ROLL OF THERMAL PAPER. YOUR PREPARED TEXT WILL AUTOMATICALLY BE ADJUSTED TO FIT THIS FORMAT WHEN YOU SELECT THE VT25 THERMAL PRINTER IN PRINTER SETUP.
Delete When you no longer need a file, erasing it from the optional RAM cartridge is a good idea because it will free up more space for other files. Select Delete from the File Options and it will prompt you with a list of files in the optional RAM cartridge. Select the file to delete and press the Enter key. A message will appear on the screen asking you to confirm your selection. Be careful when deleting a file because whatever you delete will be gone permanently.
Paste Block After you have used the Block Cut or Block Copy option, move the cursor to the position where you want the block of text to be pasted. Select Paste Block from the EDIT menu and the block of text you defined will be pasted to the new location. Clear Block To erase a block of text, first define the block of text and select Clear Block from the EDIT menu to clear the block. The defined block will be permanently cleared from the document. FORMAT OPTIONS There are four options in the FORMAT menu.
TOOLS OPTIONS The TOOLS menu provides two functions: Check Spelling and Symbols. Check Spelling Spell checker checks a word to see if it is in the unit's dictionary. To check the spelling of a word, highlight a word using your mouse. Then choose Tools Options and select Check Spelling. Press the Enter key. If the word does not exist in the unit’s dictionary, it will give you a list of possible words for reference. Also, you may spell check an entire document. Select Check Spelling from the TOOLS menu.
Printer Setup Printer Setup allows you to select a printer. This can also be done through System Setup. Please see Chapter 6 for details. Print In order to use the print feature, you must connect it to one of the printers compatible to the PRECOMPUTER POWER PAD™ PLUS. Please see the list of printers listed in Chapter 6 under Printer Setup. When this option is selected, the unit will ask you whether to print the text in Single or Double Line Spacing. Select one as you like.
CHAPTER 6: SYSTEM SETUP To enter System Setup, click on the System Setup icon located at the bottom right-hand corner of the screen. The System Setup menu will appear with the following options: Printer Setup, Tips of Today, Screen Saver, Clear Last Score, Icon Box, Quick Menu Setup, Customize Setup, Demo Mode, Ram Cart. Manager and Power Link. PRINTER SETUP Due to the extensive varieties of printers, not all compatible printers are listed.
SCREEN SAVER The unit features a screen saver option. The screen saver will appear after two minutes with no input. You can turn this feature ON or OFF by pressing the Enter key or selecting it with your mouse. CLEAR LAST SCORE The PRECOMPUTER POWER PAD™ PLUS learning unit will store all players’ last scores in memory. This will allow you to check future scores to measure your progress. Select the Clear Last Score option. Last scores cleared will appear on the screen.
Customize Screen The Customized Screen is the screen shown after the opening animation. You may personalize the screen by entering your name and your message. This information will be displayed each time you turn on the PRECOMPUTER POWER PAD™ PLUS learning unit. Also, we have provided three different default messages for you to choose from. To customize your screen, select Customize Screen and press the Enter key. A Customize Screen menu will appear.
List Files When this function is selected, the files stored in the RAM cartridge are listed on the screen. Save File When this function is selected, you will be asked to choose whether to save a BASIC program or a Word Processor file. After you have made your selection, provide a filename for your file. This process allows the BASIC program or Word Processor file to be saved into the RAM cartridge. Load File When this function is selected, the files stored in the RAM cartridge are listed on the screen.
CHAPTER 7: BASIC INTRODUCTION WHAT IS BASIC? BASIC is a computer language. The name BASIC stands for Beginner’s All-purpose Symbolic Instruction Code. It was developed by professors at Dartmouth College in the mid-1960s. It was designed for students who had no previous experience in programming computers.
THE KEYBOARD 1. The numeric (top row) keys are used for entering numbers. The letter keys are used for entering letters. 2. The cursor is the blinking symbol “_” on the display that indicates where the next character that is pressed on the keyboard will be entered in the computer. 3. The SHIFT key is used with another key to enter a character into the computer. For example to enter the “+” character, you must press SHIFT and the key marked “+ =”.
THE LCD SCREEN The PRECOMPUTER POWER PAD™ PLUS learning unit uses a Liquid Crystal Display (LCD) screen. Each line will display 20 characters at a time. The Left Arrow key and Right Arrow key are used to scroll the 20 character display window left or right, respectively. In BASIC, pressing the ENTER key allows you to see the next printed statement that your program is displaying. You need to do this so the output doesn’t scroll off the end of the line.
RUN This command instructs PRECOMPUTER POWER PAD™ PLUS to begin executing each BASIC statement with a line number that was typed into memory. The computer will start with the lowest line number and proceed up to the highest numbered statement. EDIT Use the EDIT command when you want to change a statement that has been typed into memory without re-typing the entire line. Type EDIT and the line number and press the ENTER key. The statement will appear on the display.
BASIC COMPUTER TUTORIAL EXAMPLE OF A BASIC PROGRAM You and Teresa went to the local video store to rent some movies. Teresa brought back 12 but 4 were too scary for you so you returned them. On that trip you came home with 7 new movies. How many are you going to watch this afternoon? You could work this out yourself, but here is a BASIC program that can do the arithmetic for you. Type in: 10 PRINT 12-4+7 press ENTER 20 END press ENTER Now type RUN and press ENTER.
LET’S DO SOME ARITHMETIC In the previous section you learned to program the sum of three numbers using the BASIC program. Numbers like 1, 3, 27, 14.3, etc., are called CONSTANTS, numbers that do not change value. The program added and subtracted the constants 12, 4 and 7. The order that you do addition is unimportant: 6+10 is the same as 10+6. In subtraction, the order is important: 10-6 is not the same as 6-10. So the order that you write numbers and do arithmetic operations is very important.
Type this: 10 PRINT 3+11/7 press ENTER RUN Is it really evaluated from left to right? Yes, but was it the answer you were expecting? If the answer came out to 4.57143, the computer first divided 11 by 7 getting 1.57143 and then it added 3 to the result giving 4.57143. You probably were expecting the answer to be 2 because 3+11 is 14, then divided by 7 is 2. You can see that expressions are not simply evaluated from left to right. It is necessary to have an exact set of rules to follow.
The computer creates a box in memory and calls it “A”. It puts the number 8 in this box. Now type: 20 LET B=10 press ENTER The computer creates a box called “B” and places 10 into it. Type: 30 LET B=15 press ENTER Since there is a box called “B” already with a value of 10 in it, it doesn’t make another box called “B” with a value of 15 in it. The number 10 is just replaced with the number 15. Now type: 40 LET C=A+B press ENTER This statement is a bit more complicated. Here’s how it works.
You will see the following on the screen: FIRST NUMBER 8 press ENTER SECOND NUMBER 15 press ENTER THE SUM IS 23 Let’s take a look at the print statements on lines 50 through 70. The words in quotes are called a STRING or a LITERAL. Whatever you put between a set of quotation marks will appear on the screen exactly the way you typed it. Remember that quotation marks come in pairs! Next, the semicolon tells the print statement to print what is immediately to the right of the end of the string.
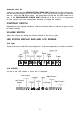
VARIABLE NAMES CONTENTS A 675 B 2.3434 C$ CURTIS A$ ALPHABET SOUP Here’s an example of storing a string variable: 10 LET A$=“ALPHABET SOUP NO 123” You can have a numeric variable called A and a string variable called A$. The $ lets BASIC know how to tell them apart. NOTE: For both numeric and string variables, only the first 2 characters of the variable names are valid. Also, they cannot resemble the name of any command.
50 PRINT “THE ANSWER IS”; N press ENTER RUN The statement at line 10 stores the numeric constant zero into N, a numeric variable. In statement 20 the variable will have a numeric constant,1, added to itself and then the sum of that operation will be stored in place of the value previously stored there. The program in the above example contains a programming construction called a loop. A loop is one or more BASIC statements, usually called a set, that can be executed as many times as you want.