User’s Manual Lightning McQueen™ Digital Camera © Disney/Pixar; Fiat™; Gremlin™; ©Volkswagen AG; Pacer™ Visit disney.
To learn more about VTech® toys, visit www.vtechuk.
Thank you for purchasing the VTech® Lightning McQueen™ Digital Camera! Take photos with Lightning McQueen™ and his friends or add a Cars touch to your movie clips with this sleek, easy to use and durable digital camera! The Lightning McQueen™ Digital Camera includes 256MB of built-in memory and supports both normal SD and SDHC cards (not included) with a capacity of 32MB to 16GB, so even more photos and movies can be stored! The Lightning McQueen™ Digital Camera can be connected to a TV so you can view your
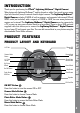
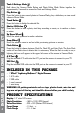
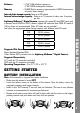
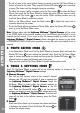
Included In This Package/ Product Specifications 4 Tools & Settings Mode Hold down the Camera Mode Button and Photo Editor Mode Button together for approximately 2 seconds to access the Tools and Settings Mode. Play Button Press this button to view saved photos in Camera Mode, play a slideshow, or view saved videos in Movie Mode. Trash Button Press this button to delete the selected file. Shutter/OK Button Press this button to take a photo, start/stop recording a movie, or to confirm a choice or action.
: 4 “AA” (LR6) alkaline batteries or 4 “AA” NiMH rechargeable batteries Memory : 256MB Built-in memory (approximately 196MB free memory for photo/video storage) Internal photo storage capacity: Store up to 500 photos Internal video storage capacity: Store up to 10 minutes of video, max. 5 minutes per file. Lightning McQueen™ Digital Camera supports both normal SD and SDHC cards with a memory size of 32MB to 16GB. It doesn’t support SD cards less than 32MB. SD cards of 1GB or above are recommended.
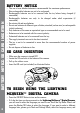
Battery Notice/SD card insertion BATTERY NOTICE 6 • The use of new alkaline batteries is recommended for maximum performance. • Non-rechargeable batteries are not to be recharged. • Rechargeable batteries are to be removed from the toy before being charged (if removable). • Rechargeable batteries are only to be charged under adult supervision (if removable). • Do not mix old and new batteries. • Do not mix batteries of different types: alkaline, standard (carbon-zinc) or rechargeable (nickel-cadmium).
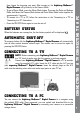
BATTERY STATUS When the batteries are running low, the low battery symbol will be displayed . Automatic Shut-Off To preserve battery life, the Lightning McQueen™ Digital Camera will automatically turn off after several minutes without input. The camera can be turned on again by pressing the ON/OFF Button. Connecting to a TV NOTE: Before connecting your Lightning McQueen™ Digital Camera to a TV, check to make sure that the camera is working properly.
• • • • Locate the USB port on the back of your camera. Pull up the rubber cover. Insert the USB cable (smaller end) into the USB port on the camera. Insert the larger end of the USB cable into a USB port on the computer. A USB port is usually marked with this symbol . MINIMUM SYSTEM REQUIREMENTS FOR PC CONNECTION: Microsoft® Windows® XP, Windows Vista® or Windows® 7 Operating System Mac OS X version 10.5 or 10.
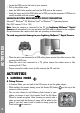
Flash mode Optimum distance for using Auto flash 2.5 – 3.5 feet Flash on 3.5 – 8 feet B. Viewing Photos • To view the photos you’ve taken, press the Play button to enter the Photo Album. Scroll the Up/Down Wheel to view the next or previous picture stored in the album. To return to Camera Mode, press the Shutter/OK button , or the Camera Mode button. C. Slideshow • While in the Photo Album, press the Play button again and it will start to display the photos in a slideshow.
Activities • To add a frame to the movie before starting to record, scroll the Up/Down Wheel to choose a frame for the video. Then, press the Shutter/OK button to start recording a movie. The frame can’t be changed during the recording. • To watch the movies you’ve recorded, press the Play button to enter the Movie Album, then scroll the Up/Down Wheel to choose the movie that you want to watch, and press the Play button to start the movie.
5. Lightning McQueen™ Photo Editor To edit your photos with a computer, there is a VTech® Lightning McQueen™ Photo Editor software package available for both PC and Mac systems. Visit the following website to download the software: www.vtechkids.com/download After you download and install this Photo Editor software on your computer, you can add additional fun photo frames and stamps to your photos, as well as distortion and animation effects.
care & maintenance/ Troubleshooting • 256 MB RAM (512 MB recommended) • 300MB Hard disk space • Mac OS X version 10.5 or 10.6 Internet Connection is required for software download. 12 Microsoft®, Windows® and Windows Vista® are either registered trademarks or trademarks of Microsoft Corporation in the United States and/or other countries. Intel®, Pentium® are trademarks of Intel Corporation in the United States and other countries. Macintosh, Mac and Mac OS are trademarks of Apple Inc.
Check the camera lens protection window is clean. Display on the Lightning McQueen™ Digital Camera LCD does not turn on 1. Make sure there are 4 “AA” batteries in the camera. Hold the ON/OFF button for 2 seconds to turn it on. 2. Make sure the camera is not connected to a TV with the A/V cable. 3. Make sure the camera is not in power saving mode. Press the ON/OFF button for 2 seconds to turn it on. There is no picture on 1.
Disclaimer And Limitation Of Liability 14 SD Card can’t be detected 1. Check if the SD card is correctly inserted. 2. Check if the SD card is less than 32MB in capacity. The Lightning McQueen™ Digital Camera doesn’t support SD cards of less than 32MB. 3. Check to see if it is the correct type of card. The Lightning McQueen™ Digital Camera doesn’t support MMC or other formats. Can’t view the downloaded JPEG file Please check if the downloaded JPEG is Standard Baseline JPEG format.
This equipment has been tested and found to comply with the limits for a Class B digital device, pursuant to Part 15 of the FCC Rules. These limits are designed to provide reasonable protection against harmful interference in a residential installation. This equipment generates, uses and can radiate radio frequency energy and, if not installed and used in accordance with the instructions, may cause harmful interference to radio communications.
Wrist Strap Attachment Instructions Step 1 Locate the thread loop on the end of the strap.