User’s Manual © 2011 VTech® Printed in China 91-002579-003-000
Kidizoom® Spin & Smile CameraTM is a fun, durable, and easy-to-use 2 megapixel digital camera with a twisting lens. You can take photos or movies of your friends, then take fantastic self-portraits. You can also add a range of great photo effects to make your pictures really stand out! The camera features a 4X digital zoom, built-in flash, color screen, 5 great games, dual viewfinders, and a great voice recording feature with 5 different voice changing effects.
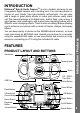
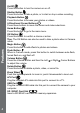
Features 4 On/Off Press this button to turn the camera on or off. Shutter Button Press this button to take a photo, or to start or stop a video recording. Playback Button Press this button to browse your photos or videos. 4-Directional Cursor Buttons Press these buttons to move the cursor and make selections. Home Button Press this button to go to the main menu. OK Button Press this button to confirm a choice or action. Tips: The OK Button can also be used to take a photo when in Camera mode.
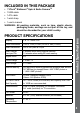
Included In This Package • 1 VTech® Kidizoom® Spin & Smile CameraTM • 1 USB cable • 1 A/V cable • 1 wrist strap • 1 user’s manual WARNING: All packing materials, such as tape, plastic sheets, packaging locks, and tags are not part of this toy, and should be discarded for your child’s safety. Display 1.8” TFT color LCD Photo Resolution 1600 X 1200 (2.0 MP) or 640 X 480 (0.
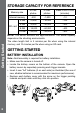
Storage Capacity for reference Memory size 2.0 MP photos 0.3 MP photos Video in 320 X 240 (minutes) Internal memory ~400 ~1,600 ~10 2 GB ~4,000 ~16,000 ~100 4 GB ~8,000 ~32,000 ~200 Getting Started SD card 6 8 GB ~16,000 ~64,000 ~400 16 GB ~32,000 ~128,000 ~800 NOTE: The above amounts are approximations. The actual capacity depends on the shooting environments.
• The use of new alkaline batteries is recommended for maximum performance. • Non-rechargeable batteries are not to be recharged. • Rechargeable batteries are to be removed from the toy before being charged (if removable). • Rechargeable batteries are only to be charged under adult supervision (if removable). • Do not mix old and new batteries. • Do not mix batteries of different types: alkaline, standard (carbon-zinc), or rechargeable (nickel-cadmium).
To Begin Using Kidizoom® Spin & Smile CameraTM To Begin Using Kidizoom® Spin & Smile CameraTM 8 • Press the On/Off Button to turn on the camera. • If it is the first time that you are turning on the camera, the Try-me demo movie will start playing. To exit the Try-me demo mode, press the OK Button . The Try-me demo will be disabled and will not play again on start-up. • After the camera exits demo mode, the language selection screen will appear. To select a language, press the Up or Down Cursor Button.
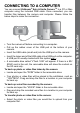
Connecting To A Computer • Turn the camera off before connecting to a computer. • Pull up the rubber cover of the USB port at the bottom of your camera. • Insert the USB cable (small end) into the USB port on the camera. • Insert the larger end of the USB cable into a USB port on the computer. A USB port is usually marked with this symbol . • A removable drive called “VTech 1228” will appear. If there is a SD/ SDHC card in the unit, the removable drive will show the content on the SD card only.
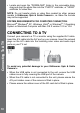
• Locate and open the “DOWNLOAD” folder in the removable drive, drag and drop the photo files into the “PHOTO” subfolder, or “VIDEO” subfolder for video files. NOTE: Do not transfer photo or video files created by other camera models to Kidizoom® Spin & Smile CameraTM, as these file formats may not be supported. SYSTEM REQUIREMENTS FOR COMPUTER CONNECTION: Microsoft® Windows® XP, Windows Vista® or Windows® 7 Operating System or Macintosh Computer with Mac OS X version 10.5 or 10.
Activities Home Menu • Press the Home Button to go to the main menu to select different activities: Camera, Video, Voice Recorder, Games, Extras (Wacky Slide Show, Photo Editor, Voice Photo), and Settings • Press the 4-Directional Cursor Buttons to select different modes and press the OK Button to enter the selected mode. In Camera mode, you can take standard photos, or take photos with stamps, photo frames, funny face effects, kaleidoscope effects, fantasy effects, and all-me effects.
Activities 2. Movies In Movies mode, you can take standard movies, or take movies with funny cartoon animations. • Press the Shutter Button or OK Button to instantly start recording a movie. • Operate the Zoom Wheel anytime to use the digital zoom function. • To select a cartoon theme before recording a movie, press the Left and Right Cursor Buttons or the Magic Button . Press the OK Button to confirm the selection without starting the movie recording.
• To play a movie, press the OK Button . While playing the movie, press the Left or Right Cursor Buttons once to use the fast rewind or forward at 2X speed. Press this button again to change the speed to 4X. Press the Cursor Button again (or the OK Button ) to return to 1X playing speed. • When zoomed in to a photo, press the Cursor Buttons to pan to a different part of the photo. Use the Zoom Wheel to zoom out or press the OK Button to return to standard viewing.
Activities 14 A. Odd One Out Do you want to be a detective? Find the picture that’s different from the others as quickly as you can! The game will ask you to take a picture of yourself or a friend to begin playing. To play, press the 4-Directional Cursor Buttons to select your choice and press the OK Button to answer. Try to find as many as possible in the time available to get a high score. B.
E. Circus Star Help the clown avoid the obstacles so (s)he can reach the goals. The clown will eventually run faster as the levels progress. To play, take a photo of yourself or a friend to become the clown. Then press the Up Cursor Button to jump over obstacles or the Down Cursor Button to slide underneath obstacles. 6. Extras Wacky Slide Show A. In Wacky Slide Show, you can view all photos on the camera as a slide show. All photos to be shown in the slide show will be displayed in descending order.
B. Photo Editor In the Photo Editor, you can add photo frames, stamps, special effects, and fantasy effects to a photo. Press the Up Cursor Button and Down Cursor Button to view photos. Then press the OK Button to confirm your selection and start editing. An editing menu will appear. Press the 4-Directional Cursor Buttons to choose one of the below functions; press the OK Button to begin. Activities Photo Frames Choose this icon to add a photo frame to your photo.
C. Voice Photo In Voice Photo, you can record a voice clip (up to 10 seconds) to a selected photo and play your previously recorded voices. • To select a photo, press the Up or Down Cursor Button. When you can see a Record icon , press the OK Button to start recording voice on the selected photo. • To move the highlight to the Play icon , press the Left or Right Cursor Buttons. To play the voice, press the OK Button .
Activities E. Indoor Light Frequency To select the frequency, use the Up or Down Cursor Buttons to select an option and press the OK Button to confirm. The default frequency is set according to the A.C. frequency of your region. Please leave your camera set to the default value unless you are traveling. F. Date & Time To change the date & time settings in the Set Date & Time menu, press the Up or Down Cursor Buttons. To jump to the next item, press the Left or Right Cursor Buttons.
The VTech® Kidizoom® Photo Editor software package, available for both PC and Mac systems, allows you to edit your photos with a computer. Visit the following website to download the software: http://www.vtechkids.com/download After you download and install this Photo Editor to your computer, you can add additional fun photo frames and stamps to your photos. You will also be able to add distortion effects and view animations of your photos.
Care & Maintenance 1. Keep the camera clean by wiping it with a slightly damp cloth. 2. Keep the camera out of direct sunlight and away from any direct heat source. 3. Remove the batteries when the camera is not in use for an extended period of time. 4. Do not drop the camera on a hard surface. 5. Do not expose the camera to moisture or immerse it in water.
1. Check if the camera is held steadily. 2. Make sure the lighting conditions of the shooting environment are appropriate. 3. Check to see if the camera lens protection window is clean. Display on the Kidizoom® Spin & Smile CameraTM LCD does not turn on 1. Make sure there are 4 “AA” batteries in the camera. Hold the On/Off Button for 2 seconds to turn it on. 2. Make sure the camera is not connected to a TV with the A/V cable.
Troubleshooting Cannot connect to computer Check the connections on the USB cable between the camera and the computer, and review the appropriate connection procedure in this manual. SD Card cannot be detected 1. Check if the SD card is correctly inserted. 2. Check if the SD card is less than 32MB in capacity. The Kidizoom® Spin & Smile CameraTM doesn’t support SD cards less than 32MB. 3. Check to see if the SD card is the supported type. This camera doesn’t support MMC or other formats.
• The name of your product or model number (the model number is typically located on the back or bottom of your product). • The specific problem you are experiencing. • The actions you took right before the problem occurred. Internet: www.vtechkids.com, or www.vtechcanada.com Phone: 1-800-521-2010 in the U.S., or 1-877-352-8697 in Canada. VTech® Electronics North America, L.L.C. and its suppliers assume no responsibility for any damage or loss resulting from the use of this handbook.
Important Note Note: 24 This equipment has been tested and found to comply with the limits for a Class B digital device, pursuant to Part 15 of the FCC Rules. These limits are designed to provide reasonable protection against harmful interference in a residential installation. This equipment generates, uses and can radiate radio frequency energy and, if not installed and used in accordance with the instructions, may cause harmful interference to radio communications.
Are you ready to have fun taking photos? Here are some tips on how to get the best results from your new Kidizoom® camera. Step One First, slide the wrist strap over your hand to help you hold your new Kidizoom® properly. Step Two There are two ways to look at your photo before you take it. You can either use the color LCD screen on the back of your Kidizoom®, or the dual viewfinders above the screen.
Kidizoom® Spin & Smile CameraTM Frequently Asked Questions 26 Kidizoom® Spin & Smile CameraTM Frequently Asked Questions Question 1: I have bought a VTech® Kidizoom® Spin & Smile CameraTM, but it will not work with my PC; my PC is looking for a driver. I have searched the Internet and cannot find a VTech® camera driver. What can I do? Answer: There is no separate driver needed for the Kidizoom® Spin & Smile CameraTM. It uses a standard USB mass storage device driver.
Question 5: Why are my pictures sometimes grainy and fuzzy? Is there anything I can do to improve the picture quality? Answer: In a poorly lit environment, the frame rate (shutter speed) drops to allow for a longer exposure time. The downside of this is that any movement in the frame, or of the hand holding the camera, can result in greater blur. Furthermore, the camera sensor will soften the edges in low light to counteract the darkness by reducing the image noise.
Kidizoom® Spin & Smile CameraTM Frequently Asked Questions 28 Question 8: Will changing batteries erase the unit’s internal memory? Answer: Battery replacement under normal operation as detailed in the user’s manual should not cause data corruption or data loss in either the built-in memory or an SD card. Question 9: When connecting the camera to the USB port, I get the message “USB device not recognized, one of the USB devices attached to this computer has malfunctioned and Windows® does not recognize it.
Wrist Strap Attachment Instructions Step 1: Locate the thread loop on the end of the strap. Insert it into the groove behind the bar and then push it through. Step 2: Feed the end of the strap up through the loop and pull it all the way through. Step 3: Make sure the loop is securely tightened around the bar.