
User`s manual


8
To transfer photo or video les to the camera:
• Select the photo or video les you would like to upload from your
computer rst.
• Locate and open the “DOWNLOAD” folder in the removable drive,
drag and drop the photo les into the “PHOTO” subfolder, or “VIDEO”
subfolder for video les.
Note: Do not transfer photo or video les created by other camera models
to the main unit, these le formats may not be supported.
SYSTEM REQUIREMENTS FOR COMPUTER CONNECTION:
Microsoft
®
Windows
®
XP, Windows Vista
®
or Windows
®
7 Operating System
or Macintosh Computer with Mac OS X version 10.5 or 10.6
Note: Once the camera is connected to your computer, do not disconnect
the camera while les are uploading or downloading. After you have
nished, remove the camera by following the steps to safely remove
hardware from your computer. Then you can physically unplug the unit
from the computer.
To avoid any potential damage to your Kidizoom® Camera:
When the USB cable is not connected to the unit, ensure the USB
rubber cover is fully covering the USB port.
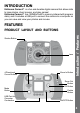
ACTIVITIES
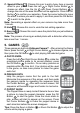
1. CAMERA
• In Camera mode, you can either look through the viewnders or look
at the LCD screen to see the capture subject.
• While holding the camera steady, press the Shutter Button
on the
top of the camera or press the OK Button to take a picture.
• Press the Zoom Buttons
to use the digital zoom feature.
• To add a photo frame, stamp, or special effect to the photo, press the
Left
or Right Cursor Button to scroll through the options. Then
take a photo as usual and the selected frame, stamp, or effect will be
part of the photo.
• To view the photos you’ve taken, press the Up
or Down Cursor
Button once to enter the Playback mode.
2. MOVIES
In Movies mode, you can take digital movies. Press the Shutter Button
or the OK Button to start movie recording; press the button again to
stop the recording. When the movie recording is stopped, press the OK
Button to play the movie you have just recorded:
Activities