
User`s manual


27
Getting started
System setup
Network setup (continued)
If you want to switch from Auto set IP to Set static IP, you have to disable the Auto
set IP setting first.
To disable the Auto set IP:
1. When the deskset is idle, press MENU/SELECT.
2. Press or to scroll to System Setup, then press
MENU/SELECT or /SKIP.
3. Press or to scroll to Network Setup, then press
MENU/SELECT or /SKIP.
4. Press or to scroll to Auto set IP, then press
MENU/SELECT or /SKIP.
5. Press or to scroll to No, then press MENU/SELECT or /SKIP to save the
setting. To exit without making changes, press CANCEL.
To enable the Static IP:
1. When the deskset is idle, press MENU/SELECT.
2. Press or to scroll to System Setup, then press
MENU/SELECT or /SKIP.
3. Press or to scroll to Network Setup, then press
MENU/SELECT or /SKIP.
4. Press or to scroll to Set static IP, then press
MENU/SELECT or /SKIP.
5. The screen displays Enter static IP. Use the dialing keys
to enter a specific IP.
• Press DELETE to delete a digit.
• Press # to add a dot.
• Press /REPEAT or /SKIP to move the cursor to
the left or right.
When entering a specific IP, make sure the IP range is not blocked by the
Ethernet switch or router. If you are installing more than one deskset in the
system, keep the first three sets of digits consistent and the last one different
among different desksets. For example, if you enter 192.168.1.1 as the static
IP of the first deskset, make sure the first three sets of digits are also set as
192.168.1 in other system desksets.
6. Press MENU/SELECT to proceed. The screen displays Subnet mask: XXX.
XXX.X.X. Use the dialing keys to enter a specific subnet mask.
• Press DELETE to delete a digit.
• Press # to add a dot.
• Press /REPEAT or /SKIP to move the cursor to the left or right.
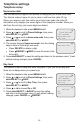
Auto Set IP
Yes
>No
Network Setup
Auto set IP
>Set static IP
Discovery Method
Enter static IP
192.168.1._
<’#’ = Add dot>
Subnet mask:
255.255.0._
<’#’ = Add dot>