
Telephone Owner Manual


Table Of Contents
- About caller ID
- About cordless telephones
- Activate the answering system
- Advanced operation
- Answer an incoming call during an intercom call
- Answering intercom and external calls
- Answering system operation
- Answering system setup
- Base lights
- Basic operation
- Battery
- Belt clip
- Belt clip & headset (optional)
- Call log
- Call waiting
- Chart of characters
- Clear voicemail
- Clock setting
- Commands during playback mode:
- Commands in remote standby mode:
- Conference call
- Contrast
- Delete a directory entry
- Delete all messages
- Delete a redial entry
- Delete one or all entries
- Delete your announcement
- Desk/table bracket installation
- Dial a call log entry
- Dial a directory entry
- Dial from redial
- Dial type
- Directory
- Display menu
- Edit a directory entry
- FCC, ACTA and IC regulations
- Find handset
- Handset and base indicators
- Handset display screen messages
- Handset icons
- Handset indicator lights
- Handset layout
- Handset speakerphone
- Headset
- If you subscribe to DSL service
- Important safety instructions
- Installation
- Install handset battery
- Intercom
- Key tone
- Language
- Maintenance
- Make, answer, and end calls with the handset
- Memo playback
- Message capacity
- Message playback
- Message window
- Mute
- New message indication
- Operating range
- Options during playback
- Outgoing announcement
- Parts checklist
- Play your announcement
- Record a memo
- Record and play memos
- Record your announcement
- Redial list
- Remote access
- Review the call log
- Ringer melody
- Ringer mute
- Ringer volume
- Save an entry to the directory
- Search the directory
- Set base ringer
- Set message alert tone
- Set number of rings
- Set remote access code
- Set the clock
- Settings menu
- Store a directory entry
- Technical specifications
- Telephone base installation
- Telephone base layout
- Telephone settings
- Transfer an external call
- Troubleshooting
- Voicemail
- Voicemail service
- Volume
- Wall mounting bracket installation (optional)
- Wallpaper
- Installation
- Telephone settings
- Basic operation
- Advanced operation
- Answering system operation
- Handset display screen messages
- Handset and base indicators
- Battery
- Important safety instructions
- Troubleshooting
- Operating range
- Maintenance
- About cordless telephones
- Limited Warranty
- FCC, ACTA and IC regulations
- Technical specifications
www.vtechphones.com
2
Installation
Basic operation
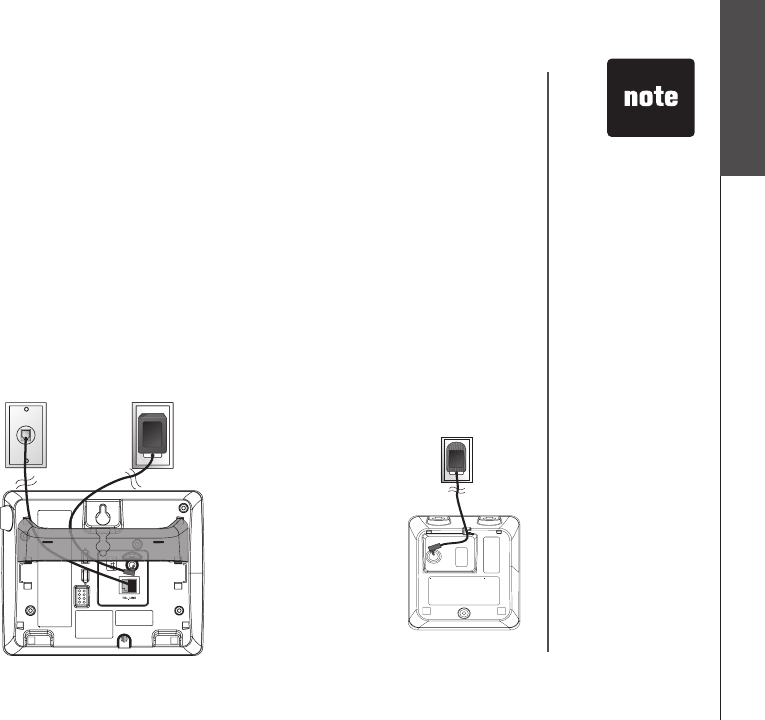
Installation
Telephone base installation
It is recommended to install the telephone base away from any electronic equipment and appliances
such as personal computers, computer routers, television sets, microwave ovens, and refrigerators.
Avoid excessive heat, cold, dust or moisture. When a location is selected, install the telephone base
and the charger as shown below.
• Plug the connector into the power jack at the bottom of the telephone base and chargers. Route cords
through slots and plug the power adapter into an electrical outlet not controlled by a wall switch.
• Plug one end of the telephone line cord into the telephone line jack at the bottom of the telephone
base. Route the telephone line cord through slot, then plug the other end of the cord into the
modular wall telephone outlet.
Your telephone base comes with the bracket installed for desktop use. If you prefer to mount your
telephone on the wall, plug in the telephone line cord and the power adapter to the telephone base as
instructed above before changing it to a wall mount position (see page 7 for bracket installation).
• Use only the AC
power adapter
supplied with this
telephone.
• This power unit
is intended to be
correctly oriented
in a vertical
or oor mount
position. The
prongs are not
designed to hold
the plug in place
if it is plugged
into a ceiling or
an under-the-
table/cabinet
outlet.
Plug the telephone
line cord into a
telephone jack.
Plug power adapter
into an electrical
outlet not controlled
by a wall switch.