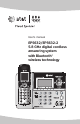
User’s manual EP5632/EP5632-2 5.
Congratulations on your purchase of this AT&T product. Before using this AT&T product, please read the Important safety information on pages 101-103 of this manual. Please thoroughly read this user’s manual for all the feature operations and troubleshooting information necessary to install and operate your new AT&T product. You can also visit our website at www.telephones.att.com or call 1 (800) 222-3111. In Canada dial 1 (866) 288-4268. Model #: EP5632/EP5632-2 Type: 5.
Before you begin you must install and charge the battery, see page 14 for Battery installation instructions. Please read and follow these instructions carefully: • Use only the supplied rechargeable battery or replacement battery. • Observe the proper polarity orientation between the battery and handset during battery installation. • Do not dispose of the battery in a fire. Check with local codes for special disposal instructions. • Do not open or mutilate the battery.
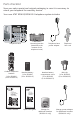
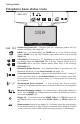
Parts checklist Save your sales receipt and original packaging in case it is necessary to return your telephone for warranty service. Your new AT&T EP5632/EP5632-2 telephone system includes: Cordless telephone handset (1 for EP5632) (2 for EP5632-2) Handset battery (1 for EP5632) (2 for EP5632-2) User’s manual Quick start guide EP5632/EP5632-2 5.8 GHz digital cordless answering system with Bluetooth® wireless technology EP5632/EP5632-2 5.
Table of contents Getting started Intercom calls.................................... 68 Quick reference guide......................2 Handset status icons........................4 Telephone base status icons........5 Handset main menu..........................6 Telephone base main menu..........7 Installation setup................................8 Telephone base installation..........9 Desktop to wallmount installation options......................... 10 Wallmount to desktop installation...................
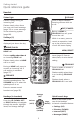
Getting started Quick reference guide Handset VOLUME Status light Press to adjust handset listening volume while on a call. Flashes rapidly during an incoming call. Flashes slowly when there is a new voice mail message (page 33) or a new message in the answering system (page 88). OFF/CANCEL During a HOME or CELLULAR line call, press to end the call. 12:00 AM HANDSET 1 Softkeys (2) Press to select a menu item displayed just above the key.
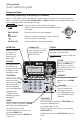
Getting started Quick reference guide Telephone Base Answering system keys and NavKeys (in brackets) When in idle mode, press the answering system keys to operate the answering system. When in a menu, press the UP, DOWN, LEFT or RIGHT NavKeys to navigate through the menus, highlight items, and change settings. PLAY/STOP (DOWN) Press to play or stop playing messages Flashes when there are new answering system messages. SKIP (RIGHT) Press to skip to the next message.
Getting started Handset status icons 1 12:00AM 2 12:00AM HANDSET 1 REDIAL 12:00AM CALLER ID Time - indicates the handset time. New answering system message - alternates with the time when you have a new answering system message. New voice mail message - alternates with the time when you have a new voice mail message. HOME line - on steady when the HOME line is in use. Flashes slowly when a HOME call is on hold. Flashes rapidly when there is an incoming HOME call.
Getting started Telephone base status icons ANS. OFF 1 2 12:00 AM REDIAL ANS. OFF MENU CID Answering system off - indicates that the answering system will not answer incoming calls (page 50). HOME line - on steady when the HOME line is in use. Flashes slowly when a HOME call is on hold. Flashes rapidly when there is an incoming HOME call. 1 2 CELLULAR (cell phones 1 or 2) - depending on which cell phone is active, on steady when the CELLULAR line is in use.
Getting started Handset main menu To enter the main menu: 1. Press MENU/SELECT when the handset is in idle mode. 2. Press the UP and DOWN NavKeys to select a handset feature menu, then press MENU/SELECT to enter that menu. To return to the idle mode, press and hold OFF/CANCEL. Directory allows you to store and search for names and numbers. Directory Directory Settings allows you to change your handset settings.
Getting started Telephone base main menu To enter the main menu: 1. Press the MENU softkey when the telephone base is in idle mode. 2. Press the UP and DOWN NavKeys to highlight a menu item, then press the SELECT softkey to enter that menu. To return to the idle mode, press and hold CANCEL. Main Menu allows you to review and setup features and settings. Bluetooth allows you to set up and manage your Bluetooth device(s).
Getting started Installation setup Install the telephone base close to a telephone jack and a power outlet not controlled by a wall switch. The telephone base can be placed on a flat surface or vertically mounted on the wall (see page 10). For optimum range and better reception, place the telephone base in a central and open location.
Getting started Telephone base installation Install the telephone base as shown below. Make sure that the electrical outlet is not controlled by a wall switch. Also, if you receive high speed Internet through your telephone line (commonly referred to as DSL), install a DSL filter to the telephone line between the telephone base and the telephone wall jack. Contact your DSL service provider for more information about DSL filters.
Getting started Installation options The telephone base comes with the mounting bracket already installed for desktop use. If wall mounting is desired, a telephone outlet wall mounting plate with mounting studs is required. This mounting plate with studs may be available for purchase from any hardware or consumer electronics retailers and may require professional installation.
Getting started Installation options Desktop to wall mount installation (continued) 4. Plug the telephone line cord and power adapter plug into the telephone base and place the cords in the bracket grooves. Bracket grooves Mounting studs 5. Plug the power adapter and telephone line cord into the wall outlets, then align the mounting studs on the telephone outlet plate with the mounting holes on the bracket. Mounting holes 2 6.
Getting started Installation options Wall mount to desktop installation To change the telephone base from the wall mount position to desktop position, make sure that you first unplug the power adapter and telephone line cord from the wall outlets before you begin. 1. Slide the telephone base upwards, then pull the telephone base away from the wall off of the mounting studs. 1 2 Mounting studs 2. Remove the telephone line cord and power adapter plug from the telephone base. Wall mount position 3.
Getting started Installation options Wall mount to desktop installation (continued) 4. Rotate the bracket to the desktop position. Desktop position 5. Insert the center bracket ta b s , t h e n p re s s t h e bracket downwards until the bracket clicks into place. Center tabs 6. Plug the telephone line cord into the telephone base and telephone wall jack, then plug the power adapter plug into the telephone base and to an electrical wall outlet not controlled by a wall switch (see page 9).
Getting started Battery installation & charging 1. Press the tab and slide the battery compartment cover downwards. (if necessary) 80-5808-00-00 BATTERY PACK Install the battery as shown below. After installing the battery, you can make and receive short calls, but replace the handset in the telephone base or charger when not in use. For optimal performance, charge the handset battery for at least 16 hours before use.
Getting started Belt clip & optional headset Install belt clip as shown below, if desired. To attach the belt clip: To remove the belt clip: Snap the belt clip into the retaining tabs on both sides of the handset as shown in the figure. Gently lift either of the belt clip retaining tabs, shown in the figure, outwards to remove the belt clip from the handset. For handsfree headset conversations, use any industry standard 2.5 mm headset (purchased separately). For best results, use an AT&T 2.
Getting started Expanding your telephone system Your new AT&T EP5632/EP5632-2 telephone system can accommodate up to 12 cordless handsets. You can add new handsets (EP562 purchased separately) to your telephone system but each handset must be registered with the same telephone base before use. To register new handsets to your telephone system, see page 17. The EP5632 telephone system comes with one registered handset. The EP5632-2 telephone system comes with two registered handsets.
Getting started Adding new handsets (optional) Your telephone system can accommodate up to 12 handsets (AT&T model EP562, purchased separately). Before using a newly purchased handset, it must first be registered with the telephone base. Register Handset 12:00AM Place in Charger 12:00AM Register handset: Press MENU in the base. Find 'Register Handset' in the main menu. Press SELECT. 12:00AM Registration in progress...
Getting started Spare battery (optional) You can keep a charged spare battery (AT&T model 103, part number 89-0429-00-00, purchased separately) in the telephone base. The spare battery compartment is located on the side of the telephone base. The spare charged battery allows you to quickly replace a low handset battery, or in the event of a power failure, make and receive short calls for up to three hours, depending on the amount of use. To install and charge a spare battery: 1.
Bluetooth Introducing BLUETOOTH Your new AT&T ��������������������������������������������������������� EP5632/EP5632-2 telephone ����������������������������������������� system with Bluetooth wireless technology has the following features: •������������������������������������������������������������������������� Pair up to eight Bluetooth enabled cell phones and/or headsets with the telephone base.
Bluetooth Glossary of terms Below are some terms used in this user’s manual to help you become familiar with using your Bluetooth devices and your new AT&T telephone system. Active Devices list - A maximum of two paired devices (two cellular phones or one cellular phone and one headset) on the Active Devices list�������� can be connected to the telephone base, but only one cellular phone or headset can be on a call at a time. Bluetooth headset - Refers to a Bluetooth enabled headset.
Bluetooth Bluetooth at Glance NOTE: Before using your Bluetooth device(s) with the telephone base, make sure that your Bluetooth device(s) are not connected to any other device(s). The telephone base allows you to pair up to eight Bluetooth devices. You can have a maximum of two paired devices connected at anytime (two cellular phones, or one cellular phone and one headset)������ , but only one cellular phone or headset can be on a call at a time.
Bluetooth Bluetooth Setup NOTE: To learn how to operate your Bluetooth devices with the telephone base, see the Telephone operation section (page 55).
Bluetooth NOTE: If you have a device connected to the telephone base when pairing, Connected devices will be temporarily disconnected will appear on the display.
Bluetooth NOTE: If you have a device connected to the telephone base when pairing, Connected devices will be temporarily disconnected will appear on the display.
Bluetooth Managing your devices NOTE: ��������� To use a paired device, it must be connected and on the Active Devices list (page 27). Paired Devices John's Cell Mary's Cell Mary's Headset RENAME INFO DELETE Once you have paired a Bluetooth device, you can rename, delete, and view the device's information on the Paired Devices list.
Bluetooth Delete a paired device If you already have the maximum of eight paired devices on the Paired Devices list, and you want to add another device, you must delete a paired device from the Paired Devices list.
Bluetooth NOTE: Connected devices appear on the Active Devices list automatically. 12:00 AM REDIAL MENU 1 2 CID Main Menu Call Log Answering System Bluetooth Select Bluetooth Set up Cellular Set up Headset Active Devices Select Active Devices X 1 My Headset 2 John's Cell Active Devices Only devices on the Active Devices list can establish a Bluetooth connection with the telephone base.
Bluetooth Replace an active device Replacing a Bluetooth device on the Active Devices list will replace an active device with a device from the Paired Devices list.
Bluetooth NOTE: ������������ Devices on the Active Device list temporarily disconnect during this process, but automatically reconnect afterwards. It may take up to two minutes to reconnect. Active Devices X 1 My Headset 2 (empty) ADD Add Device Mary's Headset John's Cell select INFO Add an active device If you have only one active device, you can add another paired device to the Active Devices list, however, you can only have one headset on the Active Devices list. To add an active device: 1.
System setup Handset Settings Settings In the handset Settings menu, you can change and edit the handset settings. You can also clear the voice mail indication, delete a handset registration, or restore the default settings. To enter the Settings menu: 1. Press MENU/SELECT in idle mode to enter the main menu. 2. Press the UP or DOWN NavKeys to select Settings, then press MENU/SELECT to enter the Settings menu.
System setup Set Time Settings Set Time Edit Handset Name Show Handset Name If you subscribe to the caller ID service provided by your local telephone company (see page 76), the time will automatically be set with an incoming HOME call. Keypad Tone To manually set the time: Language 1. Press MENU/SELECT in idle mode to enter the main menu. 2. Press the UP or DOWN NavKeys to select Settings, then press MENU/SELECT to enter the Settings menu. 3. Press MENU/SELECT to select Set Time. 4.
System setup Show Handset Name By default, the handset name is shown on the display when in idle mode. Settings To change this setting: Set Time Edit ShowHandset HandsetName Name Show Handset Name Keypad Tone Language 1. Press MENU/SELECT in idle mode to enter the main menu. 2. Press the UP or DOWN NavKeys to select Settings, then press MENU/SELECT to enter the Settings menu. 3. Press the UP and DOWN NavKeys to highlight Show Handset Name, then press MENU/SELECT. 4.
System setup Settings Edit Handset Name Show Handset Name Keypad Tone Language LCD Contrast LCD Contrast SET HANDSET 1 New Voice Mail REDIAL CALLER ID LCD Contrast You can adjust the handset LCD screen contrast to suit different lighting conditions. To adjust the LCD contrast: 1. Press MENU/SELECT in idle mode to enter the main menu. 2. Press the UP or DOWN NavKeys to select Settings, then press MENU/SELECT to enter the Settings menu. 3.
System setup Default Settings (restore settings) You can restore the factory-set default settings for all handset settings. Restoring the default settings for a handset only affects that handset. To restore the default settings: Settings Keypad Tone Language LCD Contrast Clear Voice Mail Default Settings Restore Default Settings? 1. Press MENU/SELECT in idle mode to enter the main menu. 2. Press the UP and DOWN Navkeys to select Settings, then press MENU/SELECT to enter the Settings menu. 3.
System setup Handset Ringers Ringers In the handset Ringers menu, you can select a ringer melody and adjust the ringer volume for incoming calls to the HOME and CELLULAR lines (pages 36 and 37). You can also record your own ringer through the handset microphone (page 38). To enter the Ringers menu: 1. Press MENU/SELECT in idle mode to enter the main menu. 2. Press the UP and DOWN Navkeys to select Ringers, then press MENU/SELECT to enter the Ringers menu.
System setup NOTE: Even if the ringer volume is off, the telephone base or handset will ring at the lowest volume setting during an incoming intercom call. Ringers Ringer for HOME Ringer for CELL 1 Ringer for CELL 2 Record New Ringer Ringer Volume SET OFF To adjust the handset ringer volume: 1. Press MENU/SELECT in idle mode to enter the main menu. 2. Press the UP and DOWN Navkeys to select Ringers, then press MENU/SELECT to enter the Ringers menu. 3.
System setup NOTE: Selecting, recording, or deleting a ringer melody on one handset does not affect the other handset(s) in the system. Ringer for HOME Ringer Volume Ringer Melody Ringer Melody Melody 1 Melody 2 Melody 3 Melody 4 SET DELETE Ringer Melody Delete Ringer? Ringer Melody You can select from the traditional ringers and musical polyphonic ringer melodies on each handset. Select a ringer melody 1. Press MENU/SELECT in idle mode to enter the main menu. 2.
System setup NOTE: For optimal recording, place the handset microphone nine inches away from the source that you wish to record. Ringers Ringer for HOME Ringer for CELL 1 Ringer for CELL 2 Record New Ringer Record New Ringer Press RECORD to start recording Remaining record time 0:14 RECORD Record New Ringer Recording... STOP Record New Ringer Recording Complete Press SAVE to save recording or PLAY to review SAVE PLAY Record New Ringer Each recordable ringer can be up to 14 seconds.
System setup Handset Pictures Pictures In the handset Pictures menu, you can select a background image for a handset screen. These images can also be programmed for individual callers in the directory so that different images will show when different callers phone in (see page 71). To enter the Pictures menu: 1. Press MENU/SELECT in idle mode to enter the main menu. 2. Press the UP and DOWN NavKeys to select Pictures, then press MENU/SELECT to enter the Pictures menu.
System setup Handset Animations Animations In the handset Animations menu, you can select an animation for a handset screen. These animations can also be programmed for individual callers in the directory so that different animations will show when different callers phone in (see page 71). To enter the Animations menu: 1. Press MENU/SELECT in idle mode to enter the main menu. 2. Press the UP and DOWN NavKeys to select Animations, then press MENU/SELECT to enter the Animations menu.
System setup Telephone base Settings In the Settings menu of the telephone base, you can set the date, the time, keypad tone, language, and LCD contrast. You can also clear the voice mail indication, restore the default settings, and delete handset registrations. To enter the Settings menu: 12:00 AM REDIAL MENU CID Main Menu Answering system Bluetooth Settings Select 1. Press the MENU softkey in idle mode to enter the main menu. 2.
System setup Set Date If you subscribe to caller ID service provided by your local telephone company (see page 76), the time and date will automatically be set with an incoming HOME call. To manually set the date: Settings Set Date Set Time Keypad Tone Select Set Date YYYY/MM/DD 2007/01/01 SET info 1. Press the MENU softkey in idle mode to enter the main menu. 2. Press the UP and DOWN NavKeys to select Settings, then press the SELECT softkey to enter the Settings menu. 3.
System setup Keypad Tone By default, the telephone base will beep when you press a key. You can turn these keypad tones on or off: Settings Set Date Set Time Keypad Tone Select Keypad Tone On Off Set Settings Set Time Keypad Tone Language SELECT Language English Español Français Set To change the keypad tone setting: 1. Press the MENU softkey in idle mode to enter the main menu. 2. Press the UP and DOWN NavKeys to select Settings, then press the SELECT softkey to enter the Settings menu. 3.
System setup LCD Contrast You can adjust the telephone base LCD screen contrast to an appropriate level to suit the different lighting conditions. To adjust the LCD contrast: Settings Keypad Tone Language LCD Contrast 1. Press the MENU softkey in idle mode to enter the main menu. 2. Press the UP and DOWN NavKeys to select Settings, then press the SELECT softkey to enter the Settings menu. 3. Press the UP and DOWN NavKeys to highlight LCD Contrast, then press the SELECT softkey. 4.
System setup Default Settings (restore settings) You can restore the factory-set default settings of the telephone base if desired. Restoring the default settings only affects the telephone base. To restore default settings: Settings LCD Contrast Clear Voice Mail Default Settings SElect Default Settings Restore Default Settings? YES No 1. Press the MENU softkey in idle mode to enter the main menu. 2.
System setup Telephone base Ringers In the telephone base Ringers menu, you can select a ringer melody and adjust the ringer volume for incoming calls to the HOME and CELLULAR lines. Main Menu Bluetooth Settings Ringers Select Ringers Ringer for HOME Ringer for CELL1 Ringer for CELL2 Select To enter the Ringers menu: 1. Press the MENU softkey in idle mode to enter the main menu. 2. Press the UP and DOWN NavKeys to select Ringers, then press the SELECT softkey to enter the Ringers menu.
System setup NOTE: Even if the ringer volume is off, the telephone base or handset will ring at the lowest volume setting during an incoming intercom call. Ringers Ringer for HOME Ringer for CELL1 Ringer for CELL2 Select Ringer for HOME Ringer Volume Ringer Melody Select Ringer Volume SET OFF To adjust the telephone base ringer volume: 1. Press the MENU softkey in idle mode to enter the main menu. 2.
System setup Ringer Melody You can select from eight traditional ringer melodies on the telephone base. To select a ringer melody: Ringers Ringer for HOME Ringer for CELL1 Ringer for CELL2 Select Ringer for HOME Ringer Volume Ringer Melody Select Ringer Melody Melody 1 Melody 2 Melody 3 Set 1. Press the MENU softkey in idle mode to enter the main menu. 2. Press the UP and DOWN NavKeys to select Ringers, then press the SELECT softkey to enter the Ringers menu. 3.
System setup Answering System settings In the Answering System menu, you can set the answering system on or off, change the outgoing announcement, remote access code, the number of rings, and the answering system message alert tone. The answering system only answers incoming HOME line calls.
System setup Main Menu Directory Call Log Answering System Select Answering System Answer On/Off Announcement Record Memo select Answer On/Off On Off Set Answer On/Off By default, the answering system is on. When the answering system is off, ANS. OFF appears on the telephone base display. This means that incoming calls will not be answered by the answering system. However when the answering system is off, you can still play recorded messages (page 88) or record a memo (page 91).
System setup Announcement The announcement is the message that callers hear when the answering system answers an incoming HOME call. Main Menu Directory Call Log Answering System Select Answering System Answer On/Off Announcement Record Memo Select Announcement Review Annc. Record Annc. Delete Annc. Select NOTE: For optimal audio quality when recording an announcement, speak facing the microphone from approximately nine inches away from the telephone base.
System setup Number of Rings By default, the answering system answers an incoming HOME call after four rings. You can set the answering system to answer an incoming HOME call after two, four, or six rings. You can also select Toll Saver (see below).
System setup Call Screening By default, Call Screening is on. Call Screening allows you to listen to a caller leaving a message on the answering system. Answering System Record Memo Number of Rings Call Screening Select Call Screening On Off Set To change this feature's setting: 1. Press the MENU softkey on the telephone base to enter the main menu. 2. Press the UP and DOWN NavKeys to highlight Answering System, then press the SELECT softkey to enter the Answering System menu. 3.
System setup Msg Alert Tone By default, Msg Alert Tone is off. When the message alert tone and the answering system is on, the telephone base will beep every 10 seconds when you have a new message on the answering system. Answering System Call Screening Remote Code Msg Alert Tone Select Msg Alert Tone On Off Set To change this setting: 1. Press the MENU softkey on the telephone base to enter the main menu. 2.
Telephone operations NOTES: • ����������������� You can only use one Bluetooth device on a call at a time, either one cellular phone on the CELLULAR line or one headset on the HOME line (page 56). • Pre-dial mode - When the handset or telephone base is in idle mode, enter the telephone number before pressing HEADSET, HOME, CELLULAR or SPEAKER (handset only) button�.
Telephone operations NOTE: To erase the last digit entered when entering a telephone number (pre-dial mode), press OFF/CANCEL on the handset or CANCEL on the telephone base. Make a HOME call You can make HOME calls using a handset and telephone base. You can also use a wireless Bluetooth-enabled headset on HOME calls. Using a handset To make a HOME call: • Enter the telephone number (pre-dial mode), then press HOME/FLASH or SPEAKER. –OR– • Press HOME/FLASH or enter the telephone number.
Telephone operations Receive a HOME call You can receive HOME calls using a handset or on the telephone base. You can also use a wireless Bluetooth-enabled headset on HOME calls. Using a handset To receive an incoming HOME call: • Press HOME/FLASH or SPEAKER. To end a HOME call: • Press the OFF/CANCEL or return the handset to the telephone base or charger. Using the telephone base To receive an incoming HOME call: • Press HOME. To end a HOME call: • Press HOME.
Telephone operations NOTE: To use the CELLULAR line, make sure that a Bluetoothenabled cellular phone is connected to the telephone base and on the Active Devices list (page 27). Cellular 1 John's Cell 2 Mary's Cell SELECT INFO Make a CELLULAR call You can connect a maximum of two Bluetoothenabled cellular phones to the telephone base, but only one cellular phone can be used on a CELLULAR call at a time (see page 19).
Telephone operations Receive a CELLULAR call You can receive CELLULAR calls using a handset or the telephone base. Using a handset To receive a CELLULAR call: • Press CELLULAR or SPEAKER. To end a CELLULAR call: • Press OFF/CANCEL or return the handset in the telephone base or charger cradle. Using the telephone base To receive a CELLULAR call: • Press CELLULAR. To end a CELLULAR call: • Press CELLULAR.
Telephone operations To place a CELLULAR call waiting call on hold: Call options Hold Cell call Swap Cell call Back 1 Press the OPTIONS softkey on the handset or telephone base. 2. Press the UP and DOWN Navkeys to highlight Hold cell call. 3. Press MENU/SELECT on the handset or the SELECT softkey on the telephone base. This places your current cellular call on hold. To retrieve your cellular call on hold: • Press CELLULAR.
Telephone operations Adjusting the listening volume You can choose the appropriate listening volume levels on the handset and the telephone base. For both the HOME and CELLULAR lines, each time a volume button is pressed, the listening volume is adjusted by one level. When you are at the highest and lowest volume levels, you will hear a tone. To adjust the listening volume while on a call: Using a handset • Press VOLUME on the side of the handset.
Telephone operations Mute While on a HOME or CELLULAR line call, you can mute the microphone. This allows you to hear the caller, but the caller will not be able to hear you. To mute a call on a handset or telephone base: • Press the MUTE softkey to silence the microphone. MICROPHONE MUTED will appear on the display. To unmute a call on a handset or telephone base: • Press the UNMUTE softkey to unmute the microphone and resume the conversation.
Telephone operations NOTE: If you have voice mail service active on your cellular phone, and you do not answer the incoming CELLULAR call, the call will be answered by your cellular phone's voice mail. Contact your cellular service provider for more information about voice mail service. Receive a CELLULAR call while on a HOME call While on a HOME call and there is an incoming 1 or CELLULAR call, CELLULAR, and 2 will flash on the handset and telephone base display and you will hear a short beep.
Telephone operations NOTE: If the answering system is on and you do not answer an incoming HOME call while on the CELLULAR line, the incoming HOME line call will be answered by the answering system. Receive a HOME call while on a CELLULAR call While on a CELLULAR call and there is an incoming HOME call, HOME and the status icon will flash on the handset and telephone base display and you will hear a short beep. To answer the incoming HOME call: HOME on the handset or telephone • Press base.
Telephone operations Conferencing HOME and CELLULAR calls While you are on a HOME or CELLULAR call, and the other line is on hold or in use, you can conference the lines using a handset or telephone base. When conferenced, you can end the HOME, CELLULAR, or conference call separately. NOTE: The OPTIONS softkey is available when there are calls on both HOME and CELLULAR lines To conference both HOME and CELLULAR calls: 1. Press the OPTIONS softkey on the handset or telephone base. 2.
Telephone operations Call waiting while on a conference call If you subscribe to call waiting service and you receive an incoming HOME call while on a conference call, you can answer the call waiting call. To answer the call waiting HOME call: • Press HOME/FLASH on the handset. –OR– • Press FLASH on the telephone base. The call waiting HOME call will now join the conference call with the CELLULAR call. If you receive an incoming CELLULAR call while on a conference call, you can answer the call waiting call.
Telephone operations To end a conference call: • Press OFF/CANCEL on the handset or return the handset to the telephone base or charger. • Press HOME or CELLULAR on the telephone base –OR– • Use the End Conf. call option.
Telephone operations Intercom Intercom The intercom feature allows you to intercom between handset(s) and the telephone base. To enter the Intercom menu: Using a handset 1. Press MENU/SELECT when the handset is in idle mode. 2. Press the UP and DOWN NavKeys to select Intercom, then press MENU/SELECT to enter the Intercom menu. NOTES: • When in idle mode, you can press the LEFT NavKey to quick launch the Intercom menu on the handset.
Directory Directory Directory In the Directory menu, you can store and search for names and numbers. Directory entries are stored separately on each handset and the telephone base. The directory can store up to 100 entries, with a maximum of 16 alphanumeric characters (including spaces) and 32 digits for each entry. The directory also allows you to assign a unique ringer, picture, or animation for specific callers (page 71), if you subscribe to caller ID service provided by your local telephone company.
Directory NOTES: • • Press CANCEL/OFF at anytime to discard any changes and return to the Directory menu. While creating or editing an entry, if no keys are pressed within 60 seconds, changes will be discarded, and the display will timeout and return to idle screen. Directory Enter Name C DONE ERASE NOTE: The cursor moves to the right automatically after two seconds. It also moves to the right when you press another dial pad key or press the RIGHT NavKey.
Directory Creating a new directory entry (continued) Directory Enter Number 8 DONE ERASE Directory Charlie Johnson 8888832445 Ringer: Freedom Picture: SAVE ERASE NOTE: �������� You can choose from 26 pictures and backgrounds and 5 animations. 4. Press the DONE softkey or MENU/SELECT to store the name. 5. Enter the telephone number (up to 32 digits) by using the dial pad keys (0-9). • Press the ERASE softkey to backspace and delete a highlighted digit.
Directory Creating a new directory entry (continued) NOTES: • Press CANCEL at anytime to discard any changes and return to the Directory menu. • While creating or editing an entry, if no keys are pressed within 60 seconds, changes will be discarded, and the display will timeout and return to the idle screen. Using the telephone base 1. Press the MENU softkey when the telephone base is in idle mode. 2. Press the SELECT softkey to enter the Directory menu. 3.
Directory Searching for directory entries To search for directory entries on a handset or the telephone base, enter the Directory menu, then: NOTES: • Directory entries are stored in alphabetical order by the first letter in the first name. • If there is no name entry matching your search, the next closest matching entry will appear on the display in alphabetical order. • Press the UP and DOWN NavKeys to scroll through the entries in alphabetical order.
Directory Searching for directory entries (continued) • AM in the Search for screen, and then press the DONE softkey, Amy will be highlighted. • J in the Search for screen, then press the DONE softkey, and Jenny will be highlighted. NOTES: • • Press CANCEL/OFF on the handset or CANCEL on the telephone base at anytime to discard any changes and return to the Directory menu.
Directory Deleting directory entries NOTES: • • Once a directory entry is deleted, it cannot be recovered. Deleting a directory entry on one handset or on the telephone base does not affect the directories on other handsets or the telephone base. You can delete a selected directory entry or the entire directory for that handset or telephone base. Delete one directory entry 1. Enter the Directory menu from a handset or the telephone base (see page 69). 2.
Call log Information about caller ID with call waiting Your new AT&T EP5632/EP5632-2 telephone system supports caller ID services provided by most local telephone service companies. Depending on your service subscription, you may see the caller’s number, or the caller’s name and number which are sent by the telephone company after the first or second ring. Caller ID allows you to see the name, number, date and time of the incoming callers on the HOME and CELLULAR lines.
Call log Call Log In the Call Log menu, you can review a list of the 100 most recent incoming calls. Each handset and the telephone base have their own unique Call Log, meaning that the call log on one handset may be different from the call log on another handset or the telephone base. Call Log Call Log To enter the Call Log menu: Using a handset 12:00 AM HANDSET 1 26 Missed Calls REDIAL CALLER ID • Press the CALLER ID softkey when the handset is in idle mode.
Call log Call Log information If you subscribe to caller ID services, provided by your local telephone company and/or cellular service provider, the Call Log records your incoming calls for both the HOME and CELLULAR lines. NOTE: If a Bluetooth cellular device is deleted from the Paired Devices list and that device name was included in a call log entry, CELLULAR will appear as the name in the call log entry, instead of the device name.
Call log Reviewing the Call Log In the Call Log, you may see the following status icons: • NEW - indicates that the entry is new and has not been reviewed. • - indicates that a caller from HOME line recorded a message on the answering system. Call Log NEW Charlie Johnson 1-888-883-2445 Jul 4 12:01 AM HOME OPTIONS DELETE NOTE: When you have new unreviewed calls, XX Missed Calls will appear on the display. • CW - indicates the call was a call waiting call. To review the Call Log: 1.
Call log Dialing a call log entry (Display Dial) In the Call Log, you can dial a call log entry telephone number on either the HOME or CELLULAR line. To dial the call log entry telephone number: 1. Enter the Call Log menu (see page 77). 2. Press the UP and DOWN NavKeys to select the desired entry. 3. Press HOME/FLASH or SPEAKER on the handset, or HOME or HEADSET on the telephone base. –OR– Press CELLULAR on the handset or on the telephone base.
Call log Saving call log entries into the Directory When viewing a call log entry, you can save the entry into the Directory. To save an entry into the Directory: 1. Enter the Call Log menu (page 77). 2. Press the UP and DOWN NavKeys to select an entry to save to the Directory, then press the OPTIONS softkey. 3. Press the UP and DOWN NavKeys to highlight Save to Directory. Using the handset • Press MENU/SELECT to enter the directory editing menu (see step 7 on page 71).
Call log NOTES: • �������� See the Answering system operations section for more information on how to operate the answering system features (page 88). • ���������������� By default, the handset will use the speakerphone to play back messages. To switch to the earpiece, press SPEAKER. Play recorded messages in the Call Log When a caller records a message on the answering system, the recorded message icon appears on the call log entry icon status bar.
Call log Clear Missed Calls You can clear the missed calls indication using the call log option on the handset or telephone base. Missed calls refers to unreviewed calls in the Call Log. To clear the missed calls indication: 1. Enter the Call Log menu (see page 77). 2. Press the OPTIONS softkey. 3. Press the UP and DOWN NavKeys to select Clear Missed Calls (displays when there are unreviewed calls in the Call Log), then press MENU/SELECT on the handset or press the SELECT softkey on the telephone base.
Redial list Redial list 12:00 AM HANDSET 1 The Redial list stores up to 20 entries on the handset and telephone base. The first item on the Redial list is the most recent telephone number called. On the Redial list, you can dial an entry on either the HOME or CELLULAR line, save an entry into the Directory, or delete entries. To enter the Redial menu: REDIAL CALLER ID 12:00 AM REDIAL MENU CID 1. Press the REDIAL softkey when the handset or telephone base is in idle mode. 2.
Redial list Saving redial entries into the Directory From the Redial list, you can save the telephone number into the Directory on a handset or the telephone base. To save an entry into the Directory: 1. Press the REDIAL softkey when the handset or telephone base is in idle mode. 2. Press the UP and DOWN NavKeys to select an entry to save to the Directory, then press the SAVE softkey. You will then be prompted to enter a name. 3. Enter the name (up to 16 characters) by using the dial pad keys (0-9).
Redial list Dialing a redial entry From the Redial list, you can dial a redial entry telephone number using the HOME or CELLULAR line. To redial an entry: 1. Press the REDIAL softkey when the handset or telephone base is in idle mode. 2. Press the UP and DOWN Navkeys to select a redial entry. 3. Press HOME/FLASH or SPEAKER on the handset, or HOME (HEADSET if available) on the telephone base. –OR– Press CELLULAR on the handset or on the telephone base.
Redial list Deleting redial entries From the Redial list, you can delete one entry or all of the entries at the same time. To delete entries from the Redial list: NOTE: If you select Delete All Entries, Delete all Redial numbers? will appear on the display. Press the YES softkey to delete all entries. 1. Press the REDIAL softkey when the handset or telephone base is in idle mode. 2. Press the UP and DOWN NavKeys to select a redial entry, then press the DELETE softkey. 3.
Answering system operations Answering system operations HANDSET 1 New Message REDIAL CALLER ID Messages The answering system can record up to 99 messages, or a total of 15 minutes. The answering system only answers calls on the HOME line. When there are new messages (including memos) on the answering system, the PLAY/STOP light on the telephone base will flash, and the telephone base display will indicate the number of new messages.
Answering system operations Message announcements Before playing each message, the answering system announces the date and time that the message was received. The system will announce "Date and time not set" if the clock is not set. To manually set the time and day, see page 42. If you have new messages, the system will announce the number of new messages and play the oldest message first. If you only have old messages, the system will announce the number of old messages and play the oldest message first.
Answering system operations Options during playback (continued) When playing messages using the telephone base: • Press the VOLUME button to adjust the playback volume. • Press SKIP to skip to the next message. • Press RPT to repeat the message currently playing. Press twice to listen to the previous message. • Press DELETE to delete the message currently being played back. • Press PLAY/STOP to stop the playback. To delete all messages You can only delete reviewed messages.
Answering system operations Call intercept If a caller is leaving a message on the answering system, you can intercept the call by pressing HOME/FLASH or SPEAKER on the handset, or HOME or HEADSET (if available) on the telephone base. Record Memo Memos are your own recorded messages used as a reminder to yourself or for others in the household using the same answering system. They are saved, played back and deleted exactly like other answering system messages.
Answering system operations NOTES: • • If you pause for more than five seconds during remote access, "Press five for help" will be announced three times. If no commands are entered, the call will end automatically. If memory is full, the system will answer after 10 rings, and announce "Press five for help" three times. Enter your remote access code to enter the remote access mode.
Appendix Alert tones Beep Beep Handset and telephone base alert tones Beep-Beep-Beep (three quick beeps) Handset battery is low. Place handset in telephone base or charger to charge the battery. Confirmation tone Handset registration or programming command successfully completed. Out of Range tone The handset is out of range. Move it closer to the base. Beeeeeeeeep (long beep) Error tone (current operation has been unsuccessful; try again).
Appendix Troubleshooting If you have difficulty with your telephone system, please try the suggestions below. For Customer Service, visit our website at www.telephones.att.com, or call 1 (800) 222–3111 . In Canada, dial 1 (866) 288-4268 . I cannot pair my cell phone to the telephone base. • Make sure the Bluetooth function of your cellular phone is turned on. See your cell phone user's manual for more information.
Appendix I cannot put my headset in discoverable mode. • Refer to your headset user's manual for information on how to set your headset in discoverable mode. For many headsets, they are by default in discoverable mode. For other headsets, you may have to turn on the headset and press and hold the call button for a certain time period. • Make sure that the headset is not connected to any other device(s) in order to successfully pair and connect to the telephone base.
Appendix Bluetooth System Busy appears on the display. • Make sure that your cellular phone is in idle mode when connected and on the Active Devices list. • Make sure that your cellular phone or headset is not connected to any other Bluetooth device. • The EP5632/EP5632-2 can only use one Bluetooth device at a time. The PIN on the telephone base does not work. • The default PIN is 0000. I cannot hear any sound on my telephone system when on a CELLULAR call. • Reset the telephone base.
Appendix The battery does not charge in the handset -ORLow Battery is constantly displayed on the handset. • Make sure the handset is placed in the charger correctly. The CHARGE light on the charger should be on. • If the cordless handset is in the charger or in the telephone base but the CHARGE light is not on, refer to The CHARGE light is off on page 99. • Remove the battery from the handset and install it in the spare battery compartment on the side of the telephone base and let it charge for 16 hours.
Appendix I cannot dial out. • Make sure there is a dial tone before dialing on the HOME line. It is normal if the cordless handset takes a second or two to synchronize with the telephone before producing a dial tone. Wait an extra second before dialing. • If the other telephones in your home are having the same problem, the problem is in the wiring or local service. Contact your local telephone company (charges may apply). • Eliminate any background noise.
Appendix The CHARGE light is off. • Clean the charging contacts on the cordless handset(s) and telephone base each month using a pencil eraser or a dry non-abrasive fabric. • Make sure the power adapter and telephone line cords are plugged in correctly and securely. • Unplug the power adapter. Wait for 15 seconds before plugging it back in. Allow up to one minute for the cordless handset and telephone base to reset. • The telephone might be malfunctioning.
Appendix The announcement message is not clear. • When recording the announcement, make sure you speak in a normal tone of voice about nine inches from the telephone base. The answering system does not record message. • Make sure the answering system is on. The messages on the answering system are incomplete. • If a caller leaves a very long message, part of it may be lost when the system disconnects the call after four minutes.
Appendix Important safety information This symbol is to alert you to important operating or servicing instructions that may appear in this user’s manual. Always follow basic safety precautions when using this product to reduce the risk of injury, fire, or electric shock. Safety information • Read and understand all instructions in the user’s manual. Observe all markings on the product. • Avoid using a telephone during a thunderstorm. There may be a slight chance of electric shock from lightning.
Appendix Important safety information Especially about cordless telephones • Privacy: The same features that make a cordless telephone convenient create some limitations. Telephone calls are transmitted between the telephone base and the handset by radio waves, so there is a possibility that your cordless telephone conversations could be intercepted by radio receiving equipment within range of the cordless handset.
Appendix Important safety information Precautions for users of implanted cardiac pacemakers Cardiac pacemakers (applies only to digital cordless telephones): Wireless Technology Research, LLC (WTR), an independent research entity, led a multidisciplinary evaluation of the interference between portable wireless telephones and implanted cardiac pacemakers. Supported by the U.S.
Appendix FCC Part 68 and ACTA This equipment complies with Part 68 of the FCC rules and with technical requirements adopted by the Administrative Council for Terminal Attachments (ACTA). The label on the back or bottom of this equipment contains, among other things, a product identifier in the format US: AAAEQ##TXXXX. This identifier must be provided to your local telephone company upon request.
Appendix FCC Part 68 and ACTA If this product has memory dialing locations, you may choose to store emergency telephone numbers (e.g., police, fire, medical) in these locations. If you do store or test emergency numbers, please: • Remain on the line and briefly explain the reason for the call before hanging up. • Perform such activities in off-peak hours, such as early morning or late evening.
Appendix FCC Part 15 This equipment has been tested and found to comply with the requirements for a Class B digital device under Part 15 of the Federal Communications Commission (FCC) rules. These requirements are intended to provide reasonable protection against harmful interference in a residential installation. This equipment generates, uses and can radiate radio frequency energy and, if not installed and used in accordance with the instructions, may cause harmful interference to radio communications.
Appendix Limited warranty The AT&T brand is used under license - any repair, replacement or warranty service, and all questions about this product should be directed to: In the United States of America, call 1 (800) 222-3111 or visit www.telephones.att.com. In Canada, call 1 (866) 288-4268. 1.
Appendix Limited warranty 4.
Appendix Limited warranty 6. What must you return with the PRODUCT to get warranty service? You must: a. Return the entire original package and contents including the PRODUCT to the service location along with a description of the malfunction or difficulty; and b. Include “valid proof of purchase” (sales receipt) identifying the PRODUCT purchased (PRODUCT model) and the date of purchase or receipt; and c. P rovide your name, complete and correct mailing address, and telephone number. 7.
Appendix Index A Add new handsets 17 Answering system keys 3 Answering system operations 88 Call Intercept 91 Call Screening 90 Delete all messages 90 Message announcements 89 Options during playback 89–90 Record Memo 91 Remote Access 92 Answering system settings 49 Announcement 51 Answer On/Off 50 Call Screening 53 Message Alert Tone 54 Number of Rings 52 Remote Code 53 Appendix 93 Alert tones 93 FCC Part 15 106 FCC Part 68 and ACTA 104–105 Important safety information 101–103 Limited warranty 107–109 Rem
Appendix Index I Important safety information 101–103 Index 110-112 Installation Add new handsets 17 Belt clip 15 Desktop to wall mount 10–11 Telephone base 7–9 Wall mount to desktop 12–13 Intercom 66 Delete all entries 75 Delete an entry 75 Edit an entry 74 Searching for entries 73–74 Display Dial 80 Display screen status icons 4-5 E Expanding your telephone system 16 F FCC 104–106 L Limited warranty 107–109 G Glossary of terms 20 M Memo Record 91 Memory Match 78 H Handset Alert tones 93 Battery inst
Appendix Record Memo 91 Redial list 84 Deleting entries 87 Dialing an entry 86 Editing an entry 86 Saving entries into the Directory 85 Remote Access 92 Remote access wallet card 114 Reviewing your call log 79 Call waiting on a conference call 66-67 Call waiting on a HOME call 57 cellular 55 base 55 handset 55 Conferencing HOME and CELLULAR calls 65 Hold 62 homeline 55 base 55 Make a CELLULAR call 58 Make a HOME call 56 Mute 62 Receive a HOME call 57 Receive a HOME call while on a CELLULAR call 64 Receive
Appendix Technical specifications Operating temperature 0°C to 50°C (32°F to 122°F) Power input voltage 120V AC 60Hz Telephone base output voltage 9V DC 600mA Accessory handset charger output voltage 9V DC 150mA Handset battery 3.6V 600mAh (NiMH) Cordless system operating frequency 5.725 GHz to 5.850 GHz Bluetooth system operating frequency 2.400 GHz to 2.
Remote access wallet card Clip and save the wallet card below to keep a convenient list of remote commands that allow you to manage your answering system from any touch-tone telephone when you are away from home. Cut along dotted line. Using any touch-tone telephone, dial your home telephone number and wait for your answering system to answer your call. Upon answering, enter your four digit access code (default is 5000). Remote Command and Action .......Plays all messages .......Plays only new messages .
www.telephones.att.com The Bluetooth® word mark and logos are owned by Bluetooth SIG, Inc. and any use of such marks by Advanced American Telephones and its parent, VTech Holdings Limited, is under license. VTech Holdings Limited is a member of Bluetooth SIG, Inc. Other trademarks and trade names are those of their respective owners. © 2008-2009 Advanced American Telephones. All Rights Reserved.