User’s manual IS741 DECT 6.0 accessory doorbell for use with VTech models IS7121/IS7121-2/IS7121-22 Congratulations on purchasing your new VTech product. Before using this product, please read Important safety instructions on page 13 of this manual. This manual has instructions on how to set up and register your new doorbell. For more information, see the Installation guide and Abridged user’s manual that came with your telephone base.
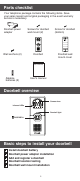
Parts checklist Your telephone package contains the following items. Save your sales receipt and original packaging in the event warranty service is necessary.
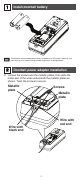
1 Install doorbell battery • The doorbell can be supported by either AA batteries or AC power. However, you need to plug in AC power during doorbell registration or deregistration. 2 Doorbell power adapter installation 1. Loosen the screws and the metallic plates, then slide the metal part of the wires underneath the metallic plates as shown. Twist the screws to secure.
2. Plug the adapter into the domestic power supply. Plug! 3 Add and register a doorbell Make sure you plug in AC power before pairing it to the telephone base. You can add another new doorbell (purchased separately) to your IS7121 telephone system. This telephone system accommodates up to two doorbells. Each new doorbell must be paired to the telephone base before use. 1. Press and hold /FIND HANDSET on the telephone base for about four seconds until the IN USE light turns on. 2.
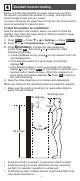
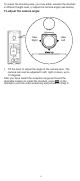
4 Doorbell location testing Before mounting the doorbell on a wall, make sure you test if the location you install the doorbell is in range, and adjust the camera angle to best suit your needs. You may unplug the AC power first so that you can move around more conveniently to make the tests. To test the location for installation: Hold the doorbell in the location where you want to install the doorbell, then follow the steps below to test the reception range and video capture angle. 1.
To adjust the shooting area, you may either relocate the doorbell in different height level, or adjust the camera angle (see below). To adjust the camera angle: Angle Angle Adjustment Adjustment Angle Adjustment View Right View Left View Rotate Right to Left View Rotate Left to Right CAUTION • Tilt the lever to adjust the angle of the camera lens. The camera lens can be adjusted to left, right or down, up to 10 degrees.
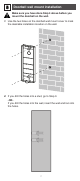
5 Doorbell wall mount installation Make sure you have done Step 4 above before you mount the doorbell on the wall. 1. Use the two holes on the doorbell wall mount cover to mark the desirable installation location on the wall. 2. If you drill the holes into a stud, go to Step 3. -ORIf you drill the holes into the wall, insert the wall anchors into the holes.
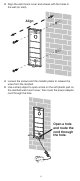
3. Align the wall mount cover and screws with the holes in the wall (or stud). Align 4. Loosen the screws and the metallic plates to release the wires from the doorbell. 5. Use a sharp object to open a hole on the soft plastic part on the doorbell wall mount cover, then route the power adapter cord through the hole. Open a hole and route the cord through the hole.
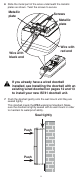
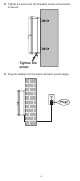
6. Slide the metal part of the wires underneath the metallic plates as shown. Twist the screws to secure. Metallic plate Screws Metallic plate Wire with red end Wire with black end If you already have a wired doorbell installed, see Installing the doorbell with an existing wired doorbell on pages 12 and 13 to install your new IS741 doorbell unit. 7. Push the doorbell gently onto the wall mount until they are sealed tightly. This doorbell meets the IPX4 waterproof standard.
8. Tighten the screw into the threaded socket at the bottom to secure. Tighten the screw 9. Plug the adapter into the indoor domestic power supply.
Detach doorbell from wall mount cover After an extended exposure to cold, heat or humidity, the doorbell gasket rubber may become sticky. If you need to remove the doorbell from its wall mount cover in case of battery replacement or doorbell relocation, follow the steps below. 1. Remove the screw at the bottom. Remove the screw 2. Insert a flat-bladed screwdriver between the doorbell and its wall mount cover. Pry open at both sides 3. Pry the doorbell off.
Installing the doorbell with an existing wired doorbell (optional) If you already have a wired doorbell installed, follow the instructions below to install your new IS741 doorbell unit. 1. Turn off the power supply to the existing wired doorbell. 2. Follow Step 1 through Step 6 in Doorbell wall mount installation from pages 7 to 10. 3. Insert a cross-head screwdriver to the side of battery compartment on the right, then twist and lift to loosen the screw and the metallic plates.
Option 2: Ring the rear doorbell of the existing wired doorbell and the IS7121 doorbell simultaneously. Transformer Transformer Rear Trans Front Chime/buzzer of wired doorbell If you do not connect domestic power supply nor install AA batteries to the IS741 doorbell, only the existing wired doorbell will ring when being pressed. 5. Follow Step 7 through Step 9 in Doorbell wall mount installation on pages 9 and 10 to complete the installation.
Precautions for users of implanted cardiac pacemakers Cardiac pacemakers (applies only to digital cordless telephones): Wireless Technology Research, LLC (WTR), an independent research entity, led a multidisciplinary evaluation of the interference between portable wireless telephones and implanted cardiac pacemakers. Supported by the U.S. Food and Drug Administration, WTR recommends to physicians that: Pacemaker patients • Should keep wireless telephones at least six inches from the pacemaker.
How long is the limited warranty period? The limited warranty period for the Product extends for ONE (1) YEAR from the date of purchase. If VTech repairs or replaces a Materially Defective Product under the terms of this limited warranty, this limited warranty also applies to the repaired or replacement Product for a period of either (a) 90 days from the date the repaired or replacement Product is shipped to you or (b) the time remaining on the original one-year warranty; whichever is longer.
FCC Part 68 and ACTA This equipment complies with Part 68 of the FCC rules and with technical requirements adopted by the Administrative Council for Terminal Attachments (ACTA). The label on the back or bottom of this equipment contains, among other things, a product identifier in the format US:AAAEQ##TXXXX. This identifier must be provided to your telephone service provider upon request.