Complete user’s manual w w w.v t e c h p h o n e s .
Congratulations on purchasing your new VTech product. Before using this telephone, please read Important safety instructions on page 56 of this manual. This manual has all the feature operations and troubleshooting necessary to install and operate your new VTech telephone. Please review this manual thoroughly to ensure proper installation and operation of this innovative and feature rich VTech product. For support, shopping, and everything new at VTech, visit our website at www.vtechphones.com.
Table of contents Getting started . . . . . . . . . . . . . . . . . 1 Call waiting . . . . . . . . . . . . . . . . . . . . . . . 21 Parts checklist . . . . . . . . . . . . . . . . . . . . . . 1 Temporary ringer silencing . . . . . . . . . . . 21 Telephone base and charger installation . . . . . . . . . . . . . . . . . . . . . . . 2 Temporary tone dialing . . . . . . . . . . . . . . 22 Battery installation . . . . . . . . . . . . . . . . . . . 3 Check voicemail . . . . . . . . . . . . . . . . . .
Table of contents View dialing options . . . . . . . . . . . . . . . . . 40 Save a caller ID log entry to the directory . . . . . . . . . . . . . . . . . . . . 41 Delete the caller ID log entries . . . . . . . . 42 Caller ID log screen messages . . . . . . . . 42 Appendix . . . . . . . . . . . . . . . . . . . . 43 Expand your telephone system . . . . . . . . 43 Add and register a handset . . . . . . . . . . 43 Replace a handset . . . . . . . . . . . . . . . . . 44 Screen messages . . . . . . . . . . .
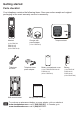
Getting started Parts checklist Your telephone contains the following items. Save your sales receipt and original packaging in the event warranty service is necessary.
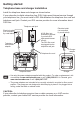
Getting started Telephone base and charger installation Install the telephone base and charger as shown below. If you subscribe to digital subscriber line (DSL) high-speed Internet service through your telephone line, you must install a DSL filter between the telephone line cord and telephone wall jack. Contact your DSL service provider for more information about DSL filter.
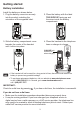
Getting started Battery installation Install the battery as shown below. THIS SIDE UP / CE CÔTÉ VERS LE HAUT 2. Place the battery with the label THIS SIDE UP facing up and the wires inside the battery compartment. THIS SIDE UP / CE CÔTÉ VERS LE HAUT Battery Pack / Bloc-piles : (2.4V Ni-MH) WARNING / AVERTISSEMENT : DO NOT BURN OR PUNCTURE BATTERIES. NE PAS INCINÉRER OU PERCER LES PILES. Made in China / Fabriqué en chine 1.
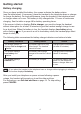
Getting started Battery charging Once you have installed the battery, the screen indicates the battery status (see the table below). If necessary, place the handset in the telephone base or charger to charge the battery. For best performance, keep the handset in the telephone base or charger when not in use. The battery is fully charged after 11 hours of continuous charging. See the table on page 48 for battery operating times.
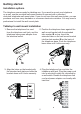
Getting started Installation options The telephone comes ready for tabletop use. If you want to mount your telephone on a wall, use the provided wall mount bracket to connect with a standard dual-stud telephone wall mount plate. If you do not have this wall mount plate, you can purchase one from many hardware or consumer electronics retailers. You may need a professional to install the wall mount plate. Tabletop to wall mount installation 1. Remove the telephone line cord 2.
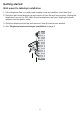
Getting started Wall mount to tabletop installation 1. If the telephone line cord and power adapter cord are bundled, untie them first. 2. Slide the wall mount bracket up and remove it from the wall mount plate. Unplug the telephone line cord (or DSL filter) from the telephone wall jack. Unplug the power adapter from the power outlet. 3. Slide the telephone base up and remove it from the wall mount bracket. 4. See Telephone base and charger installation on page 2.
Getting started Are you a new cable or VoIP subscriber? If your answer is yes, the existing telephone jacks in your home may no longer work. Your cable/VoIP service provider uses a different connection, separate from your old traditional telephone service, to connect the modem/router/terminal adapter installed in your home. To allow all existing telephone jacks to work, contact your telephone service provider for solutions, such as rewiring services (fees may apply).
Getting started Handset layout REDIAL/PAUSE • Press repeatedly to review the last 10 numbers dialed (page 22). • Press and hold to insert a dialing pause while dialing or entering numbers (page 20 or page 30). / / VOLUME • Press to review the directory when the phone is not in use (page 32). • Press to increase the listening volume during a call (page 21). • Press to scroll up while in a menu, or reviewing the directory, caller ID log or redial list.
Getting started Handset layout CHARGE light • On when the handset is charging in the telephone base or charger (page 3). 1 • Press repeatedly to add or remove 1 in front of the caller ID log entry before dialing or saving it to the directory ���������������� while reviewing a caller ID log entry���(page 40). • Press and hold to set or dial your voicemail number (page 16 and page 23). TONE • Press to switch to tone dialing temporarily when using pulse service while on a call (page 22).
Getting started Telephone base layout IN USE light • Flashes when there is an incoming call, or another telephone sharing the same line is in use. • Flashes when handsets are being deregistered. • On when a handset is in use. • On when a handset is being registered. FIND HANDSET • Press to page all system handsets (page 25).
Telephone settings Using the menu You can use a cordless handset to change the telephone settings. In the ringers menu, you can select the ringer tones and adjust the ringer volume for incoming calls. In the settings menu, you can change the settings for LCD language, voicemail number, voicemail indicators, key tone, home area code and dial mode. To enter the handset menu: 1. Press MENU when the phone is not in use. 2. Press or until the handset displays the desired feature menu. 3.
Telephone settings Ringer tone You can choose from different ringer tones on each handset. Ringers 1. Press MENU when the handset is not in use. 2. Press or until the handset displays Ringers, then press SELECT. 3. Press or until the handset displays Ringer tone, then press SELECT. 4. The handset displays Tone: with the current setting displayed. Press or to sample each ringer tone. ECO Ringer tone ECO 5. Press SELECT to save your selection. You hear a confirmation tone.
Telephone settings Quiet mode You can turn on the quiet mode for a period of time (1-12 hours). During this period, all tones (except paging tone) are muted. To set the duration and turn on the quiet mode: 1. Press and hold QUIET# when the handset is not in use. 2. The handset displays Quiet: _ _ hours. Use the dialing keys (0-9) to enter the desired duration (1-12). 3. Press SELECT to save. You hear a confirmation tone. The handset displays Quiet mode on and .
Telephone settings Set date and time If you subscribe to caller ID service, the day, month and time are set automatically with each incoming call. You can also set the date and time manually. 1. Press MENU when the handset is not in use. 2. Press or until the handset displays Set date/time, then press SELECT. Set date/time ECO 3. Press or to select the month then press SELECT, or use the dialing keys to enter a two-digit number (01-12). 4.
Telephone settings LCD language You can select English, French or Spanish to be used in all screen displays. 1. Press MENU when the handset is not in use. 2. Press or until the handset displays Settings, then press SELECT. Settings ECO 3. Press SELECT to choose LCD language. 4. Press or to choose English, Français or Español, then press SELECT. • The screen displays Set English? when you choose English. LCD language ECO • The screen displays Set Francais? when you choose Français.
Telephone settings Voicemail number If you subscribe to voicemail service offered by your telephone service provider, you can save the voicemail number to 1 on each handset for easy access. When you want to retrieve voicemail messages, press and hold 1. Contact your telephone service provider for more information and assistance about using your voicemail service. To set your voicemail number: 1. Press and hold 1 when the phone is not in use. 2.
Telephone settings Clear voicemail If you subscribe to voicemail service offered by your telephone service provider, the handsets display New voicemail and when you have new voicemail messages. Contact your telephone service provider for more information about using your voicemail service. After you have listened to all new voicemail messages, the indicators on the handsets turn off automatically.
Telephone settings Key tone Settings You can turn the key tone on or off for each handset. If you turn the key tone on, the handset beeps with each key press. If you turn the key tone off, there are no beeps when you press the handset keys. 1. Press MENU when the handset is not in use. 2. Press or until the handset displays Settings, then press SELECT. ECO Key tone ECO 3. Press or until the handset displays Key tone, then press SELECT. 4. Press or to choose Key tone:On or Key tone:Off. 5.
Telephone settings Dial mode The dial mode is preset to touch-tone dialing. If you have pulse (rotary) service, you must change the dial mode to pulse dialing before using the telephone to make a call. 1. Press MENU when the phone is not in use. 2. Press or until the handset displays Settings, then press SELECT. 3. Press or until the handset displays Dial mode, then press SELECT. 4. Press or to choose Touch-tone or Pulse. 5. Press SELECT to save your selection. You hear a confirmation tone.
Telephone operation Make a call 1. Press or on the handset. 2. When you hear a dial tone, dial the number with the dialing keys (0-9). • The screen displays the elapsed time as you talk (in hours, minutes and seconds). • While entering numbers, press and hold PAUSE to insert a dialing pause (a P appears). Predial a call 1. Enter the number with the dialing keys (0-9). 2. Press or to dial. • The screen displays the elapsed time as you talk (in hours, minutes and seconds).
Telephone operation Volume During a call, press /VOLUME or the listening volume. /VOLUME to adjust When the volume reaches the minimum or maximum setting, you hear two beeps. The handset earpiece and speakerphone volume settings are independent. Mute The mute function allows you to hear the other party but the other party cannot hear you. • During a call, press MUTE. The handset displays Muted until the mute function is turned off. • Press MUTE again to resume the conversation.
Telephone operation Temporary tone dialing If you have pulse (rotary) service only, you can switch from pulse to touch-tone dialing temporarily during a call. This is useful if you need to send touch-tone signals to access your telephone banking or long distance services. 1. During a call, press TONE . 2. Use the dialing keys to enter the number. The telephone sends touch-tone signals. It automatically returns to pulse dialing mode after you end the call.
Telephone operation Check voicemail 1 to dial your voicemail number. Press and hold See Voicemail number on page 16 to store the voicemail number. Chain dialing Use this feature to initiate a dialing sequence from numbers stored in the directory, caller ID log or redial list while you are on a call. Chain dialing can be useful if you wish to access other numbers (such as bank account numbers or access codes) from the directory, caller ID log or redial list. To access a number in the directory: 1.
Telephone operation Transfer a call While on an outside call, you can transfer the call from one handset to another. 1. During a call, press MENU. 2. Press or Transfer to scroll to Transfer, then press SELECT. • If you have two handsets, your handset displays Calling HS X and then Transferred. • If you have three or more handsets, your handset displays Transfer to: Use the dialing keys to select a destination handset. Your handset displays Calling HS X and then Transferred.
Telephone operation Find handset Use this feature to find all system handsets. To start paging: • Press FIND HANDSET on the telephone base when not in use. All idle handsets ring and display ** Paging **. To end paging: • Press FIND HANDSET on the telephone base. -OR• Press , , OFF or any dialing key (0-9, TONE QUIET#) on a handset. or -OR• Place the handset in the telephone base or charger. • Do not press and hold FIND HANDSET for more than 4 seconds. It may lead to handset deregistration.
Multiple handset use Join a call in progress You can use up to two handsets at the same time on an outside call. You can buy additional expansion handsets (CS6709) for this telephone base. You can register up to five handsets to the telephone base. To share an outside call: • When a handset is already on a call and you would like to join the call, press or on the other handset. • To exit the call, press OFF or place the handset in the telephone base or charger.
Multiple handset use Intercom Use the intercom feature for conversations between two handsets. You can buy additional expansion handsets (CS6709) for this telephone base. You can register up to five handsets to the telephone base. 1. Press INT on your handset when not in use. • If you have only one handset, your handset displays INT needs 2 HS. Calling HS X ECO • If you have two handsets, your handset displays Calling HS X. • If you have three or more handsets, your handset displays Intercom to.
Multiple handset use Call transfer using intercom Use the intercom feature to transfer an outside call to another system handset. 1. During a call, press INT. Intercom to ECO • If you have two handsets, the outside call is put on hold and your handset displays Calling HS X. • If you have three or more handsets, your handset displays Intercom to. Use the dialing keys to enter a handset number. The outside call is put on hold and your handset displays Calling HS X.
Directory About the directory The directory can store up to 50 entries which are shared by all system handsets. Each entry may consist of a phone number up to 30 digits and a name up to 15 characters. • Directory entries are shared by all system handsets. Any modifications made on one handset apply to all system handsets. • When you access the directory without records, the screen displays Directory empty. • When the directory is full and you try to save an entry, the screen displays Directory full.
Directory Add a directory entry 1. Press MENU when the phone is not in use. Directory 2. Press SELECT to choose Directory. 3. Press SELECT to choose Add contact. ECO 4. When Enter number displays, use the dialing keys to enter a number (up to 30 digits). • Press or to move the cursor to the left or right. Add contact • Press DELETE to backspace and erase a digit. • Press and hold DELETE to erase all digits. • Press and hold PAUSE to enter a dialing pause (a P appears).
Directory Add a directory entry -OR1. Use the dialing keys to enter a number (up to 30 digits) when the phone is not in use. Press SELECT. The handset displays Enter number. • Press or to move the cursor to the left or right. Enter number 800-569-9511 _ ECO • Press DELETE to backspace and erase a digit. • Press and hold DELETE to erase all digits. • Press and hold PAUSE to enter a dialing pause (a P appears). Enter name ECO -ORCopy a number from the redial list by pressing REDIAL.
Directory Review and dial from the directory Entries are sorted alphabetically. 1. Press when the phone is not in use. The screen displays Entries in DIR X and then the first entry in the directory. 2. Press press or to browse. When the desired entry displays, or to dial. Review ECO -OR1. Press MENU when the phone is not in use. 2. Press or to scroll to Directory then press SELECT. 3. Press or to scroll to Review and then press SELECT.
Directory Edit a directory entry 1. Search for the desired entry in the directory (see Review and dial from the directory or Alphabetical search on page 32). 2. When the desired entry appears, press SELECT. The screen displays Edit number and the stored number. Edit number 800-595-9511 _ ECO 3. Use the dialing keys to edit the number. • Press DELETE to backspace and erase a digit. • Press and hold DELETE to erase the entire entry. • Press or Edit name ECO to move the cursor to the left or right.
Directory Speed dial You can copy up to 9 directory entries into the speed dial locations (0 and 2-9) so that you can dial these numbers using fewer keys than usual. The speed dial memory locations are stored in the telephone base and are shared by all handsets. Changes made to the speed dial entries on one handset apply to all. Assign a speed dial entry 1. Press MENU when the phone is not in use. 2. Press or to scroll to Directory, then press SELECT. 3.
Directory Reassign a speed dial entry 1. Press MENU when the phone is not in use. 2. Press or to scroll to Directory, then press SELECT. 3. Press or to scroll to Speed dial, then press SELECT. Directory ECO 4. Press or , or use the dialing keys to choose the speed dial location you want to reassign. 5. Press SELECT twice. The screen displays Reassign SD. 6. Press SELECT. The screen displays Copy from DIR... and then the first entry of the directory. 7.
Directory Delete a speed dial entry 1. Press MENU when the phone is not in use. 2. Press or to scroll to Directory, then press SELECT. 3. Press or to scroll to Speed dial, then press SELECT. 4. Press or , or use the dialing keys to choose the desired speed dial location, then press DELETE. The screen displays Clear SD #X? Directory ECO Speed dial 5. Press SELECT to confirm. You hear a confirmation tone. Deleting the speed dial entries does not affect the entries in the directory.
Caller ID About caller ID This product supports caller ID services provided by most telephone service providers. Depending on your service subscription, you may see the caller’s number, or the caller’s name and number that are sent by your telephone service provider after the first or second ring. Caller ID allows you to see the name, number, date and time of calls.
Caller ID Caller ID log If you subscribe to caller ID service, information about each caller will appear after the first or second ring. If you answer a call before the caller information appears on the screen, it will not be saved in the caller ID log. • The caller ID log stores up to 50 entries. Each entry has up to 24 digits for the phone number and 15 characters for the name. If the telephone number has more that 15 digits, only the last 15 digits appear.
Caller ID Memory match When the incoming telephone number matches the last seven digits of a telephone number in your directory, the name that appears on the screen matches the corresponding name in your directory. For example, if Linda Jones calls, her name appears as Linda if this is how you entered it into your directory. The number shown in the caller ID log is in the format sent by the telephone service provider.
Caller ID View dialing options Although the caller ID log entries received have 10 digits (the area code plus the seven-digit number), in some areas, you may dial only the seven digits, or a 1 plus the seven digits, or a 1 plus the area code plus the seven digits. You can change the number of digits that you dial from the caller ID log and store the new number to the directory.
Caller ID Save a caller ID log entry to the directory 1. Press CID when the phone is not in use. -ORPress MENU when the phone is not in use. Press Then press SELECT twice. or to scroll to Caller ID log. 2. Press or to scroll to the desired entry, then press SELECT. The screen displays Edit number and the stored number. Edit number 800-595-9511 3. Use the dialing keys to edit the number. ECO • Press DELETE to backspace and erase a digit. • Press and hold DELETE to erase the entire entry.
Caller ID Delete the caller ID log entries To delete an entry: 1. When in the caller ID log, press or to browse. 2. Press DELETE to delete the selected entry. The screen displays Deleting... and then you hear a confirmation tone. To delete all entries: 1. Press MENU when the phone is not in use. 2. Press or to scroll to Caller ID log, then press SELECT. 3. Press or to scroll to Del all calls, then press SELECT. Delete all? ECO 4. The screen displays Delete all? Press SELECT to confirm.
Appendix Expand your telephone system Your telephone base can support up to five handsets. Each handset must be registered to the telephone base before use. The handsets provided within your product package are already registered as HANDSET 1 and so forth. You can add new handsets (CS6709, purchased separately) to your telephone base. Additional handsets are assigned numbers in the sequential order they are registered (up to HANDSET 5).
Appendix Replace a handset If you want to replace a handset, or reassign the designated handset number of a registered handset, you must deregister all handsets that are registered to the telephone base. Then register each handset individually. To make deregistration easier, read all of the instructions below before you begin. To deregister all handsets: 1. Press and hold FIND HANDSET on the telephone base for about 10 seconds until the IN USE light on the telephone base turns on and starts to flash. 2.
Appendix Screen messages Call log empty There are no caller ID log entries. Calling HS X (for models with two or more handsets only) You are calling another handset (for intercom calls). Contact deleted A directory entry is deleted. Directory empty There are no directory entries. Directory full The directory is full. You cannot save any new entry unless you delete some current entries. Ended You have just ended a call. Failed The handset registration is not successful.
Appendix Screen messages Number repeated The telephone number you have entered is already stored in the directory. Out of range or no pwr at base The telephone base has lost power, or the handset is out of range. Phone The handset is on a call. Put in charger The battery is very low. Put the handset in the telephone base or charger for recharging. Quiet mode off The quiet mode is turned off. Quiet mode on The quiet mode is turned on. Registering... The handset registration is in progress.
Appendix Handset and telephone base indicators Handset lights On when the handset speakerphone is in use. CHARGE On when the handset is charging in the telephone base or charger. Telephone base light IN USE On when the telephone line is in use. On when you are registering a handset. Flashes quickly when there is an incoming call. Flashes when another telephone sharing the same line is in use. Flashes when you are deregistering all handsets.
Appendix Battery It takes up to 11 hours for the battery to be fully charged. When it is fully charged, you can expect the following performance: Operation Operating time While in handset use (talking*) Up to 7 hours While in speakerphone mode (talking*) Up to 3.5 hours While not in use (standby**) Up to 5 days * Operating times vary depending on your actual use and the age of the battery. ** Handset is not charging or in use.
Appendix Troubleshooting If you have difficulty with your telephone, please try the suggestions below. For customer service, visit our website at www.vtechphones.com or call 1 (800) 595-9511. In Canada, go to www.vtechcanada.com or call 1 (800) 267-7377. My telephone does not work at all. • Make sure the battery is installed and charged correctly (page 3). For optimum daily performance, return the handset to the telephone base or charger after use.
Appendix Troubleshooting To register HS... and ...see manual appear alternately on the handset and it does not work at all. • The handset may be deregistered from the telephone base. Refer to Add and register a handset on page 43 to register the handset to the telephone base. My cordless handset isn’t performing normally. • Make sure you plug the power cord securely into the telephone base. Plug the power adapter into a different, working electrical outlet without a wall switch.
Appendix Troubleshooting The telephone does not ring when there is an incoming call. • Make sure the ringer volume is not set to off (page 11). • Make sure the telephone line cord and power adapter are plugged in properly (page 2). • The handset may be too far from the telephone base. Move it closer to the telephone base. • There may be too many extension phones on the telephone line to allow all of them to ring simultaneously. Unplug some of them.
Appendix Troubleshooting There is interference during a telephone conversation. My calls fade out when I am using the cordless handset. • The handset may be out of range. Move it closer to the telephone base. • If you subscribe to high-speed Internet service (DSL - digital subscriber line) through your telephone line, you must install a DSL filter between the telephone line cord and the telephone wall jack. The filter prevents noise and caller ID problems caused by DSL interference.
Appendix Troubleshooting I experience poor sound quality when using the speakerphone. • For increased sound quality while using the speakerphone, place the handset on a flat surface with the dialing keys facing up. I hear other calls when using the telephone. • Disconnect the telephone base from the telephone wall jack. Plug in a different telephone. If you still hear other calls, the problem is probably in the wiring or telephone service. Contact your telephone service provider.
Appendix Troubleshooting Out of range or no pwr at base shows on the handset screen. • The handset may be out of range. Move it closer to the telephone base. • Make sure the power cord is securely plugged into the telephone base. Use a working electrical outlet not controlled by a wall switch. • Reset your telephone by unplugging the power adapter from the telephone base. Disconnect the battery from the cordless handset. Wait for 15 seconds, then plug in the power adapter and install the battery again.
Appendix Troubleshooting Common cure for electronic equipment. • If the telephone is not responding normally, put the cordless handset in the telephone base. If it does not respond, try the following (in the order listed): 1. Disconnect the power to the telephone base. 2. Disconnect the battery on the cordless handset. 3. Wait a few minutes before connecting power to the telephone base. 4. Install the battery again and place the cordless handset in the telephone base. 5.
Appendix Important safety instructions When using your telephone equipment, basic safety precautions should always be followed to reduce the risk of fire, electric shock and injury, including the following: 1. Read and understand all instructions. 2. Follow all warnings and instructions marked on the product. 3. Unplug this product from the wall outlet before cleaning. Do not use liquid or aerosol cleaners. Use a damp cloth for cleaning. 4.
Appendix Precautions for users of implanted cardiac pacemakers Cardiac pacemakers (applies only to digital cordless telephones): Wireless Technology Research, LLC (WTR), an independent research entity, led a multidisciplinary evaluation of the interference between portable wireless telephones and implanted cardiac pacemakers. Supported by the U.S. Food and Drug Administration, WTR recommends to physicians that: Pacemaker patients • Should keep wireless telephones at least six inches from the pacemaker.
Appendix Energy-saving charging mode When this mode is activated, all telephone functions, except handset battery charging, will be disabled. To activate the energy-saving charging mode: 1. Unplug the telephone base power adapter from the power outlet. Make sure all handsets are plugged with charged batteries before proceeding. 2. While you press and hold FIND HANDSET, plug the telephone base power adapter back to the power outlet. 3.
Appendix About cordless telephones • Privacy: The same features that make a cordless telephone convenient create some limitations. Telephone calls are transmitted between the telephone base and the cordless handset by radio waves, so there is a possibility that the cordless telephone conversations could be intercepted by radio receiving equipment within range of the cordless handset. For this reason, you should not think of cordless telephone conversations as being as private as those on corded telephones.
Appendix Limited warranty What does this limited warranty cover? The manufacturer of this VTech Product warrants to the holder of a valid proof of purchase (“Consumer” or “you”) that the Product and all accessories provided in the sales package (“Product”) are free from defects in material and workmanship, pursuant to the following terms and conditions, when installed and used normally and in accordance with the Product operating instructions.
Appendix Limited warranty How do you get warranty service? To obtain warranty service in the USA, please visit our website at www.vtechphones.com or call 1 (800) 595-9511. In Canada, go to www.vtechcanada.com or call 1 (800) 267-7377. NOTE: Before calling for service, please review the user’s manual - a check of the Product’s controls and features may save you a service call.
Appendix FCC, ACTA and IC regulations FCC Part 15 This equipment has been tested and found to comply with the requirements for a Class B digital device under Part 15 of the Federal Communications Commission (FCC) rules. These requirements are intended to provide reasonable protection against harmful interference in a residential installation.
Appendix FCC, ACTA and IC regulations If this equipment is malfunctioning, it must be unplugged from the modular jack until the problem has been corrected. Repairs to this telephone equipment can only be made by the manufacturer or its authorized agents. For repair procedures, follow the instructions outlined under the Limited warranty. If this equipment is causing harm to the telephone network, the telephone service provider may temporarily discontinue your telephone service.
Index A H About caller ID 37 About cordless telephones 59 Add a directory entry 30–31 Add a handset 43 Alphabetical search 32 Answer a call 20 Handset icons 47 Handset indicators 47 Handset layout 8–9 Handset lights 47 Handset locator 25 Handset ringer 11 Home area code 18 B I Battery 48 Battery charging 4 Battery installation 3 Icons 47 Implanted cardiac pacemakers 57 Important safety instructions 56 Indicators 47 Installation 2 C Call log display screen messages 42 Call waiting 21 Caller ID 37–42
Index Q Quiet mode 13 R Redial 22 Register a handset 43 Review the caller ID log 39 Review the directory 32 Ringer tone 12 Ringer volume 11 S Safety instructions 56 Screen icons 47 Set date and time 14 Settings 11–19 Share an outside call 26 Speaker 20 Speed dial 34–36 Store a directory entry 30–31 Store a speed dial entry 34 T Technical specifications 63 Telephone base indicator 47 Telephone base installation 2 Telephone base layout 10 Telephone base light 47 Temporary ringer silencing 21 Temporary tone
VTECH TELECOMMUNICATIONS LTD. A member of THE VTECH GROUP OF COMPANIES. VTech is the registered trademark of VTech Holdings Limited. Copyright © 2013 for VTECH TELECOMMUNICATIONS LTD. All rights reserved. Version 2 06/13.