
Manual


3
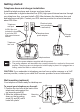
Getting started
If the handset will not be used for a long period of time, disconnect and remove the
battery to prevent any possible leakage.
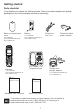
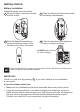
Battery installation
Install the battery as shown below.
1 2
Plug the battery connector securely
into the socket.
Place the battery with the wires inside
the battery compartment.
CHARGE light remains
on when charging.
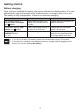
3
Slide the battery compartment
cover towards the center of the
handset until it clicks into place.
Place the handset in the telephone
base or charger to charge.
4
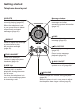
IMPORTANT:
Check for a dial tone by pressing . If you hear a dial tone, the installation
is successful.
If you do not hear a dial tone:
Make sure the installation procedures described above are properly done.
It may be a wiring problem. If you have changed your telephone service to
digital service from a cable company or a VoIP service provider, the telephone
line may need to be rewired to allow all existing telephone jacks to work.
Contact your cable/VoIP service provider for more information.
•
•