User’s manual w w w.v t e c h p h o n e s .
Before using this telephone, please read the Important safety instructions on page 22 of this manual. For support, shopping, and everything new at VTech, visit our website at www.vtechphones.com. In Canada, please visit www.vtechcanada.com. The ENERGY STAR® program (www.energystar.gov) recognizes and encourages the use of products that save energy and help protect our environment. We are proud to mark this product with the ENERGY STAR® label indicating it meets the latest energy efficiency guidelines.
Table of contents Getting started . . . . . . . . . . . . . . . 1 Parts checklist . . . . . . . . . . . . . . . . . 1 Telephone base installation . . . . . . 2 Battery installation and charging . . . 3 Wall bracket installation . . . . . . . . . 3 Wall bracket installation . . . . . . . . 3 Desktop/tabletop bracket installation . . . . . . . . . . . . . . . . 4 Handset layout . . . . . . . . . . . . . . . . 5 Telephone base layout . . . . . . . . . .
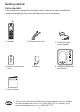
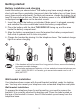
Getting started Parts checklist CHARGE Your telephone contains the following items. Save your sales receipt and original packaging in the event warranty service is necessary. A BC D EF JKL MNO PQRS TUV W XYZ TONE OPER 1. Handset 4. Battery compartment cover 2. Telephone line cord 5. Battery 3. Telephone base power adapter 6. Telephone base with wall bracket 7. User’s manual • To purchase replacement batteries or power adapters, visit our website at www.vtechphones.
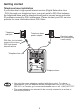
Getting started Telephone base installation If you subscribe to high-speed Internet service (Digital Subscriber Line - DSL) through your telephone lines, you must install a DSL filter between the telephone base and the telephone wall jack to prevent noise and caller ID problems caused by DSL interference. Please contact your DSL service provider for more information about DSL filters.
Getting started Battery installation and charging Install the battery as shown below. The battery may have enough charge for short calls and then completely charge and drain the battery two or three times every three months afterwards. For best performance, charge the battery for at least 16 hours before first use. When the battery power is low, LOW BATTERY is displayed and flashes on the handset screen. 1. Insert the plug of the battery as indicated.
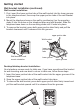
Getting started Wall bracket installation (continued) Wall bracket installation: 1. First, insert the lower portion tabs of the wall bracket into the lower grooves in the telephone base, then snap the upper portion tabs of the wall bracket into place. 2. Mount the telephone base on the wall by positioning it so the mounting studs fit into the holes on the telephone base and wall bracket. Slide the telephone base down on the mounting studs until it locks into place. 3.
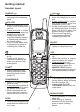
Getting started Handset layout CHARGE light • On when the handset is charging in the telephone base. CHARGE /VOL-/CID • When the telephone is not in use, press to review the call log. • Press and hold to adjust the ringer volume when the telephone is not in use. • During a call, press to lower the listening volume. A double beep sounds at the lowest setting. • Press to scroll down while in programming mode or reviewing the redial list.
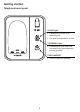
Getting started Telephone base layout IN USE light • Flashes when there is an incoming call. • On when the handset is in use. VOICEMAIL light • Flashes when you have new voicemail from your telephone service provider. FIND HANDSET • Press to page the handset.
Telephone settings Date and time I f you subscribe to caller ID service, the date and time is set automatically with the next incoming call. If you do not have caller ID service, you can set the date and time manually. 1. Press PROG when the handset is not in use. 2. Press or until DATE/TIME is displayed. Press SELECT. 3. When the month is flashing, press or correct month and then press SELECT. until the screen displays the 4. When the date is flashing, press date and then press SELECT.
Telephone settings Ringer volume (continued) 4. Press SELECT to confirm your selection. You will hear a confirmation tone. -OR- 1. Press and hold or until the screen displays RINGER VOL: and the current setting when the handset is not in use. The current setting flashes and you will hear a sample of the ringer volume. 2. Press or to select ringer volume from OFF, LOW or HI. You will hear a sample of the selected volume level. 3. Press SELECT to confirm your selection.
Telephone settings Language 1. Press PROG when the handset is not in use. 2. Press or until LANGUAGE is displayed. 3. Press SELECT. The current setting flashes. 4. Press or until the screen displays the desired language (English, Espanol or Francais). 5. Press SELECT to confirm your selection. You will hear a confirmation tone.
Telephone operation Make calls • Press and then use the dial pad keys to dial a number. -OR1. Enter the phone number first. You can press to backspace and press CHAN/REMOVE to erase digits. 2. Press to dial. Answer calls • Press any dial pad keys (except /VOL-/CID, /VOL+/ an incoming call. and OFF) to answer End calls • Press OFF or put the handset back to the telephone base to end a call. • The call timer is activated during a call to show call duration.
Telephone operation Redial • The telephone stores the five most recently dialed telephone numbers in the redial list. When the list is full, the oldest entry is deleted to make room for the new entry. • Press REDIAL/PAUSE, then press , or REDIAL/PAUSE repeatedly to review the redial list. Press CHAN/REMOVE to delete the displayed number. • Press , then press REDIAL/PAUSE to dial the last telephone number dialed.
Telephone operation Character chart Use the dial pad keys and the chart below to enter a name (up to 14 characters). An error tone sounds if you try to enter more than 14 characters. Each press of a particular key causes the characters to be displayed in the following order: Dial key 1 Characters by number of key presses 1 2 3 4 5 2 A B C 2 3 D E F 3 4 G H I 4 5 J K L 5 6 M N O 6 7 P Q R S 8 T U V 8 9 W X Y Z 9 0 0 * * & , , - .
Telephone operation Edit a directory entry (continued) 3. When the screen displays the desired entry, press SPEED EDIT DEL SELECT and EDIT flashes. 8005959511 4. Press SELECT. The screen displays the name and number. The cursor appears at the beginning of the name. • Use the dial pad keys to edit the name. • Press to move the cursor to the left or to the right. • Press CHAN/REMOVE to erase a character. 5. Press SELECT to move on to the phone number. • Use the dial pad keys to edit the number.
Telephone operation Copy a directory entry into speed dial 1. Press /VOL+/ when the handset is not in use. The screen displays DIRECTORY. 2. Press or to scroll through the entries stored in the directory alphabetically. -OR- Press the dial pad key for the first letter of the entry to copy. If necessary, scroll or to find the desired entry. 3. When the screen displays the desired entry, press SPEED EDIT DEL SELECT. Then press or until SPEED flashes. 8005959511 4. Press SELECT.
Telephone operation Store a speed dial entry (continued) 4. Use the dial pad keys to enter the name (see the Character chart on page 12) and then press SELECT or prog. • Press to move the cursor to the left or to the right. • Press CHAN/REMOVE to erase a character. 5. The screen displays ENTER NUMBER. 6. Use the dial pad keys to enter the telephone number, and then press SELECT or prog. • Press to move the cursor to the left or to the right. • Press CHAN/REMOVE to erase a digit.
Telephone operation Delete a speed dial entry 1. Press and hold the speed dial location key (1-9) of SPEED EDIT DEL the desired entry when the handset is not in use. 8005959511 2. When the screen displays the desired entry, press 01 SELECT. Then press or until DEL (delete) flashes. 3. Press SELECT. The screen displays ERASE NO YES and the number. The current choice flashes. 4. Press until YES flashes. 5. Press SELECT. You will hear a confirmation beep. Dial a speed dial number 1.
Telephone operation Call log Caller’s name Caller’s telephone number VTECH 800-595-9511 NEW 05 6:10AM 08/17 New call log indicator and location in the call log Date of call Time of call If you subscribe to caller ID service, information about each caller will be displayed after the first or second ring. • The call log can store up to 45 entries. • When the call log is full, the earliest entry will be deleted to make room for new incoming call information.
Telephone operation Make call log entries ready to dial Although the call log entries received have 10 digits (the area code plus the seven-digit number), in some areas, you may dial only the seven digits, or a 1 plus the seven digits, or a 1 plus the area code plus the seven digits. You can change the number of digits that you dial from or store in the call log.
Telephone operation Save a call log entry to the directory (continued) 5. Enter or edit the name if necessary. See the Character chart on page 12. • Press to move the cursor to the left or to the right. • Press CHAN/REMOVE to erase a character. Press SELECT to move on to the phone number. 6. Edit the number if necessary. • Press to move the cursor to the left or to the right. • Press CHAN/REMOVE to erase a digit. • Press REDIAL/PAUSE to insert a dialing pause (P will be displayed). 7.
Appendix Handset display screen messages Displays: When: LOW BATTERY The battery needs to be recharged. CID EMPTY There are no call log entries. DIRECTORY EMPTY The cordless handset is searching for the telephone base. There are no directory entries. MEMORY FULL The directory is full. XX MISSED CALLS There are unreviewed calls in the call log. CONNECTING... NEW VOICEMAIL **PAGING** PHONE There are new voicemail message(s) from your telephone service provider.
Appendix Battery After the battery is fully charged for 16 hours, you can expect the following performance: Operation Operating time While in use (talking) Five hours While not in use (standby*) Six days *Handset is off the telephone base but not in use. The battery needs charging when: • A new battery is installed in the handset. • The handset beeps when taken off the telephone base. • LOW BATTERY is displayed and the battery icon on the handset screen is flashing.
Appendix Important safety instructions When using your telephone equipment, basic safety precautions should always be followed to reduce the risk of fire, electric shock and injury, including the following: 1. Read, understand, and follow all warnings and instructions marked on the product and in this manual. 2. Unplug this product from the wall outlet before cleaning. Do not use liquid or aerosol cleaners. Use a damp cloth for cleaning. 3.
Appendix Troubleshooting If you have difficulty with your telephone, please try the suggestions below. For Customer Service, visit our website at www.vtechphones.com, or call 1 (800) 595-9511; in Canada, call 1 (800) 267-7377. My telephone does not work at all. • Make sure the battery is installed and charged correctly (page 3). For optimum daily performance, return the handset to the telephone base after use. • Make sure the power adapter is securely plugged into an outlet not controlled by a wall switch.
Appendix Troubleshooting The talk time and standby time of my handset is noticeably shorter than before. • Completely charge and drain the battery two or three times consecutively every three months instead of returning the handset to the telephone base or charger after each use. If the performance does not improve, please buy a new battery. There is no dial tone. • First, try all the above suggestions. • Move the handset closer to the telephone base. It might be out of range.
Appendix Troubleshooting I cannot dial out. • First, try all the above suggestions. • Make sure there is a dial tone before dialing. It is normal if the handset takes a second or two to synchronize with the telephone base before producing a dial tone. Wait an extra second before dialing. • Make sure the telephone is set to the correct dial type (pulse dial or tone dial) for the service in your area. See Dial mode on page 8 to set the dial type.
Appendix Troubleshooting I hear noise in the handset, and none of the keys or buttons work. • Make sure the telephone line cord is plugged in securely. • Remove and re-insert the battery. My caller ID features are not working properly. • Caller ID is a subscription service. You must subscribe to this service from your telephone service provider for this feature to work on your telephone. • The caller may not be calling from an area which supports caller ID.
Appendix Troubleshooting • Other electronic products can cause interference to your cordless telephone. Try installing your telephone as far away from these electronic devices as possible: wireless routers, radios, radio towers, pager towers, cellular telephones, intercoms, room monitors, televisions, personal computers, kitchen appliances and other cordless telephones. POWER FAILURE OR OUT OF RANGE shows on the handset screen. • The handset may be out of range. Move it closer to the telephone base.
Appendix Troubleshooting Common cure for electronic equipment • If the unit is not responding normally, try putting the handset in the telephone base. If it does not respond, try the following (in the order listed): • Disconnect the power to the telephone base. • Disconnect the battery on the handset. • Wait a few minutes before connecting the power to the telephone base. • Re-install the battery and place the handset in the telephone base. • Wait for the handset to synchronize with the telephone base.
Appendix Operating range This cordless telephone operates with the maximum power allowed by the Federal Communications Commission (FCC). Even so, this handset and telephone base can communicate over only a certain distance, which can vary with the locations of the telephone base and handset, the weather, and the layout of your home or office. When the handset is out of range, the handset will display POWER FAILURE OR OUT OF RANGE.
Appendix Warranty What does this limited warranty cover? The manufacturer of this VTech Product warrants to the holder of a valid proof of purchase (“Consumer” or “you”) that the Product and all accessories provided in the sales package (“Product”) are free from defects in material and workmanship, pursuant to the following terms and conditions, when installed and used normally and in accordance with the Product operating instructions.
Appendix Warranty Other limitations This warranty is the complete and exclusive agreement between you and VTech. It supersedes all other written or oral communications related to this Product. VTech provides no other warranties for this Product. The warranty exclusively describes all of VTech’s responsibilities regarding the Product. There are no other express warranties. No one is authorized to make modifications to this limited warranty and you should not rely on any such modification.
Appendix FCC, ACTA and IC regulations FCC Part 15 This equipment has been tested and found to comply with the requirements for a Class B digital device under Part 15 of the Federal Communications Commission (FCC) rules. These requirements are intended to provide reasonable protection against harmful interference in a residential installation.
Appendix FCC, ACTA and IC regulations Industry Canada Operation is subject to the following two conditions: (1) this device may not cause harmful interference, and (2) this device must accept any interference, including interference that may cause undesired operation. The term ‘’IC: ‘’ before the certification/registration number only signifies that the Industry Canada technical specifications were met. The Ringer Equivalence Number (REN) for this terminal equipment is 0.1.
Appendix Technical specifications Frequency control Crystal controlled PLL synthesizer Transmit frequency Handset: 5857.20-5865.90 MHz Telephone base: 912.75-917.10MHz Channels 30 Nominal effective range Maximum power allowed by FCC and IC. Actual operating range may vary according to environmental conditions at the time of use. Size Handset: 7.32in X 2.01in X 1.57in (186.0mm X 51.0mm X 40.0mm) Telephone base: 4.33in X 5.34in X 3.78in (110.0mm Weight Handset: 5.14oz (145.
Appendix Index A H About caller ID 16 About cordless telephones Answer calls 10 Appendix 20 Handset display screen messages Handset layout 5 Home area code 8 29 I B Battery 21 Battery installation and charging Important safety instructions Index 34 3 Call log 17 Call log display screen messages 19 Call waiting 10 Channel 10 Character chart 12 Charging 3 Clear voicemail 9 Copy a directory entry into speed dial 14 D Language 9 M Maintenance 29 Make call log entries ready to dial Make calls 10 18
Appendix Index T Technical specifications 34 Telephone base installation 2 Telephone base layout 6 Telephone operation 10 Telephone settings 7 Temporary tone dialing 10 The RBRC ® seal 33 Troubleshooting 23 V Volume 10 W Wall bracket installation Warranty 29 3 36
VTECH TELECOMMUNICATIONS LTD. A member of THE VTECH GROUP OF COMPANIES. Distributed in the U.S.A. by VTech Communications, Inc. Beaverton, Oregon 97008 Distributed in Canada by VTech Technologies Canada, Ltd., Richmond, B.C. V6W 1L5 Copyright ©2008 for VTECH TELECOMMUNICATIONS LTD. Printed in China.