User’s Manual Smarty’s Workshop™ © 2002 VTECH Printed in China 91-01544-005
Dear Parent, At VTech® we know that children have many different learning styles. While some children respond to more structured instruction, others learn best through imaginative role-play. That’s why we created Learning Adventures™ - a line of entertaining learning products where fun-filled play comes first, and learning comes to life in thematic, 3D environments. Learning Adventures™ is a revolutionary way for children to learn, immersing them in an imaginative hands-on adventure.
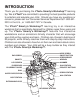
INTRODUCTION Thank you for purchasing the VTech® Smarty’s Workshop™ learning toy. We at VTech® are committed to providing the best possible products to entertain and educate your child. Should you have any questions or concerns, please call our Consumer Services Department at 1-800-5212010 in the U.S., or 1-800-267-7377 in Canada. The VTech ® Smarty’s Workshop™ learning toy is an interactive workshop that is specifically designed for children ages three years and up.
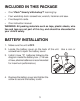
INCLUDED IN THIS PACKAGE • One VTech® Smarty’s Workshop™ learning toy. • Four workshop tools: screwdriver, wrench, hammer and saw. • Five blueprint cards. • One instruction manual. WARNING: All packing materials such as tape, plastic sheets, wire ties and tags are not part of this toy, and should be discarded for your child’s safety. BATTERY INSTALLATION 1. Make sure the unit is OFF. 2. Locate the battery cover on the back of the unit. Use a coin or screwdriver to open the battery cover. 3.
BATTERY NOTICE • Non-rechargeable batteries are not to be recharged. • Rechargeable batteries are to be removed from the toy before being charged (if removable). • Rechargeable batteries are only to be charged under adult supervision (if removable). • Different types of batteries or new and used batteries are not to be mixed. • Only batteries of the same or equivalent type as recommended are to be used. • Batteries are to be inserted with the correct polarity.
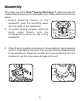
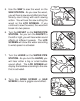
Assembly For proper use of the VTech® Smarty’s Workshop™, make sure the unit is assembled properly by an adult before use. Please follow the directions below. 1. Before attaching Smar ty to the workbench, push the connecting wires into the cavity on the workbench. 2. To position Smarty correctly, match the posts under Smar ty with the corresponding holes on top of the workbench. Match the bigger post with the big hole Match the smaller post with the small hole Push the connecting wires into the cavity 3.
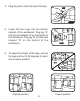
4. Plug the pencil onto the cap of Smarty. 5. Insert the four legs into the bottom cabinet of the workbench. Plug leg “A” into the hole labeled “A” on the bottom of the workbench. Plug leg “B” into the hole labeled “B” on the bottom of the workbench. 6. To adjust the height of the legs, pull out the legs and turn it 90 degrees to lock it into a secure position.
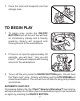
7. Place the tools and blueprints into their storage area. TO BEGIN PLAY 1. To begin play, press the ON/OFF BUTTON to turn on the unit. You will hear an introductory melody and a friendly greeting. Smar ty will respond with moving around to the workstations. 2. If there is no input for approximately 20 seconds, you will hear “ Are you still there? “ Smarty will respond with moving around to the workstations. 3. To turn off the unit, press the ON/OFF BUTTON again. You will hear the “Pack it up!” song.
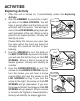
ACTIVITIES Exploring Activity 1. After the unit is turned on, it automatically enters the Exploring Activity. 2. Use the HAMMER to pound the 4 lightup nails in the NAIL STATION. You will “Yellow Nail!” hear a sound effect and the light-up nail will flash with the sound. You will see a nail on the LCD SCREEN going down per each activation of the nail. When a nail is pound to its lowest position, Smarty will identify its color.
5. Use the SAW to saw the wood on the SAW STATION. As you saw the wood, you will hear a saw sound effect and hear Smarty count along with each sawing action. You will see the saw cutting the wood on the LCD SCREEN. If you continue to saw the wood, the wood will break into two pieces. 6. Turn the FACUET on the WATER PIPE STATION. As you turn the FAUCET to the left or right, you will hear water sound effects at different speeds. The LCD SCREEN will show the water according to what speed is activated. 7.
9. While in the exploring mode, Smarty will follow along to each workstation that is activated and respond with encouraging phrases, safety phrases or music. After activation of the stations for a specific time, Smarty will encourage the child to select a building project. 10. Press the numbers 1, 2, 3,or 4 PROJECT BUTTON when there is no blueprint in the BLUEPRINT STATION to learn how to use the tools. Smarty will instruct the child how to use the tools.
Building Activity 1. Inser t a BLUEPRINT into the BLUEPRINT STATION to begin a building project. You will be encouraged to select a project to build. “Press a red button!” 2. Press one of the 5 PROJECT BUTTONS to begin a building project. The projects are numbered according to their difficulty. 1 is the easiest level, 5 is the hardest level. You will see the unfinished or broken project on the LCD SCREEN. Smarty will begin to instruct you with step-by-step instructions to build the project. 3.
5. Smarty may respond with a random safety phrase if the hammer or saw is activated. “Watch out for sharp objects” 6. When 3 projects are finished, Smarty will respond with a short melody and dance. 7. When all 5 projects are finished on the blueprint, Smarty will reward you with a melody and dance. While music playing, if you activate different stations on the workbench, you will hear the instruments change according to the corresponding sound effect on the workstation.
1. Turn on VTech® Smarty’s Workshop™. After the introduction melody and phrase, turn the ELECTRIC DRILL or TAPE MEASURE on. Smarty has a magical sensor that allows him to detect these tools when brought into The VTech® Smarty Workshop™. When Smarty detects these tools, extra melodies, curriculum and games will be activated. Please refer to The VTech® Smarty’s Toolbox™ for further details. CARE AND MAINTENANCE 1. Keep the unit clean by wiping it with a slightly damp cloth. 2.