Quick start guide CL81109/CL81209/ CL81219/CL81309 DECT 6.
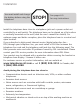
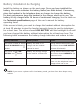
Installation You must install and charge the battery before using the telephone. STOP! See pages 4-5 for easy instructions. Install the telephone base close to a telephone jack and a power outlet not controlled by a wall switch. The telephone base can be placed on a flat surface or vertically mounted on the wall (read the user’s manual for details). For optimum range and better reception, place the telephone base in a central and open location.
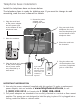
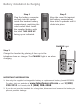
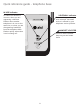
Telephone base installation Install the telephone base as shown below. The telephone base is ready for tabletop use. If you want to change to wall mounting, read the user’s manual for details. 1. Plug the small end of the power adapter into the power jack on the bottom of the telephone base. 2. Route the power adapter cord through the slot. 3. Plug one end of the telephone line cord into the telephone jack on the bottom of the telephone base. 7. Raise the antenna. 4. Place the cords into the channels.
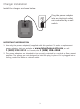
Charger installation Install the charger as shown below. Plug the power adapter into an electrical outlet not controlled by a wall switch. IMPORTANT INFORMATION 1. Use only the power adapter(s) supplied with this product. To order a replacement power adapter, visit our website at www.telephones.att.com, or call 1 (800) 222-3111. In Canada, dial 1 (866) 288-4268. 2. The power adapters are intended to be correctly oriented in a vertical or floor mount position.
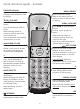
Battery installation & charging Install the battery as shown on the next page. Once you have installed the battery, the screen indicates the battery status (see table below). If necessary, place the handset in the telephone base or charger to charge the battery. For best performance, keep the handset in the charger when not in use. The battery is fully charged after 16 hours of continuous charging. See the table on the Technical specifications page of the user’s manual for battery operating times.
Battery installation & charging Step 1 Plug the battery connector securely into the socket inside the handset battery compartment, matching the color-coded label. Insert the supplied battery with the label THIS SIDE UP facing up as indicated. Step 2 Align the cover flat against the battery compartment, then slide it upwards until it clicks into place. CHARGE light Step 3 Charge the handset by placing it face up in the telephone base or charger. The CHARGE light is on when charging.
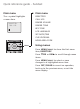
Quick reference guide - handset CHARGE indicator MENU/SELECT On when the handset is charging in the telephone base or charger. Press to show the menu. While in the menu, press to select an item or save an entry or setting. qCID/-VOLUME Press qCID to show caller ID history. DIRp/+VOLUME Press DIRp to show directory entries. Press to scroll down while in menus. Press to scroll up while in menus. While entering names or numbers, press to move the cursor to the left.
Quick reference guide - handset Main menu Main menu The > symbol highlights a menu item. DIRECTORY CALL LOG RINGER VOLUME RINGER TONE KEY TONE LCD LANGUAGE SET DATE/TIME CLR VOICEMAIL HOME AREA CODE >DIRECTORY CALL LOG Menu Using menus Press MENU/SELECT to show the first menu item, DIRECTORY. Press qCID or DIRp to scroll through menu items. Press MENU/SELECT to select or save changes to a highlighted menu item.
Quick reference guide - telephone base IN USE indicator VOICEMAIL indicator On when the handset is in use or when you are registering a handset. Flashes when you have new voicemail. Voicemail service is offered by your telephone service provider. Flashes when another telephone is in use on the same line, or when you are deregistering handset(s) from the telephone base. HANDSET LOCATOR Flashes quickly when there is an incoming call. Press to make handsets beep so you can locate them.
www.telephones.att.com © 2009 Advanced American Telephones. All Rights Reserved. AT&T and the AT&T logo are trademarks of AT&T Intellectual Property licensed to Advanced American Telephones, San Antonio, TX 78219. Printed in China. Issue 5 AT&T 12/09.