
Manual Junkers JU-52 1630mm Olympiad 1936 VQA113
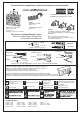
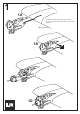
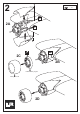
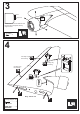
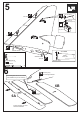
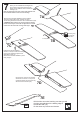

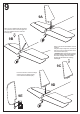
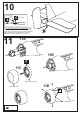
Table Of Contents

When you are satisfied with the alignment,
use a pencil to trace around the top and
bottom of the stabilizer where it meets the
fuselage (7A).
Remove the horizontal stabilizer from the fuselage.
Using the sharp hobby knife, carefully cut away
the covering inside the lines which were marked above (7B).
* WARNING: When removing any covering from the airframe,
please ensure that you secure the cut edge with CA or similar
cement. This will ensure the covering remain tight.
Cut away only
the covering
both side
Note: the rectangular hole on the center of the stabilizer must
be coincidental with the center line of the fuselage.
Install the horizontal stabilizer
and the “U” torque rod into the fuselage
at once, then adust the alignment as
described in steep 7A.
Secure the horizontal stabilizer in place
using CA glue.
“U” torque rod
Drill the hole as marked, marking sure that you drill
the hole perpendicular to the leading edge of
the elevator half (7E).
Do the same way with second elevator.
Use the pencil, mark on the elevator
where the one end of “U” torque rod
meets the elevator. Do the same way
with the second elevator (7D).
3mm
7
7A
7B
7C
7D
7E