
User Manual
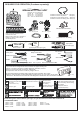
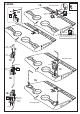
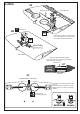


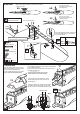


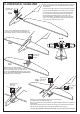
Table Of Contents

! Securely glue together. If coming off during fly, you lose control of your air plane.
A = A’
A’
A
CA
Apply CA glue
both side
(thin CA)
CA
Apply CA glue
into the slot
(thin CA)
Cut away only
the covering
Push the horizontal stabilizer into the slot on the fuselage
as show. Check the alignment of the horizontal stabilizer
by measuring from a fixed point along the center line of
the fuselage to the leading edge on each side of the
horizontal stabilizer. The distance must be equal on both
sides . If not, adjust the stabilizer until the measurements
are the same (see picture below: A=A’).
When you are satisfied with the alignment, use
a pencil to trace around the top and bottom of
the stabilizer where it meets the fuselage (11B)
Cut away only
the covering
both side
Remove the horizontal stabilizer
from the fuselage. Using a straight edge
and a sharp hobby knife, carefully cut away
the covering inside the lines which were marked
above. Be cautious not to cut into the wood-this
will weaken the structure (11C)
Install the horizontal stabilizer onto the fuselage and adjust
the alignment as described in steep 11A.
Note: it is important to ensure that the horizontal stabilizer is also level in regards to
the fuselage.
Apply the thin CA along the area where the covering was removed in the previous
step and to the fuselage where the horizontal stabilizer mounts (11D).
Pull the left and right elevator out of the horizontal stabilizer.
Using a sharp hobby knife, carefully cut away the covering
around of all slots for the horizontal stabilizer and vertical
fin installation.
CA
Apply CA glue
both side
(thin CA)
11-HORIZONTAL STABILIZER
11A
11B
11C
11D