HW-19 MK-4 SETUP MANUAL 1
PRELIMINARY REMARKS Save the carton and all internal fillers and plastic bags. If you should ever need to carry or ship the HW-19 Mk. 4 any distance, there is much less chance of it suffering damage in transit if it is properly packed in its original carton. Electrical Requirements: HW-19’s are designed to run on 115 VAC 60 Hz, or 230 VAC 50 Hz. The shipping carton shows which is the correct voltage for your unit. CAUTION: TO PREVENT FIRE OR SHOCK HAZARD, DO NOT EXPOSE THIS UNIT TO RAIN OR MOISTURE.
2. ASSEMBLING THE HW-19 MK-4 YOUR CHASSIS HAS AN ACRYLIC MOTOR BOARD, DO NOT PEEL OFF THE PROTECTIVE PAPER COVERING UNTIL DIRECTED. While the chassis is leaning against the carton or other support, remove the tonearm board by unscrewing the six Phillips-head screws with a #2 Phillips screwdriver. Be careful not to lose the washers found beneath the heads of the screws. Set the armboard, screws, and washers’ aside for now.
3. MOUNTING THE TONEARM If you have a blank (without armhole) mounting board: NOTE: DO NOT peel off the protective paper from acrylic boards until after the armhole has been drilled. The paper will help protect the high-gloss surface beneath the paper. Put the arm board back in its original position and fasten it with three screws on the right-hand side. You need only give the screws a few turns by hand—just enough to keep the board from sliding around.
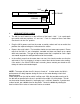
3/16” ARMBOARD WOOD FRAME SPRINGS 4. LEVELING THE HW-19 MK-4 The MK-4’s on/off switch is on the left front of the base’s “skirt.” It is a push-push type switch with two positions, “in” and “out.” Push it a couple of times and make sure that it is in the “out” position. Plug the MK-4 power cord into the motor assembly socket and into an outlet that provides the required voltage as indicated on the carton. Depress the on/off switch. The turntable should start and come up to speed.
5. FINAL ASSEMBLY Place the dustcover on the MK-4 by slipping the hinge flanges into the sockets on the rear of the base. Close the cover. Each of its front corners should rest on one of the small round cork pads on the base’s front corners. If necessary, push gently on the front of the cover until it does so. You may also have to pull up slightly on one of the rear corners. Once the cover is squarely resting on the base, tighten the screws on the back of the base’s hinge sockets with a No.
platter. You will notice that over tightening will sometimes result in the periphery lifting off again. Do not over tighten. After using the clamp system for a while, the proper amount of tightening will become pretty much automatic. The action of the clamp system is to provide uniform compression of the record at the outer edge of the label area. First, the periphery of the record is forced into contact with the platter. Then, the rest of the grooved area is pushed into contact. 8.
of the MK-4 chassis. Connect the other end to the ground connector on the amplifier or receiver (if in doubt, check the amplifier or receiver’s manual or call its manufacturer). Depending upon the tonearm you are using, it may also be possible to run a short wire from the turntable chassis to the arm’s ground connection under the arm board. If this does not cure the hum, disconnect the short wire and run a separate ground wire as above.
The MK-4’s dust cover and acrylic chassis may be cleaned with glass cleaner. Do not use solvents, abrasives, or other glass cleaners of any sort. Make sure not to drip any cleaning solution on the turntable or its base. The platter should be kept scrupulously clean so that no dirt is transferred to the record being played. Windex ™ is the best cleaner we have found. Note: any cleaner must be completely dried off before placing a record on the platter.
THE HW-19 MK-4 TURNTABLE SETUP AND INSTRUCTION MANUAL VPI INDUSTRIES INC., 77 CLIFFWOOD AVE #3B, CLIFFWOOD, NJ 07721 PHONE: 732-583-6895, EMAIL: SALES@VPIINDUSTRIES.COM www.vpiindustries.