Scout 1.1/JMW-9T Turntable Manual Setup and Instruction Manual VPI Industries, Inc., 77 Cliffwood Ave. #3B, Cliffwood, NJ 07721 Phone: 732-583-6895, Email: Sales@vpiindustries.com http://www.vpiindustries.
Important: Read Before Proceeding! Read and follow the Safety Instructions below. Save all packing materials. The Scout should only be moved or shipped in its original packaging to reduce the risk of damage in transit. The Scout must be placed on a flat, level surface. This will make setup easy, provide better sound quality, and put less strain on the main bearing. Safety Instructions Follow the instructions below to reduce risk of electrical hazard or injury.
Unpacking the Box The turntable and tonearm are packed very carefully to avoid damage during shipping. It is important that you save the packing materials and box to use for shipping or moving the Scout. 1. Remove the 2 foam side pieces and foam block in the center. 2. Make space for the Scout and remove the chassis from the box. Put the chassis down on a solid surface. Complete and return the warranty card. The warranty does not take effect until the warranty card is returned. 3.
7. Verify the turntable is level by using a 9 or 12-inch bubble level front-to-back and side-to-side on the platter. If it is not level, rotate the aluminum cone feet up or down. If you must turn the Scout feet more than three full turns, level the shelf or platform the table sits on first. Installing and Aligning the Cartridge Remove the protective cover from the male pivot point on the arm base assembly. To avoid injury, do not touch the male pivot point. It is extremely sharp.
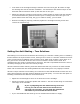
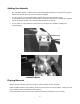
Look down at the cartridge and align it between the lines of the grid. Be careful to align the cartridge and not the tonearm headshell. You should have the diamond stylus on the white dot and the cantilever lined up with the lines on the grid. Adjust the cartridge mounting screws and the counterweight as needed until the cartridge is centered between the grid lines and the stylus is resting on the dot of the grid. The picture below shows the setup, the jig is in white for clarity, yours is black.
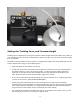
Setting the Tracking Force and Tonearm Height Tracking force is adjusted by moving the tonearm counterweight forward and back on its shaft. If your cartridge is heavy and the counterweight is all the way back, you can order a heavier weight from your dealer. The JMW-9T Tonearm does not have a built-in tracking force gauge. We recommend that you use a Shure Stylus Force Gauge or good digital gauge.
Setting the Azimuth Set a fireplace match or coffee stirrer (something light and about 6” long) into the groove behind the mounting screws on the tonearm headshell. If it is not level, use the supplied Allen wrench to loosen the setscrew on the counterweight and rotate the counterweight around the shaft until the headshell is parallel to the record. Be careful not to change the tracking force setting.
General Use Allow at least 20 hours of break-in time. The motor will make some low-level noise. This will not get into the system. The motor and bearings will become quieter as you use your Scout. Place the motor on a mouse pad for better isolation If you notice hum in the system, remove the turntable to phono section interconnects and replace them with very cheap, standard VCR interconnects. These are well shielded and should eliminate the hum.
VPI Industries, Inc. Limited Warranty VPI Industries, Inc. (VPI) warrants this unit against defects in materials and/or workmanship for three (3) years from the date of purchase by the original retail purchaser. VPI’s sole obligation under this warranty is limited to the repair or replacement, at VPI’s option, of any part(s) found to be defective.