
User Manual


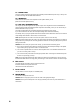


Table Of Contents

7
Rear Panel
1. Nutube BIAS
You can control the bias voltage of Nutube for CH1 and CH2 individually.
VINTAGE:
Decreasing the voltage makes the amp sound like a vintage guitar amp, this sometimes makes
your tone feel a little more unstable (like the old days).
MODERN:
Increasing the voltage creates more gain, and makes its tone smoother.
2. EFFECT LOOP
This has SEND and RETURN jacks, and a SERIES/PARALLEL switch.
This can be switched On or Off by the foot switch.
3. FOOTSWITCH
There are 2 foot switch jacks to switch the setting of the amplifier as below.
Optional VFS2 or VFS2A is accepted.
TIP!
You can also use a commercially-available open/close type footswitch with a TRS standard phone jack
connection.
4. EMULATED LINE OUT
This output has a built-in analog speaker cabinet emulation circuit. This sounds like you’re using a well-
known dynamic microphone in front of your speaker cabinet.
5. SPEAKER OUTPUTS
MVX150C1 has 1 EXTERNAL speaker jack. Use this jack to use another speaker cabinet. Connecting to this
jack disables the internal speaker. Minimum load is 4ohms.
MVX150H has 2 parallel speaker jacks.
With the MVX150H, you can connect two speakers at the same time, for a parallel connection. When doing
so, make sure that the combined impedance is not less than 4 ohms. When connecting two of the same
speakers, use speaker cabinets of 8 ohms or more on each.
TIP: LOOP ON/OFF
RING: REVERB ON/OFF
Switch 1 Switches the EFFECT LOOP on/off.
Switch 2 Switches the REVERB on/off.
TIP: CHANNEL 1/2
RING: MASTER 1/2
Switch 1 Switches between CHANNEL 1 and CHANNEL 2.
Switch 2 Switches between MASTER1 and MASTER2.
MVX150C1
MVX150H
1
1
2
2
3
3
4
4
55-1
5-1
5-2
5-2
5-3
5-3
5
6
6
7
7
8
8