
Instructions


Table Of Contents
- 1 Introduction
- 2 Using this Manual
- 3 Installation
- 4 Standard Version
- 5 Professional Version
- 5.1 User Management
- 1.1 To launch the user management module, click on File->User Management on the main menu. The user management of this module is only for the web-based version.
- 1.1
- 1.1
- 1.1
- 1.1 N.B. Voltsoft only allowed max. three user exist in the system.
- 5.2 Email Management
- 5.3 Email Template
- 5.4 Email Alert
- 5.5 Custom Graph
- Web Interface
- Using the Voltsoft System (Web)
- Voltsoft also provides a web-based interface for the user to control the device through Internet Explorer (version 7 or 8).
- To access the Voltsoft Web interface, please open Internet Explorer (I.E.) on your local computer and input http://127.0.0.1 or http://localhost. If you change the port number in General Settings to another port number, then you are required to enter ...
- If it is successful the login page will be displayed.
- Enter the valid user login created in the user management module.
- After login, you will see a main screen similar to the Windows client.
- Click on the device entry and you will be prompted to install an ActiveX control issued by CEI Conrad Electronic International (HK) Ltd. Please click Install to install it.
- After the installation, the chart control should be displayed like this:
- Accessing Voltsoft Web from a Remote Computer
- Voltsoft Web allows users to control the device information from a remote computer through I.E., just like the remote feature of the IP camera. However, the computer may need some configuration changes in order to allow access to incoming traffic.
- First, you need to check the IP address of your computer by opening the settings page in the Windows client or check by using command prompt.
- To check by using command prompt, open a command prompt and enter ‘ipconfig’.
- For example, your IP address is 192.168.1.130 in the above example.
- Secondly, check your firewall settings. Go to Control Panel, and click on Windows Firewall.
- For testing, you can turn off your firewall. Or you can also configure the firewall by allowing an exception. For details, please contact your network administrator.
- Then you can try to access the Voltsoft Web through another computer on the same network. E.g. in the above case, you should input http://192.168.1.130 in I.E. If you have any problems, please contact your network administrator to check the network co...
- You may access Voltsoft Web through the Internet from a remote site office, however you will be required to provide the network settings of your computer to your network administrator in order for him/her to configure your company router and firewall.
- Using the Voltsoft System (Web)
- The interface of the Web client will be very similar to the Windows-based client.
- i. Login Screen
- ii. Main Screen
- Screen Layout
- One of the most significant differences between the Windows version and the Web version is that you can arrange the Web version’s device windows into three different layouts: 1) Single Column, 2) Two Columns, 3) Tab Layout
- 1) Single Column
- 2) Two Columns
- 2) Tab Layout
- Limitation in Web Version
- Although the interface and function of the Web version is very similar to the Windows version, they have some differences as following:
- 1) The Web version is targeted to those users who are not in front of the computer which is connected to the device; therefore, the “Add and Remove Device” function will not be available in the Web version.
- 2) The Web version will not auto refreshed in some areas (when compared with the Windows version), so users are required to press “F5” or the “Refresh” button in the browser tool bar on the interface. These areas are:
- i. Device list
- ii. Real-time / Display status for VC930 or VC950
- iii. Real-time / Display status for VC880 or VC650BT
- 6 Supported Devices
- 6.1 DL101T
- 6.2 DL121TH
- 1.1 DL121TH –Web Interface
- 1.1 Please refer to section 5.6 on how to launch the web interface.
- 1.1
- 1.1 The web interface for DL121TH is the same as Windows version, except the downloaded data can only have 10,000 reading in a single download.
- 1.1
- 6.3 DL131G
- 6.4 DL141TH
- 6.5 DL161S
- 6.5.1 Add new DL161S
- 6.5.2 Remove DL161S
- 6.5.3 DL161S – Device Control Panel
- 6.5.4 DL161S – Settings
- 6.5.5 DL161S - Download Data
- 6.5.6 DL161S – Display / Plot Data
- 6.5.7 DL161S – Data View
- 6.5.8 DL161S – Graph View
- 6.5.9 DL161S – Email Alert
- 6.5.10 DL161S – Calibration
- DL161S – Web Interface
- Please refer to section 5.6 on how to launch the web interface.
- The web interface for DL161S is the same as Windows version, except the downloaded data can only have 10,000 readings in a single download.
- 6.6 DL141TH2K
- 1.1
- 1.1 DL141TH2K– Web Interface
- 1.1 Please refer to section 5.6 on how to launch the web interface.
- 1.1
- 1.1 The web interface for DL141TH2K is the same as Windows version, except the downloaded data can only have 10,000 readings in a single download.
- 1.1
- 6.7 DL181THP
- 6.7.1 Add new DL181THP
- 6.7.2 Remove DL181THP
- 6.7.3 DL181THP – Device Control Panel
- 6.7.4 DL181THP – Settings
- 6.7.5 DL181THP - Download Data
- 6.7.6 DL181THP – Display / Plot Data
- 6.7.7 DL181THP – Data View
- 6.7.8 DL181THP – Graph View
- DL181THP – Web Interface
- Please refer to section 5.6 on how to launch the web interface.
- The web interface for DL181THP is the same as Windows version, except the downloaded data can only have 10,000 readings in a single download.
- 6.8 DL131LUX
- 1.1 DL131LUX – Web Interface
- 1.1 Please refer to section 5.6 on how to launch the web interface.
- 1.1
- 1.1 The web interface for DL131LUX is the same as Windows version, except the downloaded data can only have 10,000 readings in a single download.
- 1.1
- 6.9 DL161SAN
- 6.10 DL201THM
- 6.11 DL200T / DL210TH / DL220THP
- 6.11.1 Add new DL200T / DL210TH / DL220THP
- 6.11.2 Remove DL200T / DL210TH / DL220THP
- 6.11.3 DL200T / DL210TH / DL220THP – Device Control Panel
- 6.11.4 DL200T / DL210TH / DL220THP - Settings
- 6.11.5 DL200T / DL210TH / DL220THP - Download Data
- 6.11.6 DL200T / DL210TH / DL220THP – Display / Plot Data
- 6.11.7 DL200T / DL210TH / DL220THP – Data View
- 6.11.8 DL200T / DL210TH / DL220THP – Graph View
- 6.12 DL230L / DL240K
- 6.13 DL111K
- 1.1 DL111K – Web Interface
- 1.1 Please refer to section 5.6 on how to launch the web interface.
- 1.1
- 1.1 The web interface for DL111K is the same as Windows version, except the downloaded data can only have 10,000 readings in a single download.
- 6.14 DL191A
- 6.15 DL191V
- 6.16 DL151AN
- 6.17 PL-125-T2 / PL-125-T4
- 6.17.1 Add new PL-125-T2 / PL-125-T4
- 6.17.2 Remove PL-125-T2 / PL-125-T4
- 6.17.3 PL-125-T2 / PL-125-T4 – Device Control Panel
- 6.17.4 PL125-T2 / PL-125-T4 - Settings
- 6.17.5 PL125-T2 / PL-125-T4 - Download Data
- 6.17.6 PL125-T2 / PL-125-T4 – Display / Plot Data
- 6.17.7 PL125-T2 / PL-125-T4 – Data View
- 6.17.8 PL125-T2 / PL-125-T4 – Graph View
- PL125-T2 / PL-125-T4 –Web Interface
- Please refer to section 5.6 on how to launch the web interface.
- The web interface for 6.11.9 PL125-T2 / PL-125-T4 is the same as Windows version, except the downloaded data can only have 10,000 reading in a single download.
- 6.18 IR 1200-50D / IR 1201-50D
- 6.18.1 Add new IR 1200-50D / IR 1201-50D
- 6.18.2 Remove IR 1200-50D / IR 1201-50D
- 6.18.3 IR 1200-50D / IR 1201-50D – Device Control Panel
- 6.18.4 IR 1200-50D / IR 1201-50D – Settings
- 6.18.5 IR 1200-50D / IR 1201-50D – Play (Real Time Mode)
- 6.18.6 IR 1200-50D / IR 1201-50D – Download Store Data
- 6.18.7 IR 1200-50D / IR 1201-50D – Display / Plot Data
- 6.18.8 IR 1200-50D / IR 1201-50D – Data View
- 6.18.9 IR 1200-50D / IR 1201-50D – Graph View
- 6.19 SL451
- 6.20 VC930 / VC950
- 6.20.1 Add new VC930 / VC950
- 6.20.2 Remove VC930 / VC950
- 6.20.3 VC930 / VC950 – Device Control Panel
- 6.20.4 VC930 / VC950 - Download Data
- 6.20.5 VC930 / VC950 – Settings
- 6.20.6 VC930 / VC950 – Display / Plot Data
- 6.20.7 VC930 / VC950 – Data View
- 6.20.8 VC930 / VC950 – Graph View
- VC930 / VC950 – Web Interface
- Please refer to section 5.6 on how to launch the web interface.
- The web interface for VC930 / VC950 is similar to the Windows version, except two points:
- Downloaded data can only have 10,000 readings in a single download.
- The status of the “Record” and “Display” button will not be refreshed automatically. A “Refresh” button was therefore added, so click on the button to refresh the button status.
- 6.21 VC880 / VC650BT
- 6.21.1 Add new VC880 / VC650BT
- 6.21.2 Remove VC880 / VC650BT
- 6.21.3 VC880 / VC650BT – Device Control Panel
- 6.21.4 VC880 / VC650BT – Settings
- 6.21.5 VC880 / VC650BT – Display / Plot Data
- 6.21.6 VC880 / VC650BT – Data View
- 6.21.7 VC880 / VC650BT – Graph View
- VC880 / VC650BT – Web Interface
- Please refer to section 5.6 on how to launch the web interface.
- The web interface for VC880 / VC650BT is the similar to Windows version, except two points:
- Downloaded data can only have 10,000 readings in a single download.
- The status of the “Record” and “Display” button will not be refreshed automatically. A “Refresh” button was therefore added, so click on the button to refresh the button status.
- 6.22 VC890
- 6.22.1 Add new VC890
- 6.22.2 Remove VC890
- 6.22.3 VC890 – Device Control Panel
- 6.22.4 VC890 – Settings
- 6.22.5 VC890 – Device Setting
- 6.22.6 VC890 - Download Data
- 6.22.7 VC890 – Display / Plot Data
- 6.22.8 VC890 – Data View
- 6.22.9 VC890 – Graph View
- VC890 – Web Interface
- Please refer to section 5.6 on how to launch the web interface.
- The web interface for VC890 is similar to Windows version, except two points:
- Downloaded data can only have 10,000 readings in a single download.
- The status of the “Record” and “Display” button will not be refreshed automatically. A “Refresh” button was therefore added, so click on the button to refresh the button status.
- 6.23 EL4000
- 7 Auto Upgrade
- 8 Appendix
Voltsoft User Manual Version 2.8
122
6.16 DL151AN
DL151AN is a data logger for measuring air velocity.
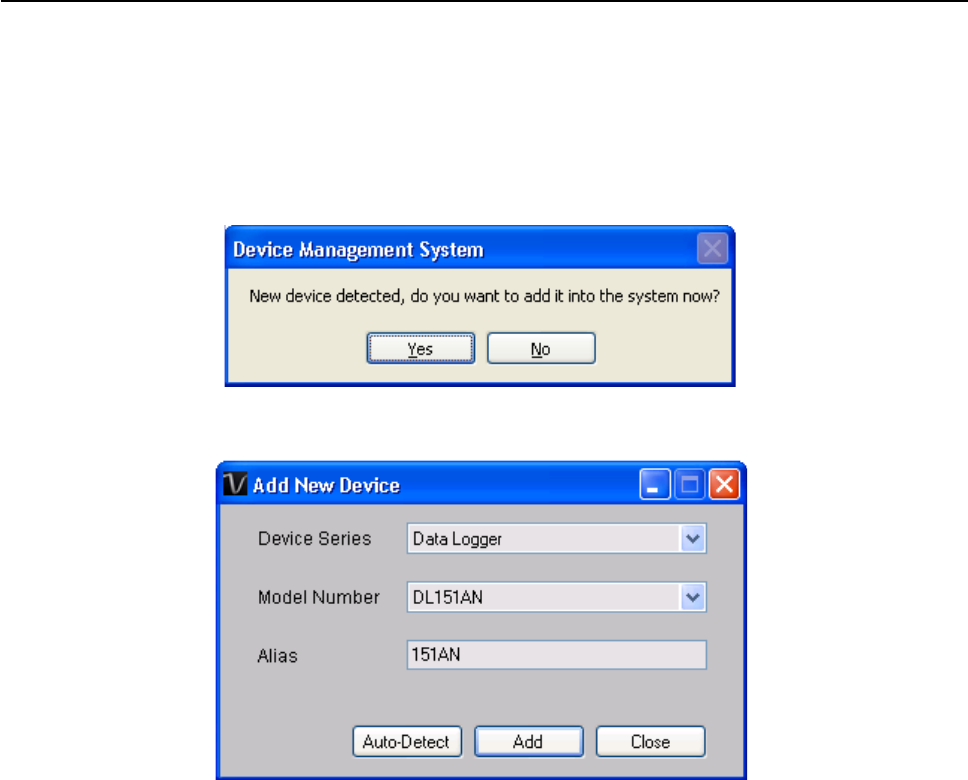
6.16.1 Add new DL151AN
When Voltsoft detected a new DL151AN attached, the following dialog will be popped up:
Click “Yes”, the following dialog will be displayed:
Enter a unique alias for this device, click “Add” will add the device into Voltsoft. User may also
launch this module by select Device Management->Add New Device in menu.
6.16.2 Remove DL151AN
To remove DL151AN, go to Device Management -> Remove Existing Device and its PC data
Storage, select the device you want to remove and click the “Remove” button.