
User manual


50
Temperature measuring
During temperature measurement, only the temperature sensor must be subject to
the the temperature to be measured. The meter working temperature must not be
undercut or exceeded. Otherwise, there may be measuring errors.
The contact temperature sensor must only be used at voltage-free surfaces.
Any K-type thermo sensor may be used for measuring temperatures. The temperature can be displayed
in °C or °F. Optional sensors can be used for the complete measuring range (-40 to +1000 °C).
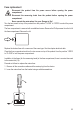
For measuring temperatures, proceed as follows:
1. Switch on the DMM and select measuring range “°C ” / “ºF”.
2. Plug the K type thermocouple into the mAµAºCºF measuring jack (12) in the right polarity with
the plus pole and into the COM measuring jack (11) with the minus pole. If necessary, use suitable
K type plug-in adapters.
3. The main display indicates the temperature value in °C or °F according to the setting.
4. When “OL” is displayed the measuring range has been exceeded.
5. After measuring, remove the sensor and turn off the DMM.
When the measuring input is bridged (sockets: °C/ºF – COM) the DMM device temperature is
indicated. Due to the closed casing, the temperature is only slowly adapted to the ambience
temperature.
12. RANGE FUNCTION, MANUAL MEASUREMENT RANGE
SELECTION
The RANGE function enables manual measuring range selection in some measurement with an
automatic measuring range selection (AUTO). In threshold areas, the measuring range should be set
rmly to prevent undesired switching.
Press the “RANGE” button (2) to activate this function. “AUTO” goes out in the display, and “MANUAL”
appears. Press again to switch to another range.
Press the “RANGE” button for 2 seconds to switch off this function. “AUTO” appears again in the
display (if the autorange function is available for this measuring range).
13. HOLD FUNCTION
The HOLD function freezes the currently indicated measured value to allow you to read or record it easily.
If you test live wires make sure that this function is deactivated before the measurement starts.
Otherwise, the measurement will be incorrect!
To switch on the Hold function, press the HOLD button (9); a signal sound conrms this command and