
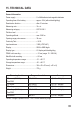
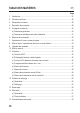
User manual

Only possible in AC mode and applicable for the range between 10 - 282.8 A. Signals of a
length of <10 ms can be captured.
Observe the notes on current measurement in chapter “f”.
• Choose the symbol for current measurement
with the adjustment wheel “6”.
• Briey push the button “8” once. The icon “PEAK” will appear.
• The measured current is indicated on the LC display
• Take the probe sensor “1” from the conductor again after measurement and switch off the
meter. For this, turn the adjustment wheel “6” into the position “OFF”.
Make sure that all circuit parts, circuits and components and other objects of measurement are
disconnected from the voltage and discharged.
• Connect the measuring lines to the meter as described in chapter “10”.
• Choose the symbol for resistance measurement or continuity
with the adjustment
wheel “6”.
• Check the measuring lines for continuity before measurement. Connect the two measuring
prods for this. A signal occurs for continuity testing.
• Now connect the measuring lines to the object to be measured.
• Wait until the resistance value is stably indicated on the LC display. This may take a few
seconds in case of resistances of > 1MΩ.
• If “OL” appears on the display, you have exceeded the measuring range or the measuring
circuit is interrupted.
• In all measured values below 30 Ω, a signal for continuity testing sounds.
• Remove the measuring lines from the object to be measured after completion of the measu-
rement and switch off the measuring device. For this, turn the adjustment wheel “6” into the
position “OFF”.