
User manual


43
d) Replacing the fuse
Observe all safety instructions when replacing the fuse!
Make sure to use replacement fuses of the specied type and nominal current. Use of incorrect or
patched fuses or bypassing the holder is prohibited and can result in a re.
The test inputs “V/ma” (7) and “+10 A” (4) are secured against overload. If measurements can no longer be conducted,
the corresponding fuse is in need or replacement.
Proceed as follows to replace a fuse:
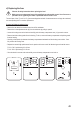
- Remove the test leads from the device and turn off the multimeter.
- Remove the 0 ohm adjustment knob (8) from the multimeter by pulling it upward.
-
Loosen the housing screw at the back and carefully push the battery compartment cover (10) upward to remove.
- Remove both side rubber guards from the housing. To do so, start at the battery compartment and pull the guards
from the housing.
- Carefully pull the plastic pin between the battery compartments backward until the housing case unlocks. Care-
fully remove the housing case.
- Replace the ceramic high-performance fuse in question with a new one of the identical type and nominal current.
F 0.5 A / 500 V quick-acting 6.3 x 32 mm
F 10 A / 500 V quick-acting 6.3 x 32 mm
-
Close the device in reverse order and carefully screw the battery compartment cover back on.