
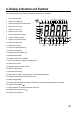
Instructions
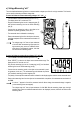

48
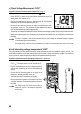
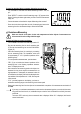
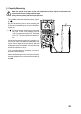
h) Diode Test
Make sure that all circuit parts, circuits and components and other objects of measurement are
disconnected from the voltage and discharged.
- Turn the DMM on and select the measuring function
- Plugthe redmeasuringlineintotheΩmeasuringjack
(E) and the black measuring line into the COM measur-
ing jack (D).
- Check the measuring lines for continuity by connecting
the two measuring prods. The value must be approxi-
mately 0,000 V.
- Connect the two measuring prods with the object to be
measured (diode).
- Thedisplayshowsthecontinuityvoltage“UF”involt(V).
If“OL”appears,thediodeismeasuredinreversedirec-
tion (UR) or the diode is faulty (interruption). Perform a
counter-pole measurement to check.
- Remove the measuring lines from the object to be meas-
ured after completion of the measurement and switch off
the DMM.
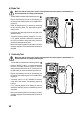
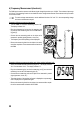
i) Continuity Test
Make sure that all circuit parts, circuits and components and other objects of measurement are
disconnected from the voltage and discharged.
- Turn the DMM on and select the measuring function
- Pressthe“SELECT”button1xtoswitchmeasurement
functions. The display shows the symbol for continuity
testingandthesymbolfortheunit“Ω”.Pressingthisbut-
ton again takes you to the next measuring function, etc.
- Plugthe redmeasuringlineintotheΩmeasuringjack
(E) and the black measuring line into the COM measur-
ing jack (D).
- Acontinuityvalueof≤10Ωisidentiedascontinuity;
in this case a beep sounds. The measuring range is up
to600Ω.
- If“OL”(overload)appearsonthedisplay,youhaveex-
ceeded the measuring range or the measuring circuit is
interrupted.
- Remove the measuring lines from the object to be meas-
ured after completion of the measurement and switch off
the DMM.