
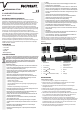
User manual

Enter the date and time when using the camera for the rst time or after periods
when the device has had no power supply. Recorded images and videos are saved
in folders which are created and sorted according to the date the images and videos
were captured. The steps for conguring the date and time can be found in the
"Setup menu" section. After removing the battery, saved settings such as date and
time are stored for approximately 10 minutes. After this time the settings must be
recongured when the camera is turned back on.
b) Inserting the Micro SD card
1. A Micro SDHC card (class 6 or higher, up to 32 GB memory capacity) must be inserted to
record audio/video. If no memory card is inserted then the monitor only displays video in
real time; you cannot save A/V data for subsequent playback. The message "Card is not
ready" is displayed when the down
(3) or up (5) buttons are pressed in video mode.
In playback mode the message "No data exists" is displayed.
2. Open the head cover (8) and carefully insert a Micro SDHC card into the memory card
slot (9). Ensure that the card is inserted in the correct position. Do not force the card into
the slot. You will hear a gentle click when the card has been inserted.
3. To remove, press the card slightly and then let go when you hear a gentle click. Remove
the card from its slot.
c) Playback of photos and videos.
1. Connect the camera to a PC using the USB cable.
2. Press the
button (4) to turn the camera on. The memory card will be recognised by the
computer's operating system and mounted as a normal disk drive. The SD symbol will
be displayed on the TFT-LCD display when the camera is switched on.
3. You can copy and delete data from the memory card or view and edit photos and videos
using appropriate software.
d) Turning inspection camera on/off
1. Press the
button (4) to turn the camera on. The camera enters video mode when
turned on for the rst time.
2. Hold the
button down for approximately 2 seconds to turn the device off.
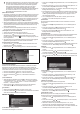
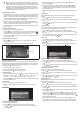
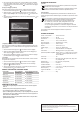
Video mode/resolution Video recording time (hh : mm : ss)
Date/time display Battery level indicator
Zoom indicator
e) Recording photos and videos
After turning on the camera you can record videos and photos once the data and time have
been congured. See section SETUP MENU, managing date/time. The video mode must be
activated in order to capture photos and videos. These will then be saved onto the memory
card and automatically sorted according to date.
1. Press the up button
once to take a photo.
2. Press the down button
once to start recording a video.
3. Press the down button
once to stop recording a video.
f) LED light functions
1. Choose one of the light functions with the
button (6). Click through the functions in the
following order: 1
st
click = dimmed → 2
nd
click = semi-dimmed → 3
rd
click = bright → 4
th
click = ash → 5
th
click = SOS function (in Morse code) → 6
th
click = LED off.
2. Hold down the
button for approximately 2 seconds to turn off the LED without clicking
through the full function cycle.
g) Zoom function
1. Hold down the up button
to use the digital zoom (1x-4x).
2. Release the up button
to stop zooming in. The zoom function only works in video
mode.
SETUP MENU
a) Video mode and playback mode
For the capture and playback of A/V data.
1. Press the
button (4) when the camera is turned on to enter the setup menu.
2. Use the
(5) and (3) buttons to scroll to "Playback mode". Conrm your selection
using the button.
3. Select "Playback mode" or "Cancel" by pressing the buttons
and . Conrm your
selection using the button.
4. The playback mode is now active. When in playback mode, use the
and buttons
to view and move between previously captured photos and videos. Playback begins
immediately after a video has been selected. You can jump from one video to another
without stopping playback.
5. To switch from playback mode to video mode, follow the above steps and select "Video
mode".
b) Looping video
Video recording begins when the camera is turned on. The recording must be stopped
manually.
1. Press the
button when the camera is turned on to enter the setup menu.
2. Use the
and buttons to scroll to "Looping video". Conrm your selection using the
button.
3. Scroll with the
and buttons. Turn looping video "On" / "Off". Conrm your selection
using the button.
c) Underwater mode
The underwater mode can be switched on before using the camera underwater. When this
mode is switched on, the underwater picture quality is improved.
1. Press the
button when the camera is turned on to enter the setup menu.
2. Use the
and buttons to scroll to "Underwater". Conrm your selection using the
button.
3. Scroll to the desired option using the
and buttons. Turn the underwater mode "On" /
"Off". Conrm your selection using the button.
d) Image size
1. Press the
button when the camera is turned on to enter the setup menu.
2. Use the
and buttons to scroll to "Capture resolution". Conrm your selection using
the button.
3. Use the
and buttons to scroll to the desired image size (2592 x 1944, 2048 x 1536,
1280 x 720, 640 x 480). Conrm your selection using the
button.
e) Video resolution
1. Press the
button when the camera is turned on to enter the setup menu.
2. Use the
and buttons to scroll to "Resolution". Conrm your selection using the
button.
3. Use the
and buttons to scroll to the desired video resolution (1280 x 720, 640 x 480).
Conrm your selection using the button.
f) Turning microphone on/off
Audio is not recorded when the microphone is switched off.
1. Press the
button when the camera is turned on to enter the setup menu.
2. Use the
and buttons to scroll to "Microphone". Conrm your selection using the
button.
3. Use the
and buttons to scroll to the desired option. Turn the microphone "On" / "Off".
Conrm your selection using the button.
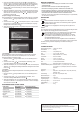
g) Managing date/time
The date displayed on the TFT-LCD display can be turned on or off. The date, time and
display format can be congured.
1. Press the
button when the camera is turned on to enter the setup menu.
2. Use the
and buttons to scroll to "Date". Conrm your selection using the button.
3. Select "On" / "Off" in the sub-menu to turn the date display on/off. Conrm your selection
using the
button.
4. Select "Congure date display" to congure the date. The adjustable value (year, month,
day) is highlighted in colour.
5. Increase the value using the
button. Use the button to decrease the value. Conrm
each value using the button. When you have nished conguring the date you can
congure the time (hours, minutes, seconds). To exit the date settings, hold down the
button for approximately 1 second.
6. Choose "Date design" from the menu. The chosen date format is highlighted in colour.
You can choose from year/month/day, month/year/day and day/month/year. Use the
and
buttons to choose a format. Conrm each of your settings using the button.