
6.5.1
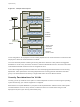

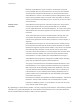
Table Of Contents
- vSphere Security
- Contents
- About vSphere Security
- Updated Information
- Security in the vSphere Environment
- vSphere Permissions and User Management Tasks
- Securing ESXi Hosts
- Configure ESXi Hosts with Host Profiles
- General ESXi Security Recommendations
- Use Scripts to Manage Host Configuration Settings
- ESXi Passwords and Account Lockout
- SSH Security
- PCI and PCIe Devices and ESXi
- Disable the Managed Object Browser
- ESXi Networking Security Recommendations
- Modifying ESXi Web Proxy Settings
- vSphere Auto Deploy Security Considerations
- Control Access for CIM-Based Hardware Monitoring Tools
- Certificate Management for ESXi Hosts
- Host Upgrades and Certificates
- Certificate Mode Switch Workflows
- ESXi Certificate Default Settings
- View Certificate Expiration Information for Multiple ESXi Hosts
- View Certificate Details for a Single ESXi Host
- Renew or Refresh ESXi Certificates
- Change the Certificate Mode
- Replacing ESXi SSL Certificates and Keys
- Use Custom Certificates With Auto Deploy
- Restore ESXi Certificate and Key Files
- Customizing Hosts with the Security Profile
- ESXi Firewall Configuration
- Customizing ESXi Services from the Security Profile
- Enable or Disable a Service in the Security Profile
- Lockdown Mode
- Manage the Acceptance Levels of Hosts and VIBs
- Assigning Privileges for ESXi Hosts
- Using Active Directory to Manage ESXi Users
- Using vSphere Authentication Proxy
- Enable vSphere Authentication Proxy
- Add a Domain to vSphere Authentication Proxy with the vSphere Web Client
- Add a Domain to vSphere Authentication Proxy with the camconfig Command
- Use vSphere Authentication Proxy to Add a Host to a Domain
- Enable Client Authentication for vSphere Authentication Proxy
- Import the vSphere Authentication Proxy Certificate to ESXi Host
- Generate a New Certificate for vSphere Authentication Proxy
- Set Up vSphere Authentication Proxy to Use Custom Certificates
- Configuring Smart Card Authentication for ESXi
- Using the ESXi Shell
- UEFI Secure Boot for ESXi Hosts
- ESXi Log Files
- Securing vCenter Server Systems
- vCenter Server Security Best Practices
- Verify Thumbprints for Legacy ESXi Hosts
- Verify that SSL Certificate Validation Over Network File Copy Is Enabled
- Required Ports for vCenter Server and Platform Services Controller
- Additional vCenter Server TCP and UDP Ports
- Securing Virtual Machines
- Enable or Disable UEFI Secure Boot for a Virtual Machine
- Limit Informational Messages From Virtual Machines to VMX Files
- Prevent Virtual Disk Shrinking
- Virtual Machine Security Best Practices
- General Virtual Machine Protection
- Use Templates to Deploy Virtual Machines
- Minimize Use of the Virtual Machine Console
- Prevent Virtual Machines from Taking Over Resources
- Disable Unnecessary Functions Inside Virtual Machines
- Remove Unnecessary Hardware Devices
- Disable Unused Display Features
- Disable Unexposed Features
- Disable HGFS File Transfers
- Disable Copy and Paste Operations Between Guest Operating System and Remote Console
- Limiting Exposure of Sensitive Data Copied to the Clipboard
- Restrict Users From Running Commands Within a Virtual Machine
- Prevent a Virtual Machine User or Process From Disconnecting Devices
- Prevent Guest Operating System Processes from Sending Configuration Messages to the Host
- Avoid Using Independent Nonpersistent Disks
- Virtual Machine Encryption
- Use Encryption in Your vSphere Environment
- Set up the Key Management Server Cluster
- Create an Encryption Storage Policy
- Enable Host Encryption Mode Explicitly
- Disable Host Encryption Mode
- Create an Encrypted Virtual Machine
- Clone an Encrypted Virtual Machine
- Encrypt an Existing Virtual Machine or Virtual Disk
- Decrypt an Encrypted Virtual Machine or Virtual Disk
- Change the Encryption Policy for Virtual Disks
- Resolve Missing Key Issues
- vSphere Virtual Machine Encryption and Core Dumps
- Securing vSphere Networking
- Introduction to vSphere Network Security
- Securing the Network With Firewalls
- Secure the Physical Switch
- Securing Standard Switch Ports with Security Policies
- Securing vSphere Standard Switches
- Standard Switch Protection and VLANs
- Secure vSphere Distributed Switches and Distributed Port Groups
- Securing Virtual Machines with VLANs
- Creating Multiple Networks Within a Single ESXi Host
- Internet Protocol Security
- Ensure Proper SNMP Configuration
- vSphere Networking Security Best Practices
- Best Practices Involving Multiple vSphere Components
- Synchronizing Clocks on the vSphere Network
- Storage Security Best Practices
- Verify That Sending Host Performance Data to Guests is Disabled
- Setting Timeouts for the ESXi Shell and vSphere Web Client
- Managing TLS Protocol Configuration with the TLS Configurator Utility
- Ports That Support Disabling TLS Versions
- Disabling TLS Versions in vSphere
- Install the TLS Configuration Utility
- Perform an Optional Manual Backup
- Disable TLS Versions on vCenter Server Systems
- Disable TLS Versions on ESXi Hosts
- Disable TLS Versions on Platform Services Controller Systems
- Revert TLS Configuration Changes
- Disable TLS Versions on vSphere Update Manager
- Defined Privileges
- Alarms Privileges
- Auto Deploy and Image Profile Privileges
- Certificates Privileges
- Content Library Privileges
- Cryptographic Operations Privileges
- Datacenter Privileges
- Datastore Privileges
- Datastore Cluster Privileges
- Distributed Switch Privileges
- ESX Agent Manager Privileges
- Extension Privileges
- Folder Privileges
- Global Privileges
- Host CIM Privileges
- Host Configuration Privileges
- Host Inventory
- Host Local Operations Privileges
- Host vSphere Replication Privileges
- Host Profile Privileges
- Network Privileges
- Performance Privileges
- Permissions Privileges
- Profile-driven Storage Privileges
- Resource Privileges
- Scheduled Task Privileges
- Sessions Privileges
- Storage Views Privileges
- Tasks Privileges
- Transfer Service Privileges
- Virtual Machine Configuration Privileges
- Virtual Machine Guest Operations Privileges
- Virtual Machine Interaction Privileges
- Virtual Machine Inventory Privileges
- Virtual Machine Provisioning Privileges
- Virtual Machine Service Configuration Privileges
- Virtual Machine Snapshot Management Privileges
- Virtual Machine vSphere Replication Privileges
- dvPort Group Privileges
- vApp Privileges
- vServices Privileges
- vSphere Tagging Privileges
Because Virtual Machine 1 does not share a virtual switch or physical
network adapter with any virtual machines in the host, the other resident
virtual machines cannot transmit packets to or receive packets from the
Virtual Machine 1 network. This restriction prevents sniffing attacks, which
require sending network traffic to the victim. More importantly, an attacker
cannot use the natural vulnerability of FTP to access any of the host’s other
virtual machines.
Internal virtual
machines
Virtual Machines 2 through 5 are reserved for internal use. These virtual
machines process and store company-private data such as medical
records, legal settlements, and fraud investigations. As a result, the system
administrators must ensure the highest level of protection for these virtual
machines.
These virtual machines connect to Internal Network 2 through their own
virtual switch and network adapter. Internal Network 2 is reserved for
internal use by personnel such as claims processors, in-house lawyers, or
adjustors.
Virtual Machines 2 through 5 can communicate with one another through
the virtual switch and with internal virtual machines elsewhere on Internal
Network 2 through the physical network adapter. They cannot communicate
with externally facing machines. As with the FTP server, these virtual
machines cannot send packets to or receive packets from the other virtual
machines’ networks. Similarly, the host’s other virtual machines cannot
send packets to or receive packets from Virtual Machines 2 through 5.
DMZ Virtual Machines 6 through 8 are configured as a DMZ that the marketing
group uses to publish the company’s external Web site.
This group of virtual machines is associated with External Network 2 and
Internal Network 1. The company uses External Network 2 to support the
Web servers that use the marketing and financial department to host the
corporate Web site and other Web facilities that it hosts to outside users.
Internal Network 1 is the conduit that the marketing department uses to
publish content to the corporate Web site, post downloads, and maintain
services like user forums.
Because these networks are separate from External Network 1 and Internal
Network 2, and the virtual machines have no shared points of contact
(switches or adapters), there is no risk of attack to or from the FTP server
or the internal virtual machine group.
By capitalizing on virtual machine isolation, correctly configuring virtual switches, and maintaining network
separation, the system administrator can house all three virtual machine zones in the same ESXi host
and be confident that there will be no data or resource breaches.
vSphere Security
VMware, Inc. 190