
5.8
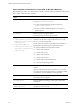
Table Of Contents
- VMware vRealize Configuration ManagerAdministration Guide
- Contents
- About This Book
- Getting Started with VCM
- Installing and Getting Started with VCM Tools
- Configuring VMware Cloud Infrastructure
- Virtual Environments Configuration
- Configure Virtual Environments Collections
- Configure Managing Agent Machines for Virtual Environment Management
- Obtain the SSL Certificate Thumbprint
- Configure vCenter Server Data Collections
- Configure vCenter Server Virtual Machine Collections
- Configure vCloud Director Collections
- Configure vCloud Director vApp Virtual Machines Collections
- Configure vShield Manager Collections
- Configure ESX Service Console OS Collections
- Configure the vSphere Client VCM Plug-In
- Running Compliance for the VMware Cloud Infrastructure
- Create and Run Virtual Environment Compliance Templates
- Create Virtual Environment Compliance Rule Groups
- Create and Test Virtual Environment Compliance Rules
- Create and Test Virtual Environment Compliance Filters
- Preview Virtual Environment Compliance Rule Groups
- Create Virtual Environment Compliance Templates
- Run Virtual Environment Compliance Templates
- Create Virtual Environment Compliance Exceptions
- Resolve Noncompliant Virtual Environments Template Results
- Configure Alerts and Schedule Virtual Environment Compliance Runs
- Configuring vCenter Operations Manager Integration
- Auditing Security Changes in Your Environment
- Configuring Windows Machines
- Configure Windows Machines
- Windows Collection Results
- Getting Started with Windows Custom Information
- Prerequisites to Collect Windows Custom Information
- Using PowerShell Scripts for WCI Collections
- Windows Custom Information Change Management
- Collecting Windows Custom Information
- Create Your Own WCI PowerShell Collection Script
- Verify that Your Custom PowerShell Script is Valid
- Install PowerShell
- Collect Windows Custom Information Data
- Run the Script-Based Collection Filter
- View Windows Custom Information Job Status Details
- Windows Custom Information Collection Results
- Run Windows Custom Information Reports
- Troubleshooting Custom PowerShell Scripts
- Configuring Linux, UNIX, and Mac OS X Machines
- Linux, UNIX, and Mac OS X Machine Management
- Linux, UNIX, or Mac OS X Installation Credentials
- Configure Collections from Linux, UNIX, and Mac OS X Machines
- Configure Installation Delegate Machines to Install Linux, UNIX, and Mac OS X...
- Configure the HTTPS Bypass Setting for Linux Agent Installations
- Enable Linux, UNIX, and Mac OS X Agent Installation
- Add and License Linux, UNIX, and Mac OS X Machines for Agent Installation
- Install the VCM Agent on Linux, UNIX, and Mac OS X Operating Systems
- Collect Linux, UNIX, and Mac OS X Data
- Linux, UNIX, and Mac OS X Collection Results
- Configure Scheduled Linux, UNIX, and Mac OS X Collections
- Using Linux and UNIX Custom Information Types
- File Types that VCM can Parse
- Parsers for Supported File Types
- Identification Expressions
- Parser Directives
- Parser Directives for Linux, UNIX, and Mac OS X
- Creating Custom Information Types for Linux and UNIX
- Custom Information Types for Linux, UNIX, and Mac OS X
- Add, Edit, or Clone Custom Information Types for Linux and UNIX
- UNIX Custom Information Data View in the Console
- Path Panel in the VCM Collection Filter
- Patching Managed Machines
- Patch Assessment and Deployment
- Prerequisite Tasks and Requirements
- Manually Patching Managed Machines
- Getting Started with VCM Manual Patching
- Configuring An Automated Patch Deployment Environment
- Deploying Patches with Automated Patch Assessment and Deployment
- Configure VCM for Automatic Event-Driven Patch Assessment and Deployment
- Generate a Patch Assessment Template
- Run a Patch Assessment on Managed Machines
- Add Exceptions for Patching Managed Machines
- Configure the VCM Administration Settings
- Generate a Patch Deployment Mapping
- Configure VCM for Automatic Scheduled Patch Assessment and Deployment
- How the Linux and UNIX Patch Staging Works
- How the Linux and UNIX Patching Job Chain Works
- How the Deploy Action Works
- Patch Deployment Wizards
- Running Patching Reports
- Running and Enforcing Compliance
- Configuring Active Directory Environments
- Configuring Remote Machines
- Tracking Unmanaged Hardware and Software Asset Data
- Managing Changes with Service Desk Integration
- Index

Agent Installation Parameters for Linux, UNIX, or Mac OS X Machines
The installation parameters are variables that you modify as needed when you install the VCM Agent on
Linux, UNIX, or Mac OS X target machines.
Installation Options with Default
Values
Description
CSI_AGENT_RUN_OPTION
You can install the Agent as a daemon process or installed to
be run by inetd/xinetd/launchd.
n A value of inetd installs the Agent for execution by
inetd/xinetd/launchd.
n A value of daemon installs the agent for execution as a
daemon process.
CSI_BIND_IP
Binds the Agent to a single IP address.
This value is only honored in daemon mode.
CSI_NO_LOGIN_SHELL= +S:+A
:+/sbin/noshell+/bin/false+
/sbin/false+/usr/bin/false
+/sbin/nologin
CSI_NO_LOGIN_SHELL= +D
:+/sbin/noshell+/bin/false+
/sbin/false+/usr/bin/false
+/sbin/nologin
The CSI_USER account must not have a login shell. This
parameter lists all valid no-login shells and is used to verify
the CSI_USER has no-login shell.
If your system has a valid no login shell that is not listed, you
append a plus sign and add the no login shell to the list.
The options available for this parameter include:
n +S means only for Solaris
n +A means only for AIX
n +H means only for HP-UX
n +L means only for Linux
n +D means only for Darwin (Mac OS X)
n + means for all operating systems
CSI_CREATE_USER=Y
Keep the default value. Indicates whether the user will be
created.
When you install in trusted mode on HP-UX v1.0 (11.11), the
user must existon the target machine. If you attempt to install
and create the user, the installation of the Agent fails.
CSI_ROOT_NAME
Name of the directory where the Agent files are located.
The default value is CMAgent.
CSI_USER_ID=501 Keep the default value. Integer value for the user ID of the
created user.
CSI_USER_NO_LOGIN_
SHELL=/bin/false
Keep the default value. Indicates the no-login shell value to
use when you create the user.
vRealize Configuration Manager Administration Guide
130
VMware, Inc.