
7.0
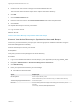
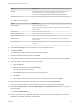

Table Of Contents
- Upgrading from vRealize Automation 6.2 to 7.0.1
- Contents
- Upgrading to vRealize Automation 7.0
- Updated Information
- Upgrading vRealize Automation
- Checklist for Upgrading vRealize Automation Components
- Considerations About Upgrading to This vRealize Automation Version
- Upgrade and Identity Appliance Specifications
- Upgrade and Licensing
- Understanding How Roles Are Upgraded
- Understanding How Blueprints Are Upgraded
- Upgrade and vApp Blueprints, vCloud Endpoints, and vCloud Reservations
- Understanding How Multi-Machine Blueprints Are Upgraded
- Upgrade and Physical Endpoints, Reservations, and Blueprints
- Upgrade and Network Profile Settings
- Upgrade and Entitled Actions
- Upgrade and Custom Properties
- Upgrade and Application Services
- Upgrade and Advanced Service Design
- Upgrade and Blueprint Cost Information
- Prerequisites for Upgrading vRealize Automation
- Preparing to Upgrade vRealize Automation
- Backing up and Saving Your Existing Environment
- Shut Down vCloud Automation Center Services on Your IaaS Windows...
- Prepare a Clustered PostgreSQL Environment for Upgrade
- Increase vCenter Server Hardware Resources for Upgrade
- (Optional) Reconfigure Disk 1 on All vRealize Automation Appliance Nodes
- Create a SaaS Schema and Citext Extension for External vRealize...
- Downloading vRealize Automation Appliance Updates
- Updating the vRealize Automation Appliance
- (Alternative Option) Upgrade the External PostgreSQL Virtual Appliance
- Install the Update on the vRealize Automation Appliance
- Update Your Single Sign-On Password for VMware Identity Manager
- Update the License Key
- Migrate Identity Stores to the VMware Identity Manager
- Install the Update on Additional vRealize Automation Appliances
- Upgrading the IaaS Server Components
- Upgrade Stand-Alone External vRealize Orchestrator for Use With vRealize Automation
- Upgrade External vRealize Orchestrator Appliance Clusters
- Add Users or Groups to an Active Directory Connection
- Enable Your Load Balancers
- Post-Upgrade Tasks for vRealize Automation
- Port Configuration for High-Availability Deployments
- Enabling the Connect to Remote Console Action for Consumers
- Reconfigure External Workflow Timeouts
- Verify That vRealize Orchestrator Service is Available
- Restore Embedded vRealize Orchestrator Endpoint
- Configure an External PostgreSQL Database to Merge into an Embedded PostgreSQL Environment
- Restore Changes to Logging
- Ensure Deployed Virtual Machines Register With Software Service
- Troubleshooting the Upgrade
- Migration of Identity Store Fails Because the Active Directory is...
- Migration of Identity Store Fails Because of Incorrect Credentials
- Migration of Identity Store Fails With a Timeout Error Message...
- Installation or Upgrade Fails with a Load Balancer Timeout Error...
- Upgrade Fails for Website Component During IaaS Upgrade
- Incorrect Tab Names Appear Intermittently
- Manager Service Fails to Run Due to SSL Validation Errors...
- Log In Fails After Upgrade
- Catalog Items Appear in the Service Catalog But Are Not...
- User Migration Batch Files Are Ineffective

5 Create a local user account to assign to the tenant administrator role.
The local user name should be unique to the vsphere.local active directory.
6 Click OK.
7 Click the Administrators tab.
8 Enter the local user name in the Tenant administrators search box and press Enter.
9 Click Finish.
10 Repeat these steps for each of your tenants.
11 Log out of the console.
What to do next
Connect Your Active Directory to Synchronize Users and Groups
Connect Your Active Directory to Synchronize Users and Groups
Connect to your Active Directory to import your users and groups into vRealize Automation using the
Directories Management functionality.
Perform these steps for each of your tenants.
Prerequisites
Verify that you have access privileges to the Active Directory.
Procedure
1 Log in to the vRealize Automation console, https://vra-appliance/vcac/org/tenant_name .
2 Navigate to Administration > Directories Management > Directories.
3 Click Add Directory.
4 Enter your specific Active Directory account settings.
u
Non-Native Active Directories
Option Sample Input
Directory Name Enter a unique directory name.
Select Active Directory over LDAP when using non-Native Active Directory.
This Directory Supports DNS Services Uncheck this option.
Base DN Enter the Distinguished Name (DN) of the starting point for directory server
searches.
For example, cn=users,dc=rainpole,dc=local.
Upgrading from vRealize Automation 6.2 to 7.0.1
VMware, Inc. 33