
6.2
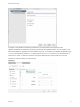
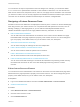
Table Of Contents
- Advanced Service Design
- Contents
- Advanced Service Design
- Updated Information for Advanced Service Design
- Using the Goal Navigator
- Introduction to VMware vRealize Orchestrator
- Configuring vRealize Orchestrator and Plug-Ins
- Authoring Services with Advanced Service Designer
- Advanced Service Designer Basics
- Creating an Advanced Service Overview
- Create a Custom Resource
- Create a Service Blueprint
- Publish a Service Blueprint as a Catalog Item
- Create a Resource Action
- Publish a Resource Action
- Assign an Icon to a Resource Action
- Create a Service
- Associate a Catalog Item with a Service
- Create an Approval Policy for Advanced Service Blueprints and Actions
- Entitle a Service, Catalog Items, and Actions to a User or a Group of Users
- Extending Operations on Resources Provisioned by Other Sources
- Importing and Exporting Advanced Service Designer Components
- Form Designer
- Advanced Service Designer Examples and Scenarios
- Create a Service for Creating and Modifying a User
- Create a Test User as a Custom Resource
- Create a Service Blueprint for Creating a User
- Publish the Create a User Blueprint as a Catalog Item
- Create a Resource Action to Change a User Password
- Publish the Change a Password Resource Action
- Create a Service for Creating a Test User
- Associate the Catalog Item with the Create a Test User Service
- Entitle the Service and the Resource Action to a Consumer
- Create and Publish an Action to Migrate a Virtual Machine
- Create an Action to Migrate a Virtual Machine With vMotion
- Create and Publish an Action to Take a Snapshot
- Create and Publish an Action to Start an Amazon Virtual Machine
- Creating a Data Refresh Service Offering
- Create a Service for Creating and Modifying a User
2 Click the custom resource to edit.
3 Click the Details Form tab.
4 Drag the Section header element from the Form pane to the Form page pane.
5 Type a name for the section.
6 Click outside of the element to save the changes.
7 Click Update.
Insert a Text Element in a Custom Resource Form
You can insert a text box to add some descriptive text to the form.
Prerequisites
n
Log in to the vRealize Automation console as a tenant administrator or service architect.
n
Create a Custom Resource.
Procedure
1 Select Advanced Services > Custom Resources.
2 Click the custom resource to edit.
3 Click the Details Form tab.
4 Drag the Text element from the Form pane to the Form page pane.
5 Enter the text you want to add.
6 Click outside of the element to save the changes.
7 Click Update.
Insert an Externally Defined Field in a Custom Resource Form
You can insert a new field and assign it an external value definition to dynamically provide read-only
information that consumers can see on the item details page when they provision a custom resource.
Prerequisites
n
Log in to the vRealize Automation console as a tenant administrator or service architect.
n
Create a Custom Resource.
n
Develop or import a vRealize Orchestrator script action to retrieve the information you want to provide
to consumers.
Procedure
1 Select Advanced Services > Custom Resources.
2 Click the custom resource to edit.
3 Click the Details Form tab.
Advanced Service Design
VMware, Inc. 60