
6.2
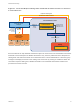
Table Of Contents
- Advanced Service Design
- Contents
- Advanced Service Design
- Updated Information for Advanced Service Design
- Using the Goal Navigator
- Introduction to VMware vRealize Orchestrator
- Configuring vRealize Orchestrator and Plug-Ins
- Authoring Services with Advanced Service Designer
- Advanced Service Designer Basics
- Creating an Advanced Service Overview
- Create a Custom Resource
- Create a Service Blueprint
- Publish a Service Blueprint as a Catalog Item
- Create a Resource Action
- Publish a Resource Action
- Assign an Icon to a Resource Action
- Create a Service
- Associate a Catalog Item with a Service
- Create an Approval Policy for Advanced Service Blueprints and Actions
- Entitle a Service, Catalog Items, and Actions to a User or a Group of Users
- Extending Operations on Resources Provisioned by Other Sources
- Importing and Exporting Advanced Service Designer Components
- Form Designer
- Advanced Service Designer Examples and Scenarios
- Create a Service for Creating and Modifying a User
- Create a Test User as a Custom Resource
- Create a Service Blueprint for Creating a User
- Publish the Create a User Blueprint as a Catalog Item
- Create a Resource Action to Change a User Password
- Publish the Change a Password Resource Action
- Create a Service for Creating a Test User
- Associate the Catalog Item with the Create a Test User Service
- Entitle the Service and the Resource Action to a Consumer
- Create and Publish an Action to Migrate a Virtual Machine
- Create an Action to Migrate a Virtual Machine With vMotion
- Create and Publish an Action to Take a Snapshot
- Create and Publish an Action to Start an Amazon Virtual Machine
- Creating a Data Refresh Service Offering
- Create a Service for Creating and Modifying a User

Prerequisites
Log in to the vRealize Automation console as a system administrator.
Procedure
1 Select Administration > Advanced Services > Default Orchestrator Folder.
2 Click the name of the tenant you want to edit.
3 Browse the vRealize Orchestrator workflow library and select a folder.
4 Click Add.
You defined the default vRealize Orchestrator workflow folder for a tenant.
What to do next
Repeat the procedure for all of the tenants for which you want to define a default workflow folder.
Configuring Advanced Service Endpoints
By configuring advanced service endpoints you can connect the vRealize Automation to your
environment. When you configure vRealize Orchestrator plug-ins as endpoints, you use the
vRealize Automation user interface to configure the plug-ins instead of using the vRealize Orchestrator
configuration interface.
To use vRealize Orchestrator capabilities and the vRealize Orchestrator plug-ins to expose VMware and
third-party technologies to vRealize Automation, you can configure the vRealize Orchestrator plug-ins by
adding the plug-ins as endpoints. This way, you create connections to different hosts and servers, such
as vCenter Server instances, a Microsoft Active Directory host, and so on.
When you add a vRealize Orchestrator plug-in as an endpoint by using the vRealize Automation UI, you
run a configuration workflow in the default vRealize Orchestrator server. The configuration workflows are
located in the Orchestrator > vCAC > ASD > Endpoint Configuration workflows folder.
Important Configuring a single plug-in in vRealize Orchestrator and in the vRealize Automation console
is not supported and results in errors.
Configure the Active Directory Plug-In as an Endpoint
You can add an endpoint and configure the Active Directory plug-in to connect to a running Active
Directory instance and manage users and user groups, Active Directory computers, organizational units,
and so on.
Important By using the Microsoft Active Directory plug-in, you can orchestrate only one connection to
an Active Directory host. You cannot add multiple Microsoft Active Directory instances as endpoints. You
cannot delete an Active Directory endpoint. After you add an Active Directory endpoint, you can update it
at any time.
Advanced Service Design
VMware, Inc. 18