
6.2
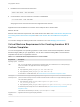

Table Of Contents
- Using Application Services
- Contents
- Using Application Services
- Updated Information
- Introducing Application Services
- Install and Configure Application Services
- Installing Application Services
- Preparing to Install Application Services
- Start the Application Services Appliance
- Troubleshooting Problems Connecting to the Application Services Web Interface
- Unlock Your darwin_user Account
- Restart Application Services
- Configure Application Services to Use a Proxy for External URLs
- Register Application Services to vRealize Automation
- Upgrading Application Services
- Setting Up Users and Groups
- Using Tenants and Business Groups in Application Services
- Import Predefined Content to a Tenant
- Using the Application Services Web Interface
- Setting Up Application Provisioning for the Application Services Environment
- Virtual Machine Requirements for Creating vRealize Automation Custom Templates
- Creating Virtual Machine Templates in vRealize Automation
- Updating Existing Virtual Machine Templates in vRealize Automation
- Register the vRealize Automation Cloud Provider and Template
- Create a vRealize Automation Deployment Environment
- Setting Up Application Provisioning for the vCloud Director Environment
- Virtual Machine Requirements for Creating vCloud Director Custom Templates
- Creating Windows Virtual Machine Templates in vCloud Director
- Create Linux Virtual Machine Templates in vCloud Director
- Verify Cloud Template Configuration from the vCloud Director Catalog
- Updating Existing Virtual Machine Templates in vCloud Director
- Exporting Virtual Machine Templates with OVF Format
- Register the vCloud Director Cloud Provider and Template
- Create a vCloud Director Deployment Environment
- Setting Up Application Provisioning for the Amazon EC2 Environment
- Developing Application Services Components
- Managing the Application Services Library
- Creating Applications
- Working with Artifacts
- Deploying Applications
- Setting Up and Configuring a Deployment Profile
- Deploying with Deployment Profiles
- Publishing Deployment Profiles to the vCloud Automation Center Service Catalog
- Request a vRealize Automation Service Catalog Item
- Using the Deployment Summary Page
- Using the Composite Deployment Summary Page
- Understanding the Deployment and Update Process
- Understanding Deployment Failures
- Updating Application Deployments
- Initiate an Update Process to Scale Out Deployments
- Initiate an Update Process to Scale In Deployments
- Initiate an Update Process to Modify Configurations
- Use an Existing Update Profile
- Promote an Update Profile
- Rollback an Update Process
- Understanding Run Custom Task Update
- Troubleshoot Failed Update Process to Scale Deployments
- Troubleshoot Failed Update Process to Modify Configuration
- Deploying Predefined Library Components
- Managing Deployments
- View Deployment Task and Blueprint Details for an Application
- View Deployed VM Details and Execution Plan of an Application
- Start a Policy Scan
- Tear Down an Application from the Cloud
- Scale In Deployments from vCloud Automation Center
- Scale Out Deployments from vCloud Automation Center
- Tear Down an Application from vCloud Automation Center
- Delete an Application Deployment from Application Services
- Cancel a Deployment or an Update Process
- View Policy Compliance Summary
- Using the Application Services CLI
- Using the CLI Import and Export Functions

Prerequisites
n
Set up an Amazon AWS user account.
n
Amazon defines the default limits for the number of Amazon EC2 instances, the number of Elastic IP
addresses for an account, and the number of API calls. Contact Amazon support to request an
increase in the instance, Elastic IP address, or API call limit. For more information on Amazon EC2,
see Amazon AWS Documentation.
Procedure
1 Log in to the AWS Management Console using your AWS user account.
2 On the AWS Identity and Access Management (IAM) Dashboard, set up a new user with either an
Administrator Access or Power User Access user privilege and generate an access key for this user.
You can also set up an access key with the master AWS user account without setting up a new IAM
user.
3 Download and save this access key for later use with Application Services.
4 To log in the deployed virtual machines in Amazon EC2, generate an SSH key-pair called
titan_keypair and save the corresponding private key.
5 Create a VPC: On the VPC Dashboard of the AWS Management Console, create a VPC with a public
subnet and a private subnet.
a Use the wizard option to create a VPC with public and private subnets.
Two subnets are created whose instances have access to the Internet. The subnets are useful for
downloading content during the application deployment.
b Specify an Availability Zone for the subnets.
You can use the same Availability Zone for both subnets.
c Use the titan_keypair SSH key-pair.
You can also use your own key-pair.
6 In the VPC, create a security group called EndpointAccess and set inbound and outbound port
access rules.
Port Access Source or Destination
Inbound 22 0.0.0.0/0
Inbound ALL SubnetofVPC
Outbound ALL 0.0.0.0/0
(Optional) Inbound 2222 0.0.0.0/0
What to do next
Create a Linux virtual machine in your VPC. See Create an Endpoint VM.
Using Application Services
VMware, Inc. 91