
6.2
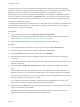
Table Of Contents
- Using Application Services
- Contents
- Using Application Services
- Updated Information
- Introducing Application Services
- Install and Configure Application Services
- Installing Application Services
- Preparing to Install Application Services
- Start the Application Services Appliance
- Troubleshooting Problems Connecting to the Application Services Web Interface
- Unlock Your darwin_user Account
- Restart Application Services
- Configure Application Services to Use a Proxy for External URLs
- Register Application Services to vRealize Automation
- Upgrading Application Services
- Setting Up Users and Groups
- Using Tenants and Business Groups in Application Services
- Import Predefined Content to a Tenant
- Using the Application Services Web Interface
- Setting Up Application Provisioning for the Application Services Environment
- Virtual Machine Requirements for Creating vRealize Automation Custom Templates
- Creating Virtual Machine Templates in vRealize Automation
- Updating Existing Virtual Machine Templates in vRealize Automation
- Register the vRealize Automation Cloud Provider and Template
- Create a vRealize Automation Deployment Environment
- Setting Up Application Provisioning for the vCloud Director Environment
- Virtual Machine Requirements for Creating vCloud Director Custom Templates
- Creating Windows Virtual Machine Templates in vCloud Director
- Create Linux Virtual Machine Templates in vCloud Director
- Verify Cloud Template Configuration from the vCloud Director Catalog
- Updating Existing Virtual Machine Templates in vCloud Director
- Exporting Virtual Machine Templates with OVF Format
- Register the vCloud Director Cloud Provider and Template
- Create a vCloud Director Deployment Environment
- Setting Up Application Provisioning for the Amazon EC2 Environment
- Developing Application Services Components
- Managing the Application Services Library
- Creating Applications
- Working with Artifacts
- Deploying Applications
- Setting Up and Configuring a Deployment Profile
- Deploying with Deployment Profiles
- Publishing Deployment Profiles to the vCloud Automation Center Service Catalog
- Request a vRealize Automation Service Catalog Item
- Using the Deployment Summary Page
- Using the Composite Deployment Summary Page
- Understanding the Deployment and Update Process
- Understanding Deployment Failures
- Updating Application Deployments
- Initiate an Update Process to Scale Out Deployments
- Initiate an Update Process to Scale In Deployments
- Initiate an Update Process to Modify Configurations
- Use an Existing Update Profile
- Promote an Update Profile
- Rollback an Update Process
- Understanding Run Custom Task Update
- Troubleshoot Failed Update Process to Scale Deployments
- Troubleshoot Failed Update Process to Modify Configuration
- Deploying Predefined Library Components
- Managing Deployments
- View Deployment Task and Blueprint Details for an Application
- View Deployed VM Details and Execution Plan of an Application
- Start a Policy Scan
- Tear Down an Application from the Cloud
- Scale In Deployments from vCloud Automation Center
- Scale Out Deployments from vCloud Automation Center
- Tear Down an Application from vCloud Automation Center
- Delete an Application Deployment from Application Services
- Cancel a Deployment or an Update Process
- View Policy Compliance Summary
- Using the Application Services CLI
- Using the CLI Import and Export Functions
7 Review the modified clustered node and rollback script in the execution plan and click Next.
The blue dotted lines in the execution plan define a specific order in which the deployment tasks will
run.
Click the down arrow next to the configuration rollback script to view script details or the variable
definitions used in the script.
8 Review the changed and rollback to components in the update.
The changed and rollback to properties are highlighted.
9 Click Rollback.
The rollback process reverts the deployment to the last successful state in the cloud.
What to do next
Review the status of the deployment from the deployment summary page. See Using the Deployment
Summary Page.
Understanding Run Custom Task Update
Run Custom Task update allows you to run a series of arbitrary custom tasks on the virtual machines of
an existing deployment.
Run Custom Task update allows you to perform the following tasks.
n
Operate at virtual machine level. Lets you operate on several components simultaneously in
components and services.
n
Execute scripts without property change. Lets you execute the scripts without changing any
service or component properties in an existing deployment.
To trigger a Run Custom Task update through the REST API, you must specify the following information.
n
All the tasks that need to be executed.
n
Input parameters for every task.
n
The node on which each task is executed.
n
The execution dependency for each task in a node. For example, one or more tasks might wait for the
other tasks to execute and complete.
When one Run Custom Task update starts, it displays in the deployment overview page. The deployment
timeline has a node that represents the current execution of the Run Custom Task update.
Run Custom Task supports rollback operation. When the custom task fails to execute or you want to
revert the changes made earlier, you must execute another custom task to revert the change. This is
because Application Services cannot generate a rollback script for arbitrary custom task.
There are two new REST APIs introduced to manage Run Custom Task.
n
Create and Schedule a Run Custom Task Update Profile
Using Application Services
VMware, Inc. 210