VMware vCloud Director 5.1 Evaluation Guide ® TEC H N I C A L W H ITE PA P E R V 1 .
VMware vCloud Director 5.1 Evaluation Guide Table of Contents Getting Started . . . . . . . . . . . . . . . . . . . . . . . . . . . . . . . . . . . . . . . . . . . . . . . . . . . . . . . . . . . . . . . . 4 About This Guide. . . . . . . . . . . . . . . . . . . . . . . . . . . . . . . . . . . . . . . . . . . . . . . . . . . . . . . . . . . . . . 4 Intended Audience. . . . . . .
VMware vCloud Director 5.1 Evaluation Guide Performing vCloud Networking and Security Manager Configuration. . . . . . . . . . . . . 36 VXLAN Preparation . . . . . . . . . . . . . . . . . . . . . . . . . . . . . . . . . . . . . . . . . . . . . . . . . . . . . . . . . . 40 vCloud Director Initial Setup. . . . . . . . . . . . . . . . . . . . . . . . . . . . . . . . . . . . . . . . . . . . . . .
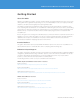
VMware vCloud Director 5.1 Evaluation Guide Getting Started About This Guide VMware vCloud® Director™ enables customers to build a private cloud–based infrastructure-as–a-service (IaaS) offering within their organization. By providing a secure, on-demand ability for end users to deploy workloads, companies can realize a level of agility previously thought impossible. This VMware vCloud Director 5.
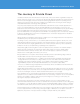
VMware vCloud Director 5.1 Evaluation Guide The Journey to Private Cloud Cloud-based infrastructure environments are a frequent topic of discussion within IT organizations today. This interest stems from several sources. Customers who have broadly adopted virtualization are looking for ways to further increase their agility. Others are interested in achieving a significant reduction in operating costs by deploying a cloud solution.
VMware vCloud Director 5.1 Evaluation Guide When enabled to get what they need quickly and easily, end users are more likely to make more realistic resource requests and to return the resources when finished. The transition to virtualization began with specific workloads. The evolution into the cloud also begins in this manner. To start, identify workloads that have a low management or governance need and that are required frequently.
VMware vCloud Director 5.1 Evaluation Guide In an effort to ease customer transition from vShield Edge 5.0 to vCloud Networking and Security 5.1 and ensure continuity, the user interface and documentation for vCloud Networking and Security still reference existing vShield product names when discussing capabilities. VMware vCenter™ Chargeback Manager™ provides accurate cost measurement and reporting on virtual machine usage.
VMware vCloud Director 5.1 Evaluation Guide VMware vCenter Server Each vCloud Director cell can connect to one or more vCenter Server instances to access resources for running workloads. Each attached vCenter Server instance provides resources, such as CPU and memory, which can be leveraged by vCloud Director. vSphere Hosts VMware vSphere ESXi™ hosts provide the compute power for vCloud Director. vSphere hosts are placed in groups of resources, such as clusters or resource pools.
VMware vCloud Director 5.1 Evaluation Guide vApps A VMware vSphere vApp™ is an abstraction that encapsulates all of the virtual machine and internetworking needs of an application. vApps can be as simple as a single virtual machine or as complex as a multitier business application. Templates can be created from a vApp to enable one to be easily redeployed multiple times by an organization’s users. These vApp templates can be shared among users in the organization or between organizations.
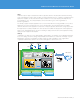
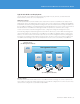
VMware vCloud Director 5.1 Evaluation Guide Typical vCloud Director Deployment The size and scale of vCloud Director deployments vary greatly. There are, however, several architectural features that are common across most deployments. Management Cluster In most implementations, all of the infrastructure components needed for vCloud Director are deployed in a management cluster. The management cluster consists of two or more vSphere hosts, enabling high availability and downtime avoidance.
VMware vCloud Director 5.1 Evaluation Guide The collection of vCenter Server instances that are attached to vCloud Director and the resources (compute and storage) is referred to as a resource cluster. It is here that the workloads provisioned from vCloud Director are run.
VMware vCloud Director 5.1 Evaluation Guide To simplify the evaluation process further, this guide leverages the benefits provided by the virtual appliances for both vCenter Server and vCloud Director. Use of these appliances eliminates the need to configure additional databases, because each of the appliances provides an embedded database. The second logical part of this evaluation environment is the resource cluster.
VMware vCloud Director 5.1 Evaluation Guide Compute Hardware Requirements The management cluster requires at least one physical host powerful enough to host the virtual machines that will be deployed. Two ESXi hosts were used for redundancy in the creation of this guide. The resource cluster requires four physical hosts of sufficient power to host two standard Linux virtual machines at a minimum. Network Requirements One physical network is utilized in this guide.
VMware vCloud Director 5.1 Evaluation Guide Software and Licensing Requirements Users must have licenses for vCloud Director installation. vCenter Server and vSphere hosts can be run using an evaluation license for a period of time. This enables users to experiment with all the features of the product before deciding on a perpetual license. Users must have access to the binaries for vCloud Networking and Security Manager, vCenter Server and vCloud Director Appliance.
VMware vCloud Director 5.1 Evaluation Guide This guide also was designed to enable evaluating vCloud Director with limited resources. Accordingly, some of the procedures do not conform to best practices to be followed when deploying vCloud Director in a production environment. Whenever possible, procedures that directly conflict with best practices are called out. In short, the procedures listed here are for evaluation purposes only.
VMware vCloud Director 5.1 Evaluation Guide You will be prompted for the file to deploy. Select the vCenter Server Appliance.ova file and click Next to continue. The next screen gives you some information about the virtual machine template you are about to deploy for the vCenter Server Appliance. Click Next to continue.
VMware vCloud Director 5.1 Evaluation Guide The OVF deployment wizard then prompts you for the name of the vCenter Server Appliance to be deployed. In this guide, we name it vc-l-01a. Click Next to continue. You will be asked to select the host or cluster within the management cluster to deploy the appliance to. Select the appropriate option and click Next to continue. Next, define the datastore in the management where the deployed appliance will reside and select a provisioning method.
VMware vCloud Director 5.1 Evaluation Guide Next, define the network configuration for the appliance. These values must match the network configuration that is present in your environment. The preceding example represents what is used in this guide. On the summary page, review the information to ensure that it is correct. Select the Power on after deployment check box to power on the appliance after the deployment has completed. Click Finish to start the deployment.
VMware vCloud Director 5.1 Evaluation Guide A window will be displayed that shows the progress of the appliance deployment. Wait until this is complete before continuing. Installing the vCloud Director Appliance In this guide, we use the vCloud Director Appliance. As with the vCenter Server Appliance, using the vCloud Director Appliance reduces the complexity that would be involved with a production deployment. The vCloud Director Appliance is not supported for production environments.
VMware vCloud Director 5.1 Evaluation Guide After specifying the location for the vCloud Director Appliance file, click Next to continue. A summary of the appliance is displayed. Click Next to continue.
VMware vCloud Director 5.1 Evaluation Guide You then are presented with an End User License Agreement (EULA) that you must accept before continuing. This EULA is specific to the embedded Oracle Database XE that is packaged with the vCloud Director Appliance. After clicking the Accept button, click Next to continue. The next step is to name the vCloud Director Appliance. In this guide, we use the name vcd-01a. Choose a name and location to place the vCloud Director Appliance. Click Next to continue.
VMware vCloud Director 5.1 Evaluation Guide The next screen prompts you to define the host and/or cluster to deploy the appliance to within the management cluster. Select the appropriate value and click Next to continue. The next step is to define the format that you want to use to store the virtual disks of the appliance. Select an option and click Next to continue. Next, define the network mapping. Each vCloud Director installation requires two IP addresses.
VMware vCloud Director 5.1 Evaluation Guide On the properties page, you can specify attributes for a vCloud Director Appliance deployment. It is divided into sections denoted by blue headers. The first section for Database Properties enables you to choose what type of database vCloud Director will use. You can specify an internal or external database.
VMware vCloud Director 5.1 Evaluation Guide In the Networking Properties section, you define the values to configure the networking services on the vCloud Director Appliance. These include the default gateway addresses, DNS servers and IP addresses used with the associated netmasks. There are two IP addresses that must be defined, as previously mentioned. These are specified as Network 1 IP Address and Network 2 IP Address.
VMware vCloud Director 5.1 Evaluation Guide At this point, you are presented with a summary screen to review the information that you provided. Verify that the information is correct and select the Power on after deployment option. Click Finish to start the deployment.
VMware vCloud Director 5.1 Evaluation Guide Observe the status provided and wait for the deployment to finish. Installing the vCloud Networking and Security Manager vCloud Networking and Security Manager provides network services to vCloud Director and to vCenter Server. A unique instance must be installed for each vCenter Server instance used by vCloud Director.
VMware vCloud Director 5.1 Evaluation Guide As you have done previously for the other components, select the appropriate file for the vCloud Networking and Security Manager and click Next to continue.
VMware vCloud Director 5.1 Evaluation Guide You then are presented with an information screen that displays details about the template to be deployed. Click Next to continue. Next you are presented with a EULA from VMware. After clicking the Accept button, click the Next button to continue.
VMware vCloud Director 5.1 Evaluation Guide The next screen enables you to specify a name for the vCloud Networking and Security Manager and a location where it will be stored. This guide uses the name vsm-01a for the vCloud Networking and Security Manager. Enter your chosen name and click Next to continue. At the next screen, select the host or cluster on which to run the vCloud Networking and Security Manager. Click Next to continue.
VMware vCloud Director 5.1 Evaluation Guide On the summary page, select the Power on after deployment option and review the information presented. If satisfied, click Finish to start the deployment of the vCloud Networking and Security Manager.
VMware vCloud Director 5.1 Evaluation Guide Observe the deployment process and wait until it finishes. Configuring the vCenter Server Appliance To utilize the vCenter Server Appliance after the initial deployment, you must complete the initial configuration. To do this, you must use a Web browser and point it to the address you used for the vCenter Server Appliance. In case you didn’t note it previously, you can open a console window to the appliance.
VMware vCloud Director 5.1 Evaluation Guide At the initial login, you are presented with a EULA to accept. Select the check box to accept the EULA and click Next to continue.
VMware vCloud Director 5.1 Evaluation Guide The next step in the configuration of the vCenter Server Appliance enables you to specify different configuration options. If you are using static IP addresses for the vCenter Server Appliance, you must cancel the setup wizard at this time to configure the host name settings before continuing. After that is complete, you can restart this wizard from the home page. If you’re not using static IPs, it is not necessary to cancel the wizard.
VMware vCloud Director 5.1 Evaluation Guide After you have started the vCenter Server instance, click Close to exit the setup wizard. At this point, you should be able to use the vSphere Client to connect to this vCenter Server instance. Performing Additional vCenter Server Appliance Configuration To take full advantage of the procedures presented within this guide, you must perform additional configuration of the vCenter Server Appliance.
VMware vCloud Director 5.1 Evaluation Guide Configure storage profiles for the storage and ensure that the Storage Profiles feature is enabled. In this guide, three storage capabilities have been defined, to represent the speed of the storage used. For example, this might represent the use of solid-state drives, Fibre Channel (FC) –connected storage and iSCSI-based storage.
VMware vCloud Director 5.1 Evaluation Guide For networking purposes, a VMware vSphere Distributed Switch™ has been created with some standard port groups. It is connected to all the hosts. Performing vCloud Networking and Security Manager Configuration We now must perform the initial configuration of the vCloud Networking and Security Manager. To start, use the vSphere Client connected to the vCenter Server that manages the management cluster.
VMware vCloud Director 5.1 Evaluation Guide When it is connected to the console, log in with the username admin and the password default. Type the command “enable” to enter the privileged mode. Provide the password default again. At the prompt, type “setup” to start the initial configuration process. When prompted, enter the appropriate values for the vCloud Networking and Security Manager IP address, netmask and DNS information.
VMware vCloud Director 5.1 Evaluation Guide At a minimum, we must associate this vCloud Networking and Security Manager instance with the vCenter Server that we deployed for use by vCloud Director. Ideally, you would configure all of the options presented on the configuration screen. To configure any of the parameters, simply click the edit button next to it. Click the edit button next to vCenter Server.
VMware vCloud Director 5.1 Evaluation Guide You will be prompted to enter information needed to connect to the vCenter Server instance. This includes the host name or IP address and the login credentials. Enter the appropriate information as needed. The default login credentials for the vCenter Server Appliance are “root” and “vmware.” Select the Assign vShield ‘Enterprise Administrator’ role to this user check box. Click OK to continue.
VMware vCloud Director 5.1 Evaluation Guide VXLAN Preparation VXLAN provides capabilities to dynamically create thousands of networks on top of an existing network infrastructure as well as create a stretched layer 2 domain across clusters that might reside in different networks. To use VXLAN with vCloud Director, the VXLAN fabric first must be prepared. Before continuing, ensure that your network is capable of supporting multicast packets and that there is a DNS server accessible.
VMware vCloud Director 5.1 Evaluation Guide The next screen enables you to select the MTU size and the Teaming Policy to be used for the Distributed Switch selected. The teaming policy is highly dependent on the type of network used in your evaluation environment. In this guide, the teaming policy is set to Fail Over. Ensure that you select an option compatible with your environment. Leave the MTU setting at 1600 and click Finish to continue. Next, select the Segment ID tab and click Edit.
VMware vCloud Director 5.1 Evaluation Guide Select the Connectivity tab again and verify that the status is labeled as Ready. You will notice that the vmknics have acquired an IP address from the DHCP server. vCloud Director Initial Setup Before you can start using vCloud Director, you must complete the initial installation that is presented the first time you log in to the vCloud Director interface. The default username for the vCloud Director Appliance is “root” and the default password is “vmware.
VMware vCloud Director 5.1 Evaluation Guide Now you will be asked to provide your vCloud Director license key. Enter a valid license key and click Next to continue. The next page enables you to define the user account to be used for the cloud administrator. Specify a username and password and complete the remaining identification fields. Click Next to continue.
VMware vCloud Director 5.1 Evaluation Guide The wizard then enables you to specify the name and installation ID for this vCloud Director instance. This guide calls the vCloud Director instance vcd-01a. The Installation ID can be left at the 1 default, because there are no other vCloud Director instances deployed. If there were, each instance would require a unique installation ID. Click Next to continue. On the next screen, review the information you provided. Click Finish to exit the wizard.
VMware vCloud Director 5.1 Evaluation Guide This will bring up a wizard that enables you to specify the information required to associate the vCenter Server instance you created earlier with this vCloud Director instance. Enter the appropriate information as shown in the preceding screenshot. Click Next to continue. Enter the necessary information to connect to the vCloud Networking and Security Manager. Click Next to continue. You then will be provided with a summary of the information that you entered.
VMware vCloud Director 5.1 Evaluation Guide Defining the Provider Virtual Datacenter In this section, you will start the process of configuring vCloud Director and defining the resources that will be consumed by the organizations. Creating a Provider VDC After a vCenter Server has been attached to vCloud Director, the resources that it provides can be added to a provider VDC.
VMware vCloud Director 5.1 Evaluation Guide This brings up a wizard that will walk you through the process of creating a provider VDC. The first part of this process is to give a name to the provider VDC to be created. In this guide, we will create multiple provider VDCs. To facilitate ease in recognition, name the first provider VDC PVDC_01. Because we will be using this provider VDC immediately, Select the Enabled check box.
VMware vCloud Director 5.1 Evaluation Guide The next step in the wizard enables you to select the storage that this provider VDC will supply. In vCloud Director 5.1, all storage is represented as a storage profile. This information is refreshed from the vCenter Server instance every 5 minutes by default. If you do not see the storage profiles that you defined, quit the wizard and perform the steps again after 5 minutes.
VMware vCloud Director 5.1 Evaluation Guide You then can review the information provided in summary form. Ensure that the information is correct. Click Finish to complete the wizard. Create an Additional Provider Virtual Datacenter For the purposes of this guide, repeat the previous steps to create another provider VDC called PVDC_02. Use the second cluster and assign the Bronze storage profile to this provider VDC. The summary page for provider VDC PVDC_02 looks like the preceding example.
VMware vCloud Director 5.1 Evaluation Guide Network Pools Network pools provide a collection of undifferentiated networks that then are consumed by organizations to provide connectivity within the cloud environment. vSphere network resources such as VXLAN, VLAN IDs and port groups back a network pool. After the creation of the provider VDCs in the previous step, a green check mark appears next to step 4 of the Quick Start section.
VMware vCloud Director 5.1 Evaluation Guide This brings up a wizard. On the first page, select the vSphere network to be used for the external network. Select Mgmt Network and click Next to continue. The next step using the wizard enables you to define the network settings used for the external network. Click Add to configure the settings. Specify the information required to match your network configuration.
VMware vCloud Director 5.1 Evaluation Guide Next, provide a name for this external network. Specify the name Corporate External Network and click Next to continue. Review the provided summary page and click Finish to complete the process of creating an external network. Create an Organization Now it is time to create the organizations to consume the resources previously configured in the provider VDC. Create one organization in this section for a development team.
VMware vCloud Director 5.1 Evaluation Guide The first step using the new organization wizard is to name the organization. As you type dev for the organization name, the Default organization URL is created automatically. This is the URL that users within this organization use to access the vCloud Director portal specific to their organization. Enter the name Development for the organization and click Next to continue. The next step is to define an LDAP service to use for this organization.
VMware vCloud Director 5.1 Evaluation Guide Because we are not configuring LDAP services, we can define users manually by adding local users. Click Add Local Users to display a dialog box that enables you to define a local user for this organization. Name the user dev_mgr and ensure that this user is associated with the Organization Administrator role. This gives the assigned user full access to this organization. Other roles are available by default to provide varying degrees of access for users.
VMware vCloud Director 5.1 Evaluation Guide You then can specify whether this organization can share catalogs with other organizations. Catalogs are a collection of vApps, vApp templates and media. An organization can create multiple catalogs. For example, an organization might choose to create a catalog of vApps that contain a set of builds for a QA team to test. The same organization might have another catalog containing .iso image files for the OS installation media they use.
VMware vCloud Director 5.1 Evaluation Guide The next step using the wizard enables you to configure a series of policies for the organization. You can define quotas for how many resources the organization can have, specify lease times for the resources, and set password policies and limits for various activities. Leave the default settings for these and click Next to continue. You then are presented with a summary page that enables you to review the information provided.
VMware vCloud Director 5.1 Evaluation Guide Allocate Organization Resources Allocating resources to an organization involves making resources from the provider VDC available to an organization VDC that is associated with the organization. To create an organization VDC, select Allocate resources to an organization under Quick Start on the Home screen. Associate this organization VDC with the dev organization that you created earlier. Click Next to continue.
VMware vCloud Director 5.1 Evaluation Guide Next, select the provider VDC that the organization VDC will draw its resources from. Select PVDC_01 and click Next to continue. Now select an allocation model to use for this organization VDC. The following three methods are available to control the quality of service and the costs associated with the resources that you will be allocating: • Allocation Pool Only a percentage of the resources you allocate is committed to the organization VDC.
VMware vCloud Director 5.1 Evaluation Guide • Pay-As-You-Go Resources are committed only when users create vApps in the organization VDC. You can specify a percentage of resources to guarantee. This enables you (the provider) to overcommit resources. You can make a pay-as-you-go organization VDC elastic by adding multiple resource pools to its provider VDC. • Reservation Pool All of the resources you allocate are committed to the organization VDC immediately.
VMware vCloud Director 5.1 Evaluation Guide After configuring the selected allocation model, you must allocate storage to the organization VDC. In this example, we select the PVDC_01 provider VDC that we created earlier. This provider VDC contains only two tiers of storage as defined by the Gold and Silver storage profiles. To provide these same tiers of storage to the organization, select them and click Add.
VMware vCloud Director 5.1 Evaluation Guide The next step offers the option to create an Edge Gateway for this organization. Select the Create a new edge gateway check box. The configuration options for the edge gateway are then displayed. Provide a name for the edge gateway and select a configuration model for it. There are two configuration models: full and compact. There is no difference in functionality between the two. The difference is in the performance they provide.
VMware vCloud Director 5.1 Evaluation Guide To add the external network that you configured earlier to the organization VDC, select it and click Add. vCloud Director 5.1 has the ability to use the edge gateway as a DNS Relay. This creates a level of abstraction between the organization and the external networks. Selecting this option enables virtual machines created within the organization to be pointed to the edge gateway to resolve DNS queries.
VMware vCloud Director 5.1 Evaluation Guide The wizard enables you to create an organization VDC network. Users within the organization can connect to this network to enable communication for their vApps. Select the Create Organization VDC Network option. In the text boxes provided, enter the name for the network, the gateway address and the netmask to be used. Define the DNS suffix, if required, and a static network pool to use for this network. Click Next to continue.
VMware vCloud Director 5.1 Evaluation Guide Merging Provider VDCs vCloud Director 5.1 has the ability to merge provider VDCs. This is helpful if you created multiple provider VDCs and want to consolidate resources. To demonstrate this capability, we now will merge the two provider VDCs that we created earlier into a single one. Click the Manage & Monitor tab. Then select Provider VDCs in the left-hand pane. Right-click PVDC_01 and select the Merge with… option.
VMware vCloud Director 5.1 Evaluation Guide You will see the status of the merge operation progress. After it completes, you will have one provider VDC listed. PVDC_01 now contains all three datastores. Click the name of the provider VDC for more details. Click the Storage Profiles tab. You will see that the provider VDC now contains all three previously defined storage profiles. Click the Resource Pools tab. You will see that both clusters also have been added to the provider VDC.
VMware vCloud Director 5.1 Evaluation Guide Developing Service Offerings After the organizations have been created, you can also create catalogs for the content that can be readily consumed by members of the organizations. In this section, you will configure a vApp and learn how to make a vApp template as well as how to perform other tasks to help populate your private cloud catalogs. Creating a Catalog A catalog is a collection of vApps, vApp templates and media that an organization uses.
VMware vCloud Director 5.1 Evaluation Guide Because we are creating the catalog as the cloud administrator, we have the option to share the catalog with other organizations. Leave the default selected to restrict this catalog to only the dev organization. Click Next to continue. Review the summary information and click Finish to complete the process of creating the catalog. Importing Media After a catalog has been created, we can add items to it so users can consume them. To start, add a media file.
VMware vCloud Director 5.1 Evaluation Guide Click the Catalogs tab to access the catalogs available to this organization. You will see the catalog you created listed in the table. Click Dev-Internal to display the contents of that catalog. Click Upload to upload a media file. This process requires that Java be installed for the Web browser you are using. If it is detected that Java must be installed, you will be redirected to java.com to download the appropriate package.
VMware vCloud Director 5.1 Evaluation Guide You can select a storage profile that will be used to store the media. This enables you to locate your media on a lower tier of storage and reserve the higher tiers for the workloads that will be running in your cloud. Select the Silver storage profile and click Upload to continue. A pop-up window will appear that will display the progress of your upload. Wait until it completes successfully. When the import function is complete, you will see the .
VMware vCloud Director 5.1 Evaluation Guide Specify the name of the vApp. You can also modify the lease times for this vApp, but you cannot exceed the lease time specified earlier for the organization. Click Next to continue. On the next page, we can select a virtual machine template from a catalog to include within this vApp. Because we just created the catalog, it has no templates in it yet. Click New Virtual Machine.
VMware vCloud Director 5.1 Evaluation Guide On this page, you can specify the attributes to be used for this virtual machine. Define the name of the virtual machine and specify the other options as needed. Because we already have uploaded a LiveCD CentOS .iso image into our catalog, we will use this. This requires setting the Operating System Family to Linux and the Operating System to a value for CentOS. Click OK to close this window. Click Next to continue.
VMware vCloud Director 5.1 Evaluation Guide Specify the virtual machine name and the storage profile that it will use. Click Next to continue. On the next page, you can define the network rail to attach the NIC of the virtual machine to. Select the organization VDC network that you created earlier. You can also define how the virtual machine will obtain an IP address. Set this to Static – IP Pool, which you defined for the organization VDC network created earlier. Click Next to continue.
VMware vCloud Director 5.1 Evaluation Guide Click Next to continue to the summary page. Verify the information and click Finish to complete the wizard and create the vApp. After the vApp has been created, you will see that the status is Stopped. Click the Open link to drill into the vApp. On this screen, you will see a graphical representation of the vApp network configuration. Right-click the virtual machine. An action menu is displayed. Select the Insert CD/DVD from Catalog… option.
VMware vCloud Director 5.1 Evaluation Guide Select the media for the CentOS LiveCD that you uploaded earlier. Click Insert. Click the green > icon to start the vApp and power on the virtual machine. You will notice that the thumbnail for the virtual machine will refresh as the virtual machine begins its boot process.
VMware vCloud Director 5.1 Evaluation Guide You can access the console for the virtual machine by clicking the thumbnail. If this is your first access attempt, you will be prompted to install the VMRC browser plug-in. Creating a vApp Template A vApp template enables users in an organization to quickly deploy vApps that have already been configured. By creating a collection of vApp templates, users can avoid the time required to set up and configure an environment for use.
VMware vCloud Director 5.1 Evaluation Guide You then can specify the various options for the vApp template. Provide a name and define the storage lease as needed. You also can make an exact copy of the virtual machines or customize them when the template is used. Customization of Microsoft Windows–based machines will require the installation of additional binaries within the vCloud Director instance. Select the Make identical copy option and click OK to continue.
VMware vCloud Director 5.1 Evaluation Guide This file can detect the changes that occur within an environment when using snapshots. Right-click the thumbnail for the virtual machine and select Create Snapshot. This brings up a window that gives you the options to snapshot the memory of the virtual machine and/or to quiesce the guest file system. In this example, you do not have VMware® Tools™ installed, so the Quiesce guest file system option is not available.
VMware vCloud Director 5.1 Evaluation Guide After the snapshot is complete, return to the virtual machine console. Delete the empty file you created earlier by right-clicking it and selecting the Move to Trash option. Return to the vCloud Director user interface and right-click the virtual machine. Select the Revert to Snapshot option. Return to the virtual machine console. You will see the empty file again, because you took the snapshot prior to deleting the file.
VMware vCloud Director 5.1 Evaluation Guide Conclusion Next Steps With VMware vCloud Director, you can do the following: • Increase business agility by empowering users to deploy preconfigured services or build a complete application stack with a few clicks. • Maintain security and control over a multitenant environment with policy-based user controls and VMware vCloud Networking and Security 5.1 security technologies.
VMware, Inc. 3401 Hillview Avenue Palo Alto CA 94304 USA Tel 877-486-9273 Fax 650-427-5001 www.vmware.com Copyright © 2012 VMware, Inc. All rights reserved. This product is protected by U.S. and international copyright and intellectual property laws. VMware products are covered by one or more patents listed at http://www.vmware.com/go/patents. VMware is a registered trademark or trademark of VMware, Inc. in the United States and/or other jurisdictions.