
5.2


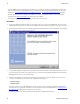

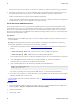
Table Of Contents
- Getting Started with vFabric Suite
- Table of Contents
- 1. About Getting Started with vFabric Suite
- 2. Quick Start Guide
- 3. Overview of vFabric Suite 5.2
- vFabric Suite Editions and Components
- vFabric Administration Server for Easier Component Management
- Simplified VM-Based Licensing Model
- vFabric Suite Product Integration and vSphere Integration
- Engineered for Spring-Built Applications
- VMware Support for Apache Tomcat, Apache HTTP Server, and RabbitMQ
- 4. vFabric Licensing
- 5. Installing vFabric Suite
- Install vFabric License Server on Your vCenter Server
- Activate vFabric Suite Licenses
- RHEL: Example Walkthrough of Installing Component From the VMware RPM Repository
- Windows/Linux: Example Walkthrough of Installing Component from Download Page
- RHEL: Optionally Configure VM to Track Open-Source Software Component Usage
- Upgrade vFabric License Server
- Uninstall vFabric License Server from vCenter Server
- 6. Monitoring vFabric License Usage

Installing vFabric Suite 25
25
5. Enter the login ID and password of the database user, and select the ODBC data source (DSN) that you created as a
prerequisite to this procedure.
6. Click Install to proceed with the installation. The installer program installs the vFabric License Server, showing you a status
of the installation as it performs its tasks.
The installer program completes successfully when you see the message InstallShield Wizard Completed.
7. To view details of the installation, click Show the Windows Installer Log. Click Finish to complete the installation.
8. Restart your vCenter Server to enable the vFabric License Server changes.
What to do next
• Activate vFabric Suite licenses in your vCenter Server.
• Install one or more vFabric components, such as vFabric tc Server, on a new or existing virtual machine (VM.) If you are
installing on RHEL, see RHEL: Example Walkthrough of Installing Component From the VMware RPM Repository for an
example, but refer to the installation instructions for the particular vFabric component for details. If you are installing on
Windows or other Linux platform, see Windows/Linux: Example Walkthrough of Installing Component from Download Page
for an example.
• If your vFabric license includes open-source software (OSS) support, optionally configure the Red Hat Enterprise Linux
(RHEL) VM on which you have installed one or more OSS components to track their usage. OSS components you can track
include Apache Tomcat, Apache HTTP Server, and RabbitMQ. See RHEL: Optionally Configure VM to Track Open-Source
Software Component Usage.
• Monitor vFabric license usage by using the vFabric Suite command-line interface. See Monitoring vFabric License Usage.
Create the Microsoft SQL Server ODBC Data Source
Before you install vFabric License Server, you must create an ODBC data source that connects to either the database system
associated with vCenter Server or to a separate database system. If using the vCenter database system, VMware recommends
that you create a separate SQL Server database instance for vFabric use so as to keep the data of the two products separate. This
ODBC data source should be used only by vFabric License Server. This section provides instructions for the Microsoft SQL
Server database system.
Prerequisites
• Ensure that the Windows computer on which vCenter Server is running has the SQL Server Native Client ODBC
driver installed on it; if not, download and install the driver from the Microsoft SQL Server Web site.
• Create the database instance that will contain vFabric license data. See Guidelines for Creating the vFabric License Server
Database Instance.
Procedure
1. On the same Windows computer on which you are running vCenter Server, invoke the ODBC Data Source Administrator
window using Start > Programs > Administrative Tools > Data Source (ODBC).
2. Click the System DSN tab.
3. Click the Add... button.
4. Select the SQL Server Native Client driver. Click Finish.
5. Enter a name and description of the data source, then select the SQL Server you want this data source to connect to from the
drop-down list. Click Next.