
User`s guide
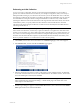
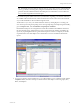
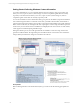
Table Of Contents
- VCM Installation and Getting Started Guide
- Updated Information
- About This Book
- Preparing for Installation
- Installing VCM
- Using Installation Manager
- Installing and Configuring the OS Provisioning Server and Components
- Installing the Operating System Provisioning Server
- Preparing Boot Images for Windows Provisioning
- Copy the VCM Certificate to the OS Provisioning Server for Linux Provisioning
- Importing Distributions into the OS Provisioning Server Repository
- Configuring the OS Provisioning Server Integration with the VCM Collector
- Maintaining Operating System Provisioning Servers
- Upgrading or Migrating vCenter Configuration Manager
- Upgrade and Migration Scenarios
- Prerequisites
- Back up Your Databases
- Back up Your Files
- Back up Your Certificates
- Software Supported by the VCM Collector
- Migration Process
- Prerequisites
- Foundation Checker Must Run Successfully
- Use the SQL Migration Helper Tool
- Migrate Only Your Database
- Replace your existing 32-Bit Environment with the Supported 64-bit Environment
- How to Recover Your Machine if the Migration is not Successful
- Migrate a 32-bit environment running VCM 5.3 or earlier to VCM 5.4
- Migrate a 64-bit environment running VCM 5.3 or earlier to VCM 5.4
- Migrate a split installation of VCM 5.3 or earlier to a single-server install...
- After You Migrate VCM
- Upgrade Process
- Upgrading Existing Windows Agents
- Upgrading Existing Remote Clients
- Upgrading Existing UNIX Agents
- Upgrading VCM for Virtualization
- Getting Started with VCM Components and Tools
- Getting Started with VCM
- Discover, License, and Install Windows Machines
- Verifying Available Domains
- Checking the Network Authority
- Assigning Network Authority Accounts
- Discovering Windows Machines
- Licensing Windows Machines
- Installing the VCM Windows Agent on your Windows Machines
- Performing an Initial Collection
- Exploring Windows Collection Results
- Getting Started Collecting Windows Custom Information
- Discover, License, and Install UNIX/Linux Machines
- Discover, License, and Install Mac OS X Machines
- Discover, License, and Collect Oracle Data from UNIX Machines
- Customize VCM for your Environment
- How to Set Up and Use VCM Auditing
- Discover, License, and Install Windows Machines
- Getting Started with VCM for Virtualization
- Getting Started with VCM Remote
- Getting Started with VCM Patching
- Getting Started with Operating System Provisioning
- Getting Started with Software Provisioning
- Getting Started with VCM Management Extensions for Assets
- Getting Started with VCM Service Desk Integration
- Getting Started with VCM for Active Directory
- Accessing Additional Compliance Content
- Installing and Getting Started with VCM Tools
- Maintaining VCM After Installation
- Troubleshooting Problems with VCM
- Index

11. Click Next and then Finish.
12. Run a collection using your new collection filter.
13. Ensure the job completes.
14. View data in the Custom Information nodes ( Console > Windows > Operating System > Custom
Information).
When the Windows Custom Information data is available in the VCM database, you can generate reports
and enforce compliance.
Change Detection in Windows Custom Information Data
Deltas in WCI are maintained on a per-filter basis at the client side, which means that if multiple filters
return data under the same top-level element name (such as NetStat), each filter will have its own change
detection.
In the following example, using multiple filters that collect the same open ports data and return it under
the NetStat top-level element name, if a client machine has just started listening on port 80, each filter will
report this new data as a newly created value the first time the filter “sees” this data. The best practice is to
avoid this type of overlap of filters.
For example, two copies of the File Permission With Audit filter could be created in order to collect file
permissions data from different parts of the file system, but they should not overlap. Having one filter get
data from C:\ and another filter get data from C:\Windows would be a good practice. However, having
one filter get data from C:\Windows with audit information and another filter get data from C:\Windows
without audit information would not be a good practice because both filters would generate "new file" and
"deleted file" events each time a new file was added or removed.
n
For an element such as NetStat, only one filter should be used.
n
For an element such as NTFS file system (NTFSDirectory), multiple filters would likely be used. For
example, one filter would be used to obtain the details under C:\, and another filter would be used for
C:\Windows\System. Both would merge under the NTFSDirectory top-level element, but there
should be no overlap; instead they would each collect separate parts of the file structure to avoid
“extra” change reporting.
Purge for Windows Custom Information
As with other data types, purge for WCI will purge all data for a machine. This means that if a single WCI
filter is collected with the “Do not limit to delta” option selected, all WCI data for that machine will be
purged from the client’s master file and from the VCM database, and it will be replaced with the resulting
data from the single filter.
Job Status Reporting for WCI
Job status reporting for WCI is provided on a per script/filter level, and includes detailed reporting about
exit codes and process standard error output. As each script/filter is executed, VCM captures detailed
results information during the execution of the WCI collection filter scripts.
You can view the detailed information in the VCM user interface in the Administration > Job Manager >
History node by selecting the executed job and then selecting View Details in the Job History Machine
Detail pane of a collection job that includes WCI data.
vCenter Configuration Manager Installation and Getting Started Guide
90 VMware, Inc.