
User`s guide
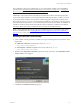
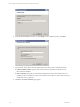
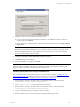
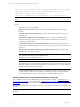

Table Of Contents
- VCM Installation and Getting Started Guide
- Updated Information
- About This Book
- Preparing for Installation
- Installing VCM
- Using Installation Manager
- Installing and Configuring the OS Provisioning Server and Components
- Installing the Operating System Provisioning Server
- Preparing Boot Images for Windows Provisioning
- Copy the VCM Certificate to the OS Provisioning Server for Linux Provisioning
- Importing Distributions into the OS Provisioning Server Repository
- Configuring the OS Provisioning Server Integration with the VCM Collector
- Maintaining Operating System Provisioning Servers
- Upgrading or Migrating vCenter Configuration Manager
- Upgrade and Migration Scenarios
- Prerequisites
- Back up Your Databases
- Back up Your Files
- Back up Your Certificates
- Software Supported by the VCM Collector
- Migration Process
- Prerequisites
- Foundation Checker Must Run Successfully
- Use the SQL Migration Helper Tool
- Migrate Only Your Database
- Replace your existing 32-Bit Environment with the Supported 64-bit Environment
- How to Recover Your Machine if the Migration is not Successful
- Migrate a 32-bit environment running VCM 5.3 or earlier to VCM 5.4
- Migrate a 64-bit environment running VCM 5.3 or earlier to VCM 5.4
- Migrate a split installation of VCM 5.3 or earlier to a single-server install...
- After You Migrate VCM
- Upgrade Process
- Upgrading Existing Windows Agents
- Upgrading Existing Remote Clients
- Upgrading Existing UNIX Agents
- Upgrading VCM for Virtualization
- Getting Started with VCM Components and Tools
- Getting Started with VCM
- Discover, License, and Install Windows Machines
- Verifying Available Domains
- Checking the Network Authority
- Assigning Network Authority Accounts
- Discovering Windows Machines
- Licensing Windows Machines
- Installing the VCM Windows Agent on your Windows Machines
- Performing an Initial Collection
- Exploring Windows Collection Results
- Getting Started Collecting Windows Custom Information
- Discover, License, and Install UNIX/Linux Machines
- Discover, License, and Install Mac OS X Machines
- Discover, License, and Collect Oracle Data from UNIX Machines
- Customize VCM for your Environment
- How to Set Up and Use VCM Auditing
- Discover, License, and Install Windows Machines
- Getting Started with VCM for Virtualization
- Getting Started with VCM Remote
- Getting Started with VCM Patching
- Getting Started with Operating System Provisioning
- Getting Started with Software Provisioning
- Getting Started with VCM Management Extensions for Assets
- Getting Started with VCM Service Desk Integration
- Getting Started with VCM for Active Directory
- Accessing Additional Compliance Content
- Installing and Getting Started with VCM Tools
- Maintaining VCM After Installation
- Troubleshooting Problems with VCM
- Index

n
Run Action now: This option immediately installs VCM Remote Client on the target machines.
n
Schedule the Action to run later: This option allows you to specify the Time and Date for the
installation.
NOTE The job appears in the Instant Collection job history queue as Install CM Remote Client.
16. Click Next. When you are ready to proceed, click Finish.
Making VCM Aware of VCM Remote Clients
After the VCM Remote Client is installed, the client contacts the collector when connected to the network.
The default VCM Remote setup enables VCM Remote to automatically contact the Collector, auto-license
the machine, install or upgrade the base VCM Windows Agent, and determine whether it should submit a
VCM collection job for that machine. In addition, VCM Remote resubmits failed deployment jobs if you
are using other VCM components for your patch management processing.
This process is automated based on VCM Remote Settings and other than configuring the settings,
requires no operator interaction.
Configuring VCM Remote Settings
Once the VCM Remote client and server components have been installed successfully, you need to collect
from, or push patches to, the mobile Windows workstations. You must configure the following:
n
Create custom Collection filter sets to be used when a mobile workstation connects using Dial-up,
Broadband, or LAN. We recommend a different Filter Set for each connection type. See "Creating
Custom Collection Filter Sets" on page 158 for more information.
n
In the VCM Remote settings, enter the names of the filter sets to be used for each type of connection.
See "Specifying Custom Filter Sets in the VCM Remote Settings" on page 158 for more information.
Creating Custom Collection Filter Sets
If you have not created any Collection filter sets, you can specify the default set. However, this is an all-
encompassing collection that would likely not be able to complete over a dial-up connection. Therefore,
you should create filter sets customized to the type of connection that might be used by the mobile
workstations: Dial-up, Broadband, or LAN. For example, the dial-up set might be limited to only a few
high-importance items and would not include the File System Uploads or Emergency Repair Disk data
classes.
1. In VCM, select Administration > Collection Filters > Filter Sets.
2. Select Add Filter Set.
3. Construct a filter set appropriate for the connection type. Use the Help available in the Filter Set
Wizard to configure the filter set.
Specifying Custom Filter Sets in the VCM Remote Settings
For a Collection of the client machine to take place, a Collection Filter Set must be created and its name
entered into VCM. You can, of course, enter Default for the automatically-created default set. The same or
different Filter Set names can be assigned to each of the three connection types: Broadband, Dialup, and
LAN. For instance, if the connection speed is only that of Dialup, you might want to create a smaller Filter
Set. If a connection type does not have a Filter Set name assigned, no Collection will be initiated when the
connection is at that speed.
vCenter Configuration Manager Installation and Getting Started Guide
158 VMware, Inc.