
User`s guide

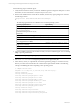
Table Of Contents
- VCM Installation and Getting Started Guide
- Updated Information
- About This Book
- Preparing for Installation
- Installing VCM
- Using Installation Manager
- Installing and Configuring the OS Provisioning Server and Components
- Installing the Operating System Provisioning Server
- Preparing Boot Images for Windows Provisioning
- Copy the VCM Certificate to the OS Provisioning Server for Linux Provisioning
- Importing Distributions into the OS Provisioning Server Repository
- Configuring the OS Provisioning Server Integration with the VCM Collector
- Maintaining Operating System Provisioning Servers
- Upgrading or Migrating vCenter Configuration Manager
- Upgrade and Migration Scenarios
- Prerequisites
- Back up Your Databases
- Back up Your Files
- Back up Your Certificates
- Software Supported by the VCM Collector
- Migration Process
- Prerequisites
- Foundation Checker Must Run Successfully
- Use the SQL Migration Helper Tool
- Migrate Only Your Database
- Replace your existing 32-Bit Environment with the Supported 64-bit Environment
- How to Recover Your Machine if the Migration is not Successful
- Migrate a 32-bit environment running VCM 5.3 or earlier to VCM 5.4
- Migrate a 64-bit environment running VCM 5.3 or earlier to VCM 5.4
- Migrate a split installation of VCM 5.3 or earlier to a single-server install...
- After You Migrate VCM
- Upgrade Process
- Upgrading Existing Windows Agents
- Upgrading Existing Remote Clients
- Upgrading Existing UNIX Agents
- Upgrading VCM for Virtualization
- Getting Started with VCM Components and Tools
- Getting Started with VCM
- Discover, License, and Install Windows Machines
- Verifying Available Domains
- Checking the Network Authority
- Assigning Network Authority Accounts
- Discovering Windows Machines
- Licensing Windows Machines
- Installing the VCM Windows Agent on your Windows Machines
- Performing an Initial Collection
- Exploring Windows Collection Results
- Getting Started Collecting Windows Custom Information
- Discover, License, and Install UNIX/Linux Machines
- Discover, License, and Install Mac OS X Machines
- Discover, License, and Collect Oracle Data from UNIX Machines
- Customize VCM for your Environment
- How to Set Up and Use VCM Auditing
- Discover, License, and Install Windows Machines
- Getting Started with VCM for Virtualization
- Getting Started with VCM Remote
- Getting Started with VCM Patching
- Getting Started with Operating System Provisioning
- Getting Started with Software Provisioning
- Getting Started with VCM Management Extensions for Assets
- Getting Started with VCM Service Desk Integration
- Getting Started with VCM for Active Directory
- Accessing Additional Compliance Content
- Installing and Getting Started with VCM Tools
- Maintaining VCM After Installation
- Troubleshooting Problems with VCM
- Index

Use the following steps to install the Agent.
1. Verify that the machine on which you intend to install the agent has enough free disk space. For more
information, see the VCM Hardware and Software Requirements Guide.
2. When VCM is installed on the VCM Collector machine, the necessary Agent packages are created in
the following locations:
\Program Files (x86)\VMware\VCM\Installer\Packages
or
The following agent binaries are available for the associated operating systems:
Operating SystemVersion Agent Binary
Red Hat (Enterprise) Linux Edition (Version 2.1)
CMAgent.<version>.Linux.2.1
Red Hat (Enterprise) Linux Edition (Version 3.0, 4.0,
5.0, 5.1, 5.2, 5.3, 5.4, 5.5)
SUSE Linux Enterprise Server (9, 10),
Debian (4)
CMAgent.<version>.Linux
Solaris (Versions 8, 9, and 10 supported on Sparc)
CMAgent.<version>.SunOS
Solaris (Version 10 for x86)
CMAgent.<version>.SunOS.x86.5.10
HP-UX 11i Versions 1.0, 2.0, 3.0 (11.11, 11.23, and
11.31; Supported on PA-RISC)
CMAgent.<version>.HP-UX.11.pa
HP-UX 11i Version 2.0, 3.0 (11.23 and 11.31-
Supported on Itanium)
CMAgent.<version>.HPUX.11.ia64
AIX Version 4.3.3
CMAgent.<version>.AIX.4
AIX Version 5L (5.1, 5.2, 5.3, and 6L (6.1))
CMAgent.<version>.AIX.5
3. Copy the installation package to the machine on which you want to install the agent. You can use ftp,
sftp, or cp using an NFS share.
NOTE If you use ftp to copy the package to your machine, be sure to use binary mode.
4. Use chmod u+x <filename> to change the permissions on the agent binary file.
5. In the directory where you copied the file, execute the agent binary package to create the necessary
directory structure and extract the files. The command and output will look similar to the following
example, with differing file names depending on the operating system:
# ./CMAgent.<version>.SunOS
UnZipSFX 5.51 of 22 May 2004, by Info-ZIP (http://www.info-zip.org).
creating: CSIInstall/
creating: CSIInstall/packages/
inflating: CSIInstall/packages/Agent.1.0.SunOS
inflating: CSIInstall/packages/CFC.1.0.SunOS
inflating: CSIInstall/packages/ECMu.1.0.SunOS
inflating: CSIInstall/packages/ThirdParty.1.0.SunOS
inflating: CSIInstall/packages/cis.1.0.SunOS
extracting: CSIInstall/packages/package.sizes.SunOS
inflating: CSIInstall/packages/python.23.SunOS
creating: CSIInstall/scripts/
inflating: CSIInstall/scripts/checksum
inflating: CSIInstall/scripts/BootStrapInstall.sh
inflating: CSIInstall/scripts/AltSource_filesystem.sh
vCenter Configuration Manager Installation and Getting Started Guide
100 VMware, Inc.