
User`s guide

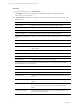
Table Of Contents
- VMware vCenter Configuration ManagerInstallation and Getting Started Guide
- About This Book
- Preparing for Installation
- Installation Manager
- Installation Configurations
- Tools Installation
- General Prerequisites to Install VCM
- Verify Hardware and Software Requirements
- Verify Administration Rights
- Set the Default Network Authority Account
- Specify the Collector Services Account
- Change the Collector Services Account Password in the Services Management Con...
- Change the Collector Services Account Password in the Component Services DCOM...
- Verify the VMware Application Services Account
- Determine the VCM Remote Virtual Directory
- Use Secure Communications Certificates
- Understand Server Authentication
- Verify the Foundation Checker System Checks
- Install UNIX Patch for HP-UX 11.11
- VCM Uses FIPS Cryptography
- Installing VCM
- Installing, Configuring, and Upgrading the OS Provisioning Server and Components
- Upgrading or Migrating VCM
- Upgrades
- Migrations
- Prerequisites to Migrate VCM
- Back Up Your Databases
- Back up Your Files
- Export and Back up Your Certificates
- Migrating VCM
- Migrate Only Your Database
- Replace Your Existing 32-Bit Environment with a Supported 64-bit Environment
- Migrate a 32-bit Environment Running VCM 5.3 or Earlier to VCM 5.4.1
- Migrate a 64-bit Environment Running VCM 5.3 or Earlier to VCM 5.4.1
- Migrate a Split Installation of VCM 5.3 or Earlier to a Single-Server Install...
- How to Recover Your Collector Machine if the Migration is not Successful
- Upgrading VCM and Components
- Maintaining VCM After Installation
- Getting Started with VCM Components and Tools
- Getting Started with VCM
- Discover, License, and Install Windows Machines
- Discover, License, and Install Windows Machines
- Verify Available Domains
- Check the Network Authority
- Assign Network Authority Accounts
- Discover Windows Machines
- License Windows Machines
- Disable User Account Control for VCM Agent Installation
- Install the VCM Windows Agent on Your Windows Machines
- Enable UAC After VCM Agent Installation
- Collect Windows Data
- Windows Collection Results
- Getting Started with Windows Custom Information
- Discover, License, and Install UNIX/Linux Machines
- Discover, License, and Install Mac OS X Machines
- Discover, Configure, and Collect Oracle Data from UNIX Machines
- Customize VCM for your Environment
- How to Set Up and Use VCM Auditing
- Discover, License, and Install Windows Machines
- Getting Started with VCM for Virtualization
- Getting Started with VCM Remote
- Getting Started with VCM Patching
- Getting Started with Operating System Provisioning
- Getting Started with Software Provisioning
- Using Package Studio to Create Software Packages and Publish to Repositories
- Software Repository for Windows
- Package Manager for Windows
- Software Provisioning Component Relationships
- Install the Software Provisioning Components
- Using Package Studio to Create Software Packages and Publish to Repositories
- Using VCM Software Provisioning for Windows
- Related Software Provisioning Actions
- Getting Started with VCM Management Extensions for Assets
- Getting Started with VCM Service Desk Integration
- Getting Started with VCM for Active Directory
- Installing and Getting Started with VCM Tools
- Index

Procedure
1. On your Agent Proxy machine, execute CMAgentInstall.exe.
2. When the installer detects the previous version of VCM and requests permission to uninstall it, select
Yes.
3. When the installer detects that Secure Communication is installed and requests whether you want to
retain your settings, select Yes.
The installer removes VCM for Virtualization and the VCM Agent from your Agent Proxy machine.
During this process, your Secure Communication settings are retained.
4. When the installer displays the license agreement, read and accept the conditions.
5. When the installer prompts whether to perform the installation of the VCM Windows Agent in HTTP
mode, select Allow HTTP and click Next.
Allowing HTTPcommunication enables the Agent to communicate through the HTTP port if DCOM is
not available. Locking an Agent prevents the Agent from being removed or upgraded.
6. When the VCM Windows Agent is installed, click Finish.
7. Copy the Virtualization product installation executable file from your upgraded Collector machine to
any location on your non-Collector Agent Proxy machine.
The path to this file is as follows, or is in the path relative to where you installed the software.
C:\Program Files
(x86)\VMware\VCM\AgentFiles\Products\VirtualizationProductInstall.exe
8. On your non-Collector Agent Proxy machine, run VirtualizationProductInstall.exe to install
VCM for Virtualization.
9. When VCM for Virtualization is installed, click Finish.
What to do next
Use your upgraded Agent Proxy to collect data from managed machines.
Unregister the Previous Version of the vSphere Client VCM Plug-In
Before you upgrade to the new version of the vSphere Client VCM Plug-In that is available when you
upgrade VCM, you must unregister a previous version of the plug-in.
The VCM upgrade removes the previous plug-in files and installs the new plug-in files in new locations
with new names. The VCM upgrade does not register the new plug-in with the vSphere Client.
Procedure
1. On your Collector machine, navigate to C:\Program Files (x86)\VMware\VCM\Tools\vSphere
Client VCM Plug-in\bin.
2. Double-click VCVPInstaller.exe.
3. In the VMware vSphere VCM Plug-in Registration dialog box, click Unregister.
4. In the Server URL field, enter the name of your vCenter Server.
For example, https//vcenter05/sdk.
5. In the Administrator User Name and Password fields, enter the Administrator user name and
password.
6. Click OK.
vCenter Configuration Manager Installation and Getting Started Guide
62 VMware, Inc.