
User`s guide
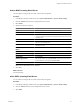
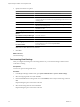
Table Of Contents
- Request Manager Installation and Configuration Guide
- Contents
- About This Book
- About vCloud Request Manager
- Request Manager System Requirements
- Installing Request Manager
- Accessing Request Manager
- Administration Overview
- Active Directory
- Request Manager Roles
- Connecting to Multiple Instances of VMware vCloud Director
- Incoming Email Server
- Workflow Management
- Modify Workflow Approvers
- Modify Approval Emails
- Add an Approval Task to a Workflow Template
- Add a New Approval Email Template
- Assign Email Notification to Recipients
- Change Email Notification Content
- Integrating External Tasks into a Workflow
- Add a Conditional Branching Task to a Workflow
- Configure Request Completion Statuses
- Cloud Blueprints
- Defining Providers
- Polling Service
- About Software License Management
- Index

Table 5-4. vCloud Directory Entities and Request Manager CMDB Types
(Continued)
vCloud Director Entity
Request Manager CMDB Type
Provider vDC Configuration Item > Provider vDC
VM Not imported
vDC Configuration Item > Cloud vDC
vDC Resource vDC Resources are imported as their specific types, for
example, vApp.
Media Not imported
vApp Configuration Item > vDC Resource > vApp
vApp Template Configuration Item > vDC Resource > vApp Template
User When Request Manager synchronizes with vCloud Director,
a match between vCD users and previously imported Active
Directory users is performed.
vCloud Director users that are created locally in the vCloud
Director database or those that are created through
importing from a non-Active Directory LDAP server will not
be imported into Request Manager.
Prerequisites
You have vCloud Administrator privileges.
Procedure
1
Log in to the Request Manager Admin Portal.
2 Click Integration.
3 Click Scheduling on the Main tab in the left explorer panel.
4 Create a new schedule or modify an existing one.
To:
Action
Create a new schedule
Click Add New Schedule.
Modify an existing schedule
Select Cloud Director Scan and click the Select Schedule button.
5
Type or modify the schedule details.
a Type a name for the schedule.
b Select a frequency for the scan.
c Select the date and time for the next scan.
d Select Update All Records to update information for every record in vCloud Director, even those that
have not changed since the last scan.
6 Click the Sources tab.
7 Click Add to add a source.
a Select the vCloud Director source you want to scan using this schedule.
b Click OK.
8 Click Save.
What to do next
View the synchronization results and create event mappings.
Chapter 5 Administration Overview
VMware, Inc. 41