
6.1
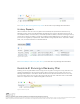

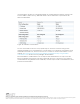
Table Of Contents
- Introduction
- Requirements
- Evaluation Workflow
- Exercise 1: Pairing Sites
- Exercise 2: Configure Inventory Mappings
- Exercise 3: Configure placeholder datastore
- Exercise 4: Add Array Manager and Enable Array Pair (If Using Array Replication)
- Exercise 5: Create a Protection Group
- Exercise 6: Create a Recovery Plan
- Exercise 7: Testing a Recovery Plan
- Exercise 8: Running a Recovery Plan
- Exercise 9: Reprotect a Recovery Plan and Fail Back
- Exercise 10: Virtual Machine Recovery Properties
- Conclusion

VMware, Inc. 3401 Hillview Avenue Palo Alto CA 94304 USA Tel 877-486-9273 Fax 650-427-5001 www.vmware.com
Copyright © 2015 VMware, Inc. All rights reserved. This product is protected by U.S. and international copyright and intellec
tual property laws. VMware products a
re covered by one or more patents listed at http://www.vmware.com/go/patents.
VMware is a registered trademark or trademark of VMware, Inc. in the United States and/or other jurisdictions. All other mark
s and names mentioned herein may be trademarks of their respective companies.
Exercise 9: Reprotect a Recovery Plan and Fail
Back
Site Recovery Manager features the ability to not only fail over virtual machine workloads, but
also fail them back to their original site. However, this assumes that the original protected site is
still intact and operational. An example of this is a disaster avoidance situation: The threat could
be rising floodwaters from a major storm and Site Recovery Manager is used to migrate virtual
machines from the protected site to the recovery site. Fortunately, the floodwater subsides
before any damage was done leaving the protected site unharmed.
A recovery plan cannot be immediately failed back from the recovery site to the original
protected site. The recovery plan must first undergo a reprotect workflow. This operation
involves reversing replication and setting up the recovery plan to run in the opposite direction.
Figure 25. Reprotect Recovery Plan
Reprotecting a recovery plan can take a considerable amount of time depending on the number
of protection groups and virtual machines in the recovery plan and the amount of data that
must be replicated to resynchronize storage. Upon completion of the reprotect workflow, a
history reports will be created and the recovery plan can be failed back. Essentially, the original
recovery site becomes the protected site and the original protected site becomes the recovery
site for the virtual machines in the recovery plan. Run the recovery plan to fail back the virtual
machines to their original protected site.
NOTE: Be sure to reprotect a recovery plan after it has been run (virtual machines have been
failed over or failed back). Failure to do this important step will prevent future testing and
running of the recovery plan until the reprotect workflow has been run.
Recommendation: Test a recovery plan as soon as possible after a reprotect workflow has run
to verify the recovery plan will work properly.
See Reprotecting Virtual Machines After a Recovery in the Site Recovery Manager
documentation.
Exercise 10: Virtual Machine Recovery
Properties
Site Recovery Manager includes several features to customize recovery for virtual machines.
Examples include the options to change the IP address of virtual network interface cards, run
scripts, and control the power state of virtual machines after they are recovered. It is also
possible to organize virtual machines into one of five priority groups. Since these are recovery
settings, these settings are accessed in the recovery plan user interface of Site Recovery
Manager.