
6.1
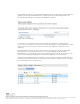

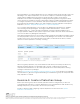
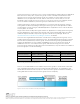
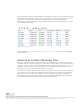
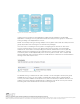
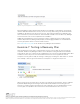
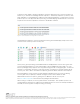
Table Of Contents
- Introduction
- Requirements
- Evaluation Workflow
- Exercise 1: Pairing Sites
- Exercise 2: Configure Inventory Mappings
- Exercise 3: Configure placeholder datastore
- Exercise 4: Add Array Manager and Enable Array Pair (If Using Array Replication)
- Exercise 5: Create a Protection Group
- Exercise 6: Create a Recovery Plan
- Exercise 7: Testing a Recovery Plan
- Exercise 8: Running a Recovery Plan
- Exercise 9: Reprotect a Recovery Plan and Fail Back
- Exercise 10: Virtual Machine Recovery Properties
- Conclusion

VMware, Inc. 3401 Hillview Avenue Palo Alto CA 94304 USA Tel 877-486-9273 Fax 650-427-5001 www.vmware.com
Copyright © 2015 VMware, Inc. All rights reserved. This product is protected by U.S. and international copyright and intellec
tual property laws. VMware products a
re covered by one or more patents listed at http://www.vmware.com/go/patents.
VMware is a registered trademark or trademark of VMware, Inc. in the United States and/or other jurisdictions. All other mark
s and names mentioned herein may be trademarks of their respective companies.
Folder mappings can also be configured automatically when the names are the same. Resource
mappings are configured manually. Reverse mappings can be created automatically. This
provides default settings for both failover and failback operations.
Figure 7. Reverse Mappings
It is possible to have multiple items at the protected site mapped to a single item at the
recovery site. For example, two resource pools at the protected site can be mapped to a single
resource pool at the recovery site. However, this prevents automatic creation of reverse
mappings.
Recommendation: Provide the same name to folders and network port groups with similar
functionality at the protected and recovery sites so that mappings can be prepared
automatically. Use 1-1 mappings so that reverse mappings can be utilized. These practices will
ease inventory-mapping configuration and minimize complexity in the environment.
Default network mappings can be overridden on a per-VM basis. Selecting a virtual machine in
the protection group and clicking the Configure Protection button enables the user to change
the virtual machine protection properties.
Figure 8. Change the Virtual Machine Protection Properties