Installation Guide VMware vCenter Server Heartbeat 6.4 Update 1 This document supports the version of each product listed and supports all subsequent versions until the document is replaced by a new edition. To check for more recent editions of this document, see http://www.vmware.com/support/pubs.
Installation Guide You can find the most up-to-date technical documentation on the VMware Web site at: http://www.vmware.com/support/ The VMware Web site also provides the latest product updates. If you have comments about this documentation, submit your feedback to: docfeedback@vmware.com Copyright © 2009-2012 VMware, Inc. All rights reserved. This product is protected by U.S. and international copyright and intellectual property laws.
Contents About This Book 5 Getting Started 1 Introduction 9 Overview 9 vCenter Server Heartbeat Concepts 9 Architecture 9 Protection Levels 9 Communications 12 vCenter Server Heartbeat Switchover and Failover Processes 13 Installation 2 vCenter Server Heartbeat Implementation 19 Overview 19 Environmental Prerequisites 19 Common Requirements 20 Server Architecture Options 21 Virtual to Virtual 21 Physical to Virtual 21 Physical to Physical 21 Cloning Technology Options 22 Cloning Prior to Installation 22
Installation Guide Post Installation Configuration 47 Configuring SQL Server Plug-in to run with the Correct Credentials Installing the View Composer Plug-in Post Installation 48 Configure the Application Timeout Exception 49 Installation of Client Tools 49 Uninstall vCenter Server Heartbeat 50 48 4 Unattended Installation of vCenter Server Heartbeat 53 Overview 53 Installation Process 53 Unattended Installation Command Line Usage 53 Parameter File Elements 54 Unattended Setup of the Primary Server 56 Un
About This Book The Installation Guide provides information about installing VMware vCenter Server Heartbeat, including implementation in a Local Area Network (LAN) or Wide Area Network (WAN). To help you protect your VMware vCenter Server, the book provides an overview of protection offered by vCenter Server Heartbeat and the actions that vCenter Server Heartbeat can take in the event of a network, hardware, or application failure.
Installation Guide Abbreviations Used in Figures The figures in this book use the abbreviations listed in Table 1. Table 1. Abbreviations Abbreviation Description Channel VMware Channel NIC Network Interface Card P2P Physical to Physical P2V Physical to Virtual V2V Virtual to Virtual Technical Support and Education Resources The following sections describe the technical support resources available to you. To access the current version of this book and other books, go to www.vmware.
Getting Started VMware, Inc.
Installation Guide 8 VMware, Inc.
1 Introduction 1 This chapter includes the following topics: “vCenter Server Heartbeat Concepts” on page 9 “vCenter Server Heartbeat Switchover and Failover Processes” on page 13 Overview vCenter Server Heartbeat is a Windows based service specifically designed to provide high availability protection for vCenter Server configurations without requiring any specialized hardware.
Installation Guide Server Protection – vCenter Server Heartbeat provides continuous availability to end users through a hardware failure scenario or operating system crash. Additionally, vCenter Server Heartbeat protects the network identity of the production server, ensuring users are provided with a replica server on the failure of the production server.
Chapter 1 Introduction Network Protection vCenter Server Heartbeat proactively monitors the network by polling up to three nodes to ensure that the active server is visible on the network. vCenter Server Heartbeat polls defined nodes around the network, including the default gateway, the primary DNS server, and the global catalog server at regular intervals.
Installation Guide vCenter Server Heartbeat provides the same level of flexibility to define and perform multiple corrective actions in the event of problems on a service by service or even attribute by attribute basis. Data Protection You can configure vCenter Server Heartbeat to protect the application environment. All data files that users or the applications require in the application environment are made available should a failure occur.
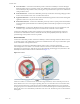
Chapter 1 Introduction Figure 1-4. Communication Between Primary and Secondary Servers The IP address a client uses to connect to the active server (the Principal (Public) IP address) must be configured as a static IP address, that is, not DHCP (Dynamic Host Configuration Protocol) enabled. In the figure above, the IP address is configured as 192.168.1.127. NOTE Obtain the IP address: type ipconfig at the prompt in a DOS shell.
Installation Guide Figure 1-5. Switchover A managed switchover performs the following steps: 1 Stop the protected applications on the active server. After the protected applications stop, no more disk updates are generated. 2 Send all updates that are still queued on the active server to the passive server. After this step, all updates are available on the passive server. 3 Re-designate the Secondary server as the new active server.
Chapter 1 Introduction Figure 1-6. Failover During the automatic failover, the passive server performs the following steps: 1 Apply any intercepted updates currently in the passive server’s receive queue as identified by the log of update records that are saved on the passive server but not yet applied to the replicated files. The amount of data in the passive server’s receive queue affects the time required to complete the failover process.
Installation Guide To enable Automatic Switchover in a WAN 16 1 In the vCenter Server Heartbeat Console, click the Network tab to display the Network Monitoring page. 2 Click Configure Auto-switchover. 3 Select the Auto-switchover if client network connectivity lost for check box. 4 Configure the number of pings to wait before performing the auto-switchover. 5 Click OK. VMware, Inc.
Installation VMware, Inc.
Installation Guide 18 VMware, Inc.
2 vCenter Server Heartbeat Implementation 2 This chapter includes the following topics: “Overview” on page 19 “Environmental Prerequisites” on page 19 “Common Requirements” on page 20 “Server Architecture Options” on page 21 “Cloning Technology Options” on page 22 “Application Component Options” on page 22 “Network Options” on page 24 “Antivirus Recommendations” on page 26 “Deployment Options Summary” on page 27 Overview vCenter Server Heartbeat is a versatile solution
Installation Guide Common Requirements The following requirements are in addition to those required for vCenter Server and SQL Server. Supported vCenter Server Versions vCenter Server 4.0 Update 1 vCenter Server 4.0 Update 2 vCenter Server 4.0 Update 3 vCenter Server 4.1 vCenter Server 4.1 Update 1 vCenter Server 5.0 vCenter Server 5.
Chapter 2 vCenter Server Heartbeat Implementation When installing into a Windows Server 2008 or 2008 R2 environment, verify that Windows Server Backup Feature and Command Line Tools have been installed on the Primary and Secondary servers prior to installing vCenter Server Heartbeat. Installation of Windows Server Backup Feature and Command Line Tools will also install Windows PowerShell.
Installation Guide Software as specified in “Common Requirements” on page 20. Secondary Server The Secondary server operates as a near clone of the Primary server and must meet the following requirements. Hardware Hardware should be equivalent to the Primary server to ensure adequate performance when the server is in the active role: Similar CPU. Similar memory. Identical number of NICs to the Primary server. Drive letters must match the Primary server.
Chapter 2 vCenter Server Heartbeat Implementation VMware, Inc. VMware vCenter Server VMware Guided Consolidation Service VMware License Server VMware ADAM VMware vCenter Management Web Server VMware vCenter Update Manager VMware vCenter Converter VMware vCenter Orchestrator VMware vSphere Host Update Utility VMware vSphere Client vCenter Server Version 4.
Installation Guide vCenter Converter Enterprise SQL Server Versions Microsoft SQL Server 2005 SP1-SP3 Microsoft SQL Server 2008 including SP2 Microsoft SQL Server 2008 R2 NOTE Ensure that all VMware components are bound to the Principal (Public) IP address on the Principal (Public) network adapter and that the Principal (Public) network adapter is listed first in the bind order of the Network Connections > Advanced > Advanced Settings page.
Chapter 2 vCenter Server Heartbeat Implementation Primary Server Three NICs (1 x Public and 2 x Channel) are recommended for redundancy in the event one channel fails. A minimum of two NICs (one for the Channel, and one for the Public) are required in this configuration. Split-brain Avoidance should be configured.
Installation Guide Persistent static routing configured for the channel connection(s) where routing is required Two NICs (1 x Public and 1 x Channel) are recommended At least one Domain Controller at the Disaster Recovery (DR) site If the Primary and DR site use the same subnet: During install, follow the steps for a LAN or VLAN on the same subnet Both servers in the vCenter Server Heartbeat pair use the same Public IP address If the Primary and DR site use different subnets:
Chapter 2 vCenter Server Heartbeat Implementation Do not use file level AV to protect application server databases, such as MS SQL Server databases. The nature of database contents can cause false positives in virus detection, leading to failed database applications, data integrity errors, and performance degradation. VMware recommends that when implementing vCenter Server Heartbeat, you do not replicate file level AV temp files using vCenter Server Heartbeat.
Installation Guide Installation Options Checklist Verify the prerequisites: Server architecture: ___ Physical to Physical ___ Physical to Virtual ___ Virtual to Virtual Cloning technology option: ___ Prior to Installation ___ During Installation Application components to protect: ___ vCenter Server with SQL Server on same host ___ vCenter Server with its Database Server on separate host ___ vCenter Server only Network environment type: ___ LAN ___ WAN Is the subnet the same at the Secondary site? If Yes
3 Installing vCenter Server Heartbeat 3 This chapter includes the following topics: “Overview” on page 29 “Installation Process” on page 29 “Primary Server” on page 29 “Secondary Server” on page 37 “Post Installation Configuration” on page 47 “VMware vCenter Server Heartbeat Console” on page 45 “Installation of Client Tools” on page 49 “Uninstall vCenter Server Heartbeat” on page 50 Overview This chapter discusses the installation process used to implement vCenter Server H
Installation Guide To install vCenter Server Heartbeat on the Primary server 1 Having verified all of the environmental prerequisites are met, download the vCenter Server Heartbeat self-extracting file to an appropriate location on the Primary server. NOTE Ensure that the user is logged into the domain before installing vCenter Server Heartbeat. 2 Open Network Connections, right-click the VMware Channel network connection and select Properties. Select Internet Protocol (TCP/IP) and click Properties.
Chapter 3 Installing vCenter Server Heartbeat 16 Select the Deployment Option. You have the following options: For installations where the Secondary server is virtual, continue with Step 17. For installations where the Secondary server is physical, continue with Step 18. 17 Select Secondary Server is Virtual if you created a clone of the Primary server prior to running Setup. Click Next and go to Step 19.
Installation Guide 21 The VMware Channel IP Configuration page prompts you to configure the VMware Channel(s) IP network addresses. Click Add for each available channel connection. For the Primary server, select from a drop-down menu that lists all local IP addresses. Type the reciprocal IP address on the Secondary server into the IP Address On Secondary text box.
Chapter 3 Installing vCenter Server Heartbeat 25 For a LAN environment, click Add to specify the IP address. Click Next. If installing in a LAN or in a WAN that uses the same subnet, go to Step 29. 26 For a WAN environment, specify the IP addresses of the Secondary server and the Primary server. 27 Add each Principal (Public) network address until all addresses are present. Click Next.
Installation Guide 29 The vCenter Server Heartbeat server pair can be administered remotely on client machines using the vCenter Server Heartbeat Console or using the vSphere plug-in. The vCenter Server Heartbeat Console connects to the IP address of the active server using the default client connection port of 52267. If this port is already in use, type an available client connection port in the text box. Click Next. 30 Select the applications to protect.
Chapter 3 Installing vCenter Server Heartbeat Backup files can be configured to include or exclude application data. Including application data in the backup file decreases the time to initially verify and synchronize the applications data on first start up of vCenter Server Heartbeat. This is useful where VMware Channel connections are slower than LAN speed, such as in a WAN implementation.
Installation Guide 39 Review the summary of options and configuration information for the installation. Click Next. 40 Pre-install checks run to ensure that the installation can continue. Setup checks the available disk space, system memory, operating system compatibility, and dependencies between modules. The Report pane displays the results of the pre-install checks.
Chapter 3 Installing vCenter Server Heartbeat 50 Click the Public tab. NOTE If installing into an environment that uses Windows Server 2008 R2 for DNS, you must configure a security level on the DNS server that permits changes to DNS. 51 Enter the Name used to connect to vCenter or SQL Server. NOTE The Name used to connect to vCenter or SQL Server is the DNS name by which application clients connect to the application. Normally this is the original name of the vCenter Server or SQL Server.
Installation Guide 1 If the Secondary server is physical, go to Step 2 Before powering on the Secondary (cloned) image, right-click the server image and select Edit Settings. a Select the Principal (Public) virtual network adapter and clear the Connected and Connect at power on check boxes. b Repeat the process on the VMware Channel virtual network adapter. c Power on the Secondary (previously cloned) server image.
Chapter 3 Installing vCenter Server Heartbeat 7 The pre-install checks run. Click Next. NOTE If the Secondary server is virtual, the pre-install checks will return the message that the Primary and Secondary server’s names match. This is expected and installation will be allowed to continue. If any of the pre-install checks are unsuccessful, go back through the wizard, make the necessary changes, and run the pre-install checks again.
Installation Guide 40 13 Click Open Network Connections to change the static IP address of the Principal (Public) adapter to match that of the Primary server (LAN configuration only). 14 If in a WAN environment, verify the Secondary Principal (Public) adapter IP address configuration. Click Next and go to Step 16.
Chapter 3 Installing vCenter Server Heartbeat 20 Expand the file tree structure to see the System State file in the left pane. Click OK to build indexes where required. Select all items listed under the media created tree and click Next. 21 With Where to restore at the default Original location, click Next. Click Finish. 22 A warning message alerts you that the restore process is going to overwrite the existing System State files. Click OK. 23 When the restoration process completes, click Close.
Installation Guide For installations on Windows Server 2008 where the Secondary server is virtual, go to Step 40 on page 43 30 The Microsoft Windows Backup Restore page is displayed. The Microsoft Windows Backup Restore page shows the progress of unbinding the packet filter and disabling NetBIOS from the channel NIC(s). After this process completes, a caution message advises you that the restore process is initiating and upon completion of the restore process, the server requires a restart.
Chapter 3 Installing vCenter Server Heartbeat 35 The Post-Reboot Configuration page is displayed. vCenter Server Heartbeat Setup installs the packet filter. When complete, click Next. NOTE If you receive warnings that the driver is unsigned or did not complete the Windows Logo tests, click Install. If Windows is configured to display Signed Driver warnings, you can receive multiple warnings. 36 The Reconnect Network Cables page is displayed.
Installation Guide 48 Enter the Name used to connect to vCenter or SQL Server. NOTE The Name used to connect to vCenter or SQL Server is the DNS name by which application clients connect to the application. Normally this is the original name of the vCenter Server or SQL Server. There is only one Name used to connect to vCenter or SQL Server and it is the same on all servers in the cluster. 49 In the NIC drop-down, select the Principal (Public) NIC.
Chapter 3 Installing vCenter Server Heartbeat To rename the Secondary server 1 Navigate to Start > Administrative Tools > Services and set the VMware vCenter Server Heartbeat service to Manual, Stopped, and close the dialog. 2 Right-click the Secondary server image and select Edit Settings. 3 Disable the virtual network adapters for both the VMware Channel and Principal (Public) NICs. 4 Open Network Connections, right-click the Principal (Public) network connection and select Properties.
Installation Guide To start vCenter Server Heartbeat Console 1 Right-click the VMware vCenter Server Heartbeat interactive status icon on the Windows too tray (located on the right side of the Windows tool bar). The vCenter Server Heartbeat quick access menu opens. 2 Select Manage Server The vCenter Server Heartbeat Console opens in a window and shows the Heartbeat Servers (overview) pane.
Chapter 3 Installing vCenter Server Heartbeat To Add a new connection 1 In the navigation panel, select the vCenter Server Heartbeat Group to receive the new connection. Click Add Connection in the tool bar, select Add Connection from the File menu, or right-click an existing group in the navigation panel and select Add Connection to invoke the Add Connection dialog.
Installation Guide 5 On the Secondary server, navigate to Start > Administrative Tools > Services and set the VMware vCenter Server Heartbeat service to Automatic and close the dialog. 6 Start vCenter Server Heartbeat on the Secondary server. Right-click the vCenter Server Heartbeat System Tray icon and select Start VMware vCenter Server Heartbeat.
Chapter 3 Installing vCenter Server Heartbeat To install the View Composer Plug-in after vCenter Server Heartbeat has been installed 1 Ensure that View Composer has been installed on both the Primary and Secondary servers with the same configuration settings. 2 Launch the vCenter Server Heartbeat Console. 3 Navigate to Applications: Plug-ins and click Install. 4 Browse to the plug-in file located at: \\plugins\ViewComposer\Vie wComposerNFPlugin
Installation Guide To install vCenter Server Heartbeat Client Tools 1 Copy the WinZip Self-Extracting file to the client where it is to be installed. 2 Double-click the WinZip Self-Extracting file to initiate the installation process. The Setup Introduction dialog appears. Review the information and click OK. 3 The WinZip Self-Extractor dialog appears. Click Setup to continue. 4 The Setup Type page appears.
Chapter 3 Installing vCenter Server Heartbeat 7 Select whether to leave the server on the network or to remove it from the network following completion of the uninstall process. If you select Leave this server on the network after uninstall and click Next to proceed to the next step, the uninstall process starts and the vCenter Server Heartbeat components are removed.
Installation Guide 52 VMware, Inc.
4 Unattended Installation of vCenter Server Heartbeat 4 This chapter includes the following topics: “Overview” on page 53 “Installation Process” on page 53 “Unattended Setup of the Primary Server” on page 56 “Unattended Setup of a Virtual Secondary Server” on page 57 “Post Installation Configuration” on page 61 “Unattended Installation of Client Tools” on page 63 “Unattended Uninstall of vCenter Server Heartbeat” on page 64 Overview This chapter discusses the unattended instal
Installation Guide Table 4-1. Command Line Parameters Parameter Description -h Displays this usage information -f: Uses a file of parameters to run Note: if the file name/path contains any white space (space, tab) or special characters(-, /, etc.) then it must be enclosed in quotes "..." -ni :Not interactive, suppresses the Graphical User Interface. This instructs Setup not to use the Graphical User Interface.
Chapter 4 Unattended Installation of vCenter Server Heartbeat Table 4-3. Parameter File Elements Tag Values Comments FORMATVERSION: V1_0 (Default) Used to indicate the Format of the tags listed after this line. This can be used multiple times. INSTALLTYPE: Install Install Client Tools Only Install AM(X) Install Service Pack Uninstall Uninstall Components LICENSEKEY: Valid license key Not required for vCenter Server Heartbeat PLUGINPATH: Must be a valid path.
Installation Guide Unattended Setup of the Primary Server Installation of vCenter Server Heartbeat begins with the Primary server 1 Create a .txt file containing the following configuration parameters: The following is an example of a parameter file (it must be modified before you use it). INSTALLTYPE:Install ACCEPT_EULA:true LICENSEKEY: SERVERROLE:PRIMARY TOPOLOGY: SECONDARYCLONETYPE:pre clone DESTINATIONPATH:C:\AutoInstall PRIMARYSECONDARYCHANNEL:<10.0.1.
Chapter 4 Unattended Installation of vCenter Server Heartbeat 7 Upon completion of the unattended installation, a message instructing to launch the Configure Server wizard is displayed. Using the desktop icon, launch the Configure Server wizard. 8 Click the Public tab. NOTE If installing into an environment that uses Windows Server 2008 R2 for DNS, you must configure a security level on the DNS server that permits changes to DNS. 9 In the Public Identity/Mode pane, select Non-Identical.
Installation Guide SERVERROLE:SECONDARY BACKUPSOURCEPATH:\\<192.168.15.111\nf backup> BACKUPUSER:Administrator NOTE The parameters enclosed in <> can be enclosed in double quotes (") and should be if they contain spaces, dashes or other potentially confusing characters. 2 Rename the self-extracting file from .exe to .zip 3 Extract the contents of the self-extracting file into a temporary folder. 4 Navigate to Start > Run and type CMD to open a command window.
Chapter 4 Unattended Installation of vCenter Server Heartbeat 14 In the Mgmt IP field, enter a reserved Management IP address for the Secondary server. NOTE The Management IP address is unique for each server in the cluster. 15 In the second Mask field, enter the Subnet Mask of the Management IP address. 16 Click Finish. Do not start vCenter Server Heartbeat.
Installation Guide 15 In the Public Identity/Mode pane, select Non-Identical. 16 Enter the Name used to connect to vCenter or SQL Server. NOTE The Name used to connect to vCenter or SQL Server is the DNS name by which application clients connect to the application. Normally this is the original name of the vCenter Server or SQL Server. There is only one Name used to connect to vCenter or SQL Server and it is the same on all servers in the cluster.
Chapter 4 Unattended Installation of vCenter Server Heartbeat To rename the Secondary server 1 Navigate to Start > Administrative Tools > Services and set the VMware vCenter Server Heartbeat service to Manual, Stopped, and close the dialog. 2 Right-click the Secondary server image and select Edit Settings. 3 Disable the virtual network adapters for both the VMware Channel and Principal (Public) NICs.
Installation Guide 4 Start vCenter Server Heartbeat on the Secondary server. Right-click the vCenter Server Heartbeat System Tray icon and select Start VMware vCenter Server Heartbeat. The icon changes from a double dash to an S, indicating that the server is the Secondary server, and a dash (–), indicating that the server is in a passive role. The Primary and Secondary servers establish a handshake and commence replication.
Chapter 4 Unattended Installation of vCenter Server Heartbeat 10 Repeat the procedure for the Network Configuration task Set SPN (Secondary). 11 After successfully configuring the correct credentials, select the Set SPN (Primary) task and click Run Now. Installing the View Composer Plug-in Post Installation Installation of the View Composer Plug-in can occur during installation of vCenter Server Heartbeat or can be installed post-installation.
Installation Guide Unattended Uninstall of vCenter Server Heartbeat vCenter Server Heartbeat allows you to uninstall the product from your vCenter Server using the command line method. Uninstall vCenter Server Heartbeat from the command line 1 Ensure all the vCenter Server Heartbeat processes are stopped and close the vCenter Server Heartbeat Console and System Tray icon. 2 Create a .
Appendix – Setup Error Messages Table A-1. Setup Error Messages Message Pri Sec Level Test 10 – ‘The pre install check data file does not have the correct format. Setup cannot continue’. No Yes Critical Stop Check that the file adheres to the correct formatting and structure for use in analysis on the Secondary. Setup has detected incompatible versions of the collector version $x and the analyzer version $y dll.
Installation Guide Table A-1. Setup Error Messages (Continued) 66 Message Pri Sec Level 113 - You do not have enough total memory to install vCenter Server Heartbeat on your #1# server. You must have at least 1GB. Yes Yes Critical Stop VMware recommend a minimum of 2GB. Note actual memory requirements depend on the application load; and may require more memory. Yes Yes Warning 117 - You do not have enough free disk space to install vCenter Server Heartbeat.
Glossary A Active The functional state or role of a server visible through the network by clients running protected applications and servicing client requests. Alert A notification sent to a user or entered into the system log indicating an exceeded threshold. Active Directory (AD) Presents applications with a single, simplified set of interfaces so users can locate and use directory resources from a variety of networks while bypassing differences among proprietary services.
Reference Guide Channel NIC (Network Interface Card) A dedicated subnet used by the VMware Channel. Cloned Servers Two servers in a pair with the same configuration settings, names, applications, Security Identifiers (SIDs) and IP addresses, following the installation of vCenter Server Heartbeat. Cloning Process The vCenter Server Heartbeat process whereby all installed applications, configuration settings, the machine name, security identifier (SID), and IP address are copied to a second server.
Glossary H Hardware Agnostic A key vCenter Server Heartbeat feature enabling the use of servers from different manufacturers, models, and processing power in a single vCenter Server Heartbeat server pair. Heartbeat The packet of information issued by the passive server across the VMware Channel, which the active server responds to, indicating its presence.
Reference Guide Pathping A route-tracing tool that sends packets to each router on the way to a final destination and displays the results of each hop. Plug-and-Play (PnP) A standard for peripheral expansion on a PC. When starting the computer, Plug-and-Play (PnP) configures the necessary IRQ, DMA and I/O address settings for the attached peripheral devices. Plug-in An optional module that can be installed into a vCenter Server Heartbeat server to provide additional protection for a specific application.
Glossary Shared Nothing A key vCenter Server Heartbeat feature whereby hardware is not shared between the Primary and Secondary servers, thus preventing a single point of failure. SMTP A TCP/IP protocol used in sending and receiving e-mail between or among servers.
Reference Guide Unprotected Application An application that is not monitored or its data replicated by vCenter Server Heartbeat. V VMware Channel The IP communications link used by vCenter Server Heartbeat for heartbeat and replication traffic. VMware vCenter Server Heartbeat The core replication and system monitoring component. VMware vCenter Server Heartbeat Packet Filter The network component installed on both servers that controls network visibility.